Programming Javascript 3D, 3D-rendering, animation, BufferGeometry, camera, composition-API, dynamic-objects, LineSegments, material-types, materials, mesh, MeshStandardMaterial, OrbitControls, raycasting, renderer, scene-management, three.js, typescript, Vue, Vue3, web-development, WebGL Craig 0 Comments
Getting Started with Three.js in Vue 3
Three.js is a powerful JavaScript library that makes working with WebGL simpler and more accessible. Combined with Vue’s reactive system and component-based architecture, you can create impressive 3D visualizations with clean, maintainable code.
This is the first of six tutorials on Three.js
- Getting Started with Three.js in Vue 3 (this post)
- Three.js Lighting and Textures
- Physics and Collisions in Three.js
- Enhancing Three.js Scenes with Shadows and Fog
- Creating Three.js Characters with Skeletons
- Full 3D Scene Example with Three.js
Complete code for the series of blog posts is available on GitHub.
In this tutorial, we’ll build a Vue application with Three.js that demonstrates:
- Setting up a basic 3D scene with a cube
- Adding interactive controls for camera movement
- Making objects respond to user clicks
- Dynamically adding and removing 3D objects
- Creating lines and visual indicators
- Exploring different material types and their properties

Three.js Core Concepts
Before diving into the code, let’s understand the essential elements of a Three.js scene:
- Scene: The container that holds all 3D objects, lights, and cameras.
- Camera: Defines the viewing perspective. We’ll use
PerspectiveCamerawhich mimics how human eyes see. - Renderer: Renders the scene from the camera’s perspective into a canvas element.
- Meshes: 3D objects composed of geometry (shape) and material (appearance).
- Lights: Illuminate objects to make them visible with various lighting techniques.
- Controls: Enable user interaction with the scene (like orbiting the camera).
Our Vue components will manage these elements, creating a reactive 3D experience.
Creating our Application
Setting Up a New Vue Project with Vite
We’ll use vite to setup our Vue project. It offers a development server with hot reload and optimized builds. Let’s start by creating a new Vue 3 project with TypeScript support:
npm create vite@latest learn-threejs
When prompted, select the following options:
- Framework: Vue
- Variant: TypeScript
This will create a new project directory with the basic structure for a Vue 3 application.
Installing Dependencies
Navigate to your new project directory and install the dependencies:
cd learn-threejs
npm install
Now, let’s install Three.js and its TypeScript type definitions:
npm install three
npm install @types/three --save-dev
Project Structure
After installation, your project structure should look like this:
learn-threejs/
├── node_modules/
├── public/
├── src/
│   ├── assets/
│   ├── components/
│   ├── App.vue
│   ├── main.ts
│   └── style.css
├── .gitignore
├── index.html
├── package.json
├── tsconfig.json
├── tsconfig.node.json
└── vite.config.ts
Understanding the Key Files
- index.html: The entry HTML file where your Vue app will be mounted
- src/main.ts: TypeScript entry point that bootstraps the Vue application
- src/App.vue: Root Vue component that we’ll modify to manage our 3D scene
- src/components/: Directory where we’ll create our ThreeScene component
Starting the Development Server
To run the application during development:
npm run dev
This will start Vite’s development server, typically at http://localhost:5173/. You can open this URL in your browser to see your application.
Now that we have our project structure set up, let’s dive into implementing our Three.js scene in the next section.
Creating the Application Components
Now that we have our project set up, let’s create the necessary components for our 3D application.
1. Update src/App.vue
First, let’s replace the default App.vue content with a component that provides a clean interface for launching our 3D scene:
<script setup lang="ts">
import { ref } from 'vue';
import ThreeScene from './components/ThreeScene.vue';

const showScene = ref(false);

const launchScene = () => {
  showScene.value = true;
};

const closeScene = () => {
  showScene.value = false;
};
</script>

<template>
  <div class="container">
    <div v-if="!showScene" class="launch-container">
      <h1>Three.js Demo</h1>
      <button @click="launchScene" class="launch-button">Launch 3D Scene</button>
    </div>
    <ThreeScene v-else @close="closeScene" />
  </div>
</template>

<style scoped>
.container {
  display: flex;
  flex-direction: column;
  align-items: center;
  justify-content: center;
  height: 100vh;
  width: 100%;
}

.launch-container {
  text-align: center;
}

.launch-button {
  background-color: #42b883;
  color: white;
  border: none;
  padding: 12px 24px;
  font-size: 18px;
  border-radius: 4px;
  cursor: pointer;
  transition: background-color 0.3s;
}

.launch-button:hover {
  background-color: #33a06f;
}
</style>
This sample sets up a basic Vue application layout that toggles between a landing screen and a Three.js scene.
- Reactive State & Event Handlers
A boolean reactive variableshowScene(created viaref(false)) determines which view is visible:- When
showSceneisfalse, a welcome screen is rendered that displays a header and a button to launch the Three.js scene. - The
launchScenefunction setsshowScenetotrue, thereby rendering the ThreeScene component. - The
closeScenefunction resetsshowScenetofalsewhen the ThreeScene emits a"close"event.
- When
- Template & Conditional Rendering
The template uses Vue’sv-ifdirective to conditionally render either the launch interface or the Three.js scene. This ensures that the 3D scene is only mounted when required. - Styling
Scoped CSS ensures the component’s styling doesn’t leak out to other parts of the application. The launch button is styled to provide smooth user interaction, including hover effects.
2. Create src/components/ThreeScene.vue
Next, let’s create a new file in the components directory for our Three.js scene component. Create a new file src/components/ThreeScene.vue with the following initial content:
<script setup lang="ts">
import { onMounted, onBeforeUnmount, ref } from 'vue';
import * as THREE from 'three';
import { OrbitControls } from 'three/examples/jsm/controls/OrbitControls';

const emit = defineEmits(['close']);

const containerRef = ref<HTMLDivElement | null>(null);
let scene: THREE.Scene;
let camera: THREE.PerspectiveCamera;
let renderer: THREE.WebGLRenderer;
let controls: OrbitControls;
let animationFrameId: number;

const init = () => {
  if (!containerRef.value) return;

  // Create scene
  scene = new THREE.Scene();
  scene.background = new THREE.Color(0x111111);

  // Create camera
  camera = new THREE.PerspectiveCamera(
    75,
    window.innerWidth / window.innerHeight,
    0.1,
    1000
  );
  camera.position.z = 5;

  // Create renderer
  renderer = new THREE.WebGLRenderer({ antialias: true });
  renderer.setSize(window.innerWidth, window.innerHeight);
  containerRef.value.appendChild(renderer.domElement);

  // Add orbit controls
  controls = new OrbitControls(camera, renderer.domElement);
  controls.enableDamping = true;

  // Add a cube
  const geometry = new THREE.BoxGeometry();
  const material = new THREE.MeshStandardMaterial({
    color: 0x42b883,
    roughness: 0.5,
    metalness: 0.5
  });
  const cube = new THREE.Mesh(geometry, material);
  scene.add(cube);

  // Add lights
  const ambientLight = new THREE.AmbientLight(0xffffff, 0.5);
  scene.add(ambientLight);

  const directionalLight = new THREE.DirectionalLight(0xffffff, 1);
  directionalLight.position.set(1, 1, 1);
  scene.add(directionalLight);

  // Handle window resize
  window.addEventListener('resize', onWindowResize);

  // Animation loop
  const animate = () => {
    animationFrameId = requestAnimationFrame(animate);

    cube.rotation.x += 0.01;
    cube.rotation.y += 0.01;

    controls.update();
    renderer.render(scene, camera);
  };

  animate();
};

const onWindowResize = () => {
  if (!camera || !renderer) return;

  camera.aspect = window.innerWidth / window.innerHeight;
  camera.updateProjectionMatrix();
  renderer.setSize(window.innerWidth, window.innerHeight);
};

const cleanup = () => {
  if (animationFrameId) {
    cancelAnimationFrame(animationFrameId);
  }

  window.removeEventListener('resize', onWindowResize);

  if (containerRef.value && renderer) {
    containerRef.value.removeChild(renderer.domElement);
  }

  if (controls) {
    controls.dispose();
  }
};

onMounted(() => {
  init();
});

onBeforeUnmount(() => {
  cleanup();
});
</script>

<template>
  <div class="scene-container">
    <div ref="containerRef" class="three-container"></div>
    <button @click="emit('close')" class="close-button">Close Scene</button>
  </div>
</template>

<style scoped>
.scene-container {
  position: relative;
  width: 100%;
  height: 100vh;
}

.three-container {
  width: 100%;
  height: 100%;
}

.close-button {
  position: absolute;
  top: 20px;
  right: 20px;
  background-color: rgba(255, 255, 255, 0.8);
  border: none;
  border-radius: 4px;
  padding: 8px 16px;
  cursor: pointer;
  z-index: 10;
}

.close-button:hover {
  background-color: rgba(255, 255, 255, 1);
}
</style>
What this code does:
<script setup lang="ts">
import { onMounted, onBeforeUnmount, ref } from 'vue';
import * as THREE from 'three';
import { OrbitControls } from 'three/examples/jsm/controls/OrbitControls';

// Define component events
const emit = defineEmits(['close']);

// DOM reference for mounting the Three.js canvas
const containerRef = ref<HTMLDivElement | null>(null);

// Three.js core objects
let scene: THREE.Scene;
let camera: THREE.PerspectiveCamera;
let renderer: THREE.WebGLRenderer;
let controls: OrbitControls;
let animationFrameId: number;
Here we’re:
- Importing required Vue composition API functions and Three.js libraries
- Defining an event emitter for the ‘close’ event that our parent component listens for
- Creating a ref that will hold the DOM container for our Three.js canvas
- Declaring variables for our core Three.js objects (without initializing them yet)
Next, let’s implement the initialization function that sets up our 3D scene:
const init = () => {
  if (!containerRef.value) return;

  // Create scene with dark background
  scene = new THREE.Scene();
  scene.background = new THREE.Color(0x111111);

  // Create perspective camera
  camera = new THREE.PerspectiveCamera(
    75,                                      // Field of view (degrees)
    window.innerWidth / window.innerHeight,  // Aspect ratio
    0.1,                                     // Near clipping plane
    1000                                     // Far clipping plane
  );
  camera.position.z = 5;  // Position camera 5 units away on z-axis
This part:
- Creates a new Three.js scene with a dark background
- Sets up a perspective camera with a 75° field of view
- Positions the camera 5 units back from the origin (0,0,0)
Now, let’s continue with renderer setup and attach it to our container:
  // Create WebGL renderer with antialiasing
  renderer = new THREE.WebGLRenderer({ antialias: true });
  renderer.setSize(window.innerWidth, window.innerHeight);
  containerRef.value.appendChild(renderer.domElement);

  // Add orbit controls for interactive camera movement
  controls = new OrbitControls(camera, renderer.domElement);
  controls.enableDamping = true;  // Add inertia to camera movement
This code:
- Creates a WebGL renderer with anti-aliasing enabled for smoother edges
- Sets the renderer size to match the window dimensions
- Appends the renderer’s canvas element to our component’s container
- Adds OrbitControls to allow users to rotate the camera around the scene
- Enables damping for smoother camera movement
Let’s add our first 3D object – a cube:
  // Create a cube
  const geometry = new THREE.BoxGeometry();  // Default 1x1x1 cube
  const material = new THREE.MeshStandardMaterial({
    color: 0x42b883,    // Vue green color
    roughness: 0.5,     // Medium roughness
    metalness: 0.5      // Semi-metallic appearance
  });
  const cube = new THREE.Mesh(geometry, material);
  scene.add(cube);
Here we:
- Create a box geometry with default dimensions (1×1×1)
- Create a MeshStandardMaterial with Vue’s green color and physical properties
- Combine them into a mesh and add it to our scene
Now, let’s add lighting to properly see our physically-based material:
  // Add ambient light for global illumination
  const ambientLight = new THREE.AmbientLight(0xffffff, 0.5);
  scene.add(ambientLight);

  // Add directional light for shadows and highlights
  const directionalLight = new THREE.DirectionalLight(0xffffff, 1);
  directionalLight.position.set(1, 1, 1);  // Top-right-front position
  scene.add(directionalLight);
Lighting is crucial because:
- The MeshStandardMaterial requires light to be visible (unlike MeshBasicMaterial)
- Ambient light provides overall scene illumination
- Directional light creates highlights and shadows that reveal the 3D form
Finally, let’s set up window resizing and our animation loop:
  // Handle window resize
  window.addEventListener('resize', onWindowResize);

  // Animation loop
  const animate = () => {
    animationFrameId = requestAnimationFrame(animate);

    // Rotate cube on both axes
    cube.rotation.x += 0.01;
    cube.rotation.y += 0.01;

    // Update controls and render
    controls.update();
    renderer.render(scene, camera);
  };

  animate();
};
This final part:
- Adds a resize event listener to keep the scene properly sized
- Creates an animation loop that:
- Rotates the cube slightly on each frame
- Updates the orbit controls (needed for damping)
- Renders the updated scene
- Starts the animation loop immediately
Let’s implement the window resize handler:
const onWindowResize = () => {
  if (!camera || !renderer) return;

  // Update camera aspect ratio
  camera.aspect = window.innerWidth / window.innerHeight;
  camera.updateProjectionMatrix();

  // Update renderer size
  renderer.setSize(window.innerWidth, window.innerHeight);
};
This function ensures our scene looks correct when the window is resized by:
- Updating the camera’s aspect ratio
- Updating the renderer’s canvas size
Proper resource cleanup is critical for WebGL applications:
const cleanup = () => {
  // Cancel animation frame to stop rendering
  if (animationFrameId) {
    cancelAnimationFrame(animationFrameId);
  }

  // Remove event listeners
  window.removeEventListener('resize', onWindowResize);

  // Remove renderer from DOM
  if (containerRef.value && renderer) {
    containerRef.value.removeChild(renderer.domElement);
  }

  // Dispose of controls
  if (controls) {
    controls.dispose();
  }
};
This cleanup function:
- Stops the animation loop to prevent memory usage
- Removes event listeners to prevent memory leaks
- Removes the renderer’s canvas from the DOM
- Disposes of the OrbitControls instance
Finally, let’s hook up our initialization and cleanup to Vue’s lifecycle:
onMounted(() => {
  init();
});

onBeforeUnmount(() => {
  cleanup();
});
</script>
These lifecycle hooks:
- Initialize our Three.js scene when the component is mounted
- Clean up all resources when the component is unmounted
Now, let’s add the template for our component:
<template>
  <div class="scene-container">
    <div ref="containerRef" class="three-container"></div>
    <button @click="emit('close')" class="close-button">Close Scene</button>
  </div>
</template>
Our template is simple but effective:
- A container for the entire scene
- A div with our
containerRefwhere the Three.js canvas will be added - A close button that emits the ‘close’ event to our parent component
When you run this code, you’ll see a spinning green cube against a dark background. You can:
- Click and drag to rotate the camera around the cube
- Use the scroll wheel to zoom in and out
- Click the “Close Scene” button to return to the main view
Simple Object Animation
Now that we have our basic scene set up, let’s make it more interactive by allowing users to click anywhere in the scene and have the cube move to that position. This demonstrates how to convert 2D screen coordinates to 3D world positions and animate objects based on user input.
- Update
src/components/ThreeScene.vue
import { onMounted, onBeforeUnmount, ref } from 'vue';
import * as THREE from 'three';
import { OrbitControls } from 'three/examples/jsm/controls/OrbitControls';
import { Vector3 } from 'three';

const emit = defineEmits(['close']);

const containerRef = ref<HTMLDivElement | null>(null);
let scene: THREE.Scene;
let camera: THREE.PerspectiveCamera;
let renderer: THREE.WebGLRenderer;
let controls: OrbitControls;
let animationFrameId: number;
let cube: THREE.Mesh;
let targetPosition = new Vector3();
let isMoving = false;
let movementSpeed = 0.05;
let raycaster = new THREE.Raycaster();
let plane = new THREE.Plane(new Vector3(0, 0, 1), 0);
let planeIntersectPoint = new Vector3();

const init = () => {
  if (!containerRef.value) return;

  // Create scene
  scene = new THREE.Scene();
  scene.background = new THREE.Color(0x1111c1);

  // Create camera
  camera = new THREE.PerspectiveCamera(
    75,
    window.innerWidth / window.innerHeight,
    0.1,
    1000
  );
  camera.position.z = 5;

  // Create renderer
  renderer = new THREE.WebGLRenderer({ antialias: true });
  renderer.setSize(window.innerWidth, window.innerHeight);
  containerRef.value.appendChild(renderer.domElement);

  // Add orbit controls
  controls = new OrbitControls(camera, renderer.domElement);
  controls.enableDamping = true;

  // Add a cube
  const geometry = new THREE.BoxGeometry();
  const material = new THREE.MeshStandardMaterial({
    color: 0x42b883,
    roughness: 0.5,
    metalness: 0.5
  });
  cube = new THREE.Mesh(geometry, material);
  scene.add(cube);

  // Add a transparent plane for raycasting
  const planeGeometry = new THREE.PlaneGeometry(100, 100);
  const planeMaterial = new THREE.MeshBasicMaterial({
    visible: false
  });
  const planeMesh = new THREE.Mesh(planeGeometry, planeMaterial);
  scene.add(planeMesh);

  // Add click event listener
  renderer.domElement.addEventListener('click', onSceneClick);

  // Add lights
  const ambientLight = new THREE.AmbientLight(0xffffff, 0.5);
  scene.add(ambientLight);

  const directionalLight = new THREE.DirectionalLight(0xffffff, 1);
  directionalLight.position.set(1, 1, 1);
  scene.add(directionalLight);

  // Handle window resize
  window.addEventListener('resize', onWindowResize);

  // Animation loop
  const animate = () => {
    animationFrameId = requestAnimationFrame(animate);

    // Rotate the cube
    cube.rotation.x += 0.01;
    cube.rotation.y += 0.01;

    // Move the cube towards target if moving
    if (isMoving) {
      const distanceToTarget = cube.position.distanceTo(targetPosition);

      if (distanceToTarget > 0.1) {
        // Calculate direction vector and move towards target
        const direction = new Vector3().subVectors(targetPosition, cube.position).normalize();
        cube.position.add(direction.multiplyScalar(movementSpeed));
      } else {
        // Snap to final position when very close
        cube.position.copy(targetPosition);
        isMoving = false;
      }
    }

    controls.update();
    renderer.render(scene, camera);
  };

  animate();
};

const onWindowResize = () => {
  if (!camera || !renderer) return;

  camera.aspect = window.innerWidth / window.innerHeight;
  camera.updateProjectionMatrix();
  renderer.setSize(window.innerWidth, window.innerHeight);
};

const onSceneClick = (event: MouseEvent) => {
  if (!camera || !renderer) return;

  // Calculate mouse position in normalized device coordinates (-1 to +1)
  const mouse = new THREE.Vector2();
  mouse.x = (event.clientX / window.innerWidth) * 2 - 1;
  mouse.y = -(event.clientY / window.innerHeight) * 2 + 1;

  // Set up raycaster
  raycaster.setFromCamera(mouse, camera);

  // Find the intersection with the plane
  if (raycaster.ray.intersectPlane(plane, planeIntersectPoint)) {
    // Set new target position
    targetPosition.copy(planeIntersectPoint);
    isMoving = true;
  }
};

const cleanup = () => {
  if (animationFrameId) {
    cancelAnimationFrame(animationFrameId);
  }

  window.removeEventListener('resize', onWindowResize);

  if (renderer) {
    renderer.domElement.removeEventListener('click', onSceneClick);
  }

  if (containerRef.value && renderer) {
    containerRef.value.removeChild(renderer.domElement);
  }

  if (controls) {
    controls.dispose();
  }
};

onMounted(() => {
  init();
});

onBeforeUnmount(() => {
  cleanup();
});
Let’s detail what this code does. First, let’s update our imports and add the necessary variables:
import { onMounted, onBeforeUnmount, ref } from 'vue';
import * as THREE from 'three';
import { OrbitControls } from 'three/examples/jsm/controls/OrbitControls';
import { Vector3 } from 'three';  // Add Vector3 import

// Define component events
const emit = defineEmits(['close']);

// DOM reference for mounting the Three.js canvas
const containerRef = ref<HTMLDivElement | null>(null);

// Three.js core objects
let scene: THREE.Scene;
let camera: THREE.PerspectiveCamera;
let renderer: THREE.WebGLRenderer;
let controls: OrbitControls;
let animationFrameId: number;

// Animation and interaction variables
let cube: THREE.Mesh;                                      // Reference to our main cube
let targetPosition = new Vector3();                        // Target point for movement
let isMoving = false;                                      // Flag to track animation state
let movementSpeed = 0.05;                                  // Controls movement smoothness
let raycaster = new THREE.Raycaster();                     // For converting 2D clicks to 3D positions
let plane = new THREE.Plane(new Vector3(0, 0, 1), 0);      // Invisible plane for click detection
let planeIntersectPoint = new Vector3();                   // Stores intersection point
These additional variables help us track the cube’s movement state:
cube: A reference to our primary 3D objecttargetPosition: A Vector3 storing the destination pointisMoving: A flag to track animation statemovementSpeed: Controls animation smoothnessraycaster&plane: Used for translating 2D clicks to 3D positions
Next, let’s modify our initialization function to set up the click interaction:
const init = () => {
  // ... existing scene, camera, renderer setup ...

  // Add a cube and store a reference to it
  const geometry = new THREE.BoxGeometry();
  const material = new THREE.MeshStandardMaterial({
    color: 0x42b883,
    roughness: 0.5,
    metalness: 0.5
  });
  cube = new THREE.Mesh(geometry, material);  // Store reference to the cube
  scene.add(cube);

  // Add a transparent plane for raycasting
  const planeGeometry = new THREE.PlaneGeometry(100, 100);
  const planeMaterial = new THREE.MeshBasicMaterial({
    visible: false  // Make it invisible
  });
  const planeMesh = new THREE.Mesh(planeGeometry, planeMaterial);
  scene.add(planeMesh);

  // Add click event listener to the renderer's DOM element
  renderer.domElement.addEventListener('click', onSceneClick);

  // ... existing lights, event listeners, animation loop ...
Here we’ve:
- Modified the cube creation to store a reference to it
- Added a large, invisible plane that will help us determine where in 3D space the user clicked
- Added a click event listener to the renderer’s DOM element
Now let’s implement the click handler function:
const onSceneClick = (event: MouseEvent) => {
  if (!camera || !renderer) return;

  // Calculate mouse position in normalized device coordinates (-1 to +1)
  const mouse = new THREE.Vector2();
  mouse.x = (event.clientX / window.innerWidth) * 2 - 1;
  mouse.y = -(event.clientY / window.innerHeight) * 2 + 1;

  // Set up raycaster from camera through mouse position
  raycaster.setFromCamera(mouse, camera);

  // Find where the ray intersects our invisible plane
  if (raycaster.ray.intersectPlane(plane, planeIntersectPoint)) {
    // Update target position and enable movement
    targetPosition.copy(planeIntersectPoint);
    isMoving = true;
  }
};
This function:
- Calculates the mouse position in normalized device coordinates (ranging from -1 to 1)
- Sets up a raycaster from the camera through those coordinates
- Checks if the ray intersects our invisible plane
- If there’s an intersection, updates the target position and enables movement
Next, we need to modify the animation loop to handle the cube movement:
const animate = () => {
  animationFrameId = requestAnimationFrame(animate);

  // Rotate the cube continuously
  cube.rotation.x += 0.01;
  cube.rotation.y += 0.01;

  // Move the cube towards target if moving flag is true
  if (isMoving) {
    // Calculate distance to target
    const distanceToTarget = cube.position.distanceTo(targetPosition);

    if (distanceToTarget > 0.1) {
      // If not close enough, calculate direction vector and move towards target
      const direction = new Vector3().subVectors(targetPosition, cube.position).normalize();
      cube.position.add(direction.multiplyScalar(movementSpeed));
    } else {
      // If close enough, snap to final position and stop moving
      cube.position.copy(targetPosition);
      isMoving = false;
    }
  }

  controls.update();
  renderer.render(scene, camera);
};
The animation now:
- Continues to rotate the cube as before
- Checks if the cube should be moving toward a target
- If moving, calculates the direction and moves the cube incrementally
- When the cube gets close enough to the target, snaps to the exact position and stops moving
Finally, we need to update our cleanup function to remove the click event listener:
const cleanup = () => {
  if (animationFrameId) {
    cancelAnimationFrame(animationFrameId);
  }

  window.removeEventListener('resize', onWindowResize);

  // Remove click event listener to prevent memory leaks
  if (renderer) {
    renderer.domElement.removeEventListener('click', onSceneClick);
  }

  if (containerRef.value && renderer) {
    containerRef.value.removeChild(renderer.domElement);
  }

  if (controls) {
    controls.dispose();
  }
};
How the Animation Works
This implementation creates a smooth, natural-looking movement:
- Ray Casting for Position: We use Three.js’s raycasting system to convert 2D screen coordinates (mouse clicks) into 3D world coordinates.
- Plane Intersection: The invisible plane serves as a “ground” for our ray to intersect with. We could instead check for intersections with specific objects in the scene, but using a plane gives us a consistent reference surface.
- Gradual Movement: Rather than teleporting the cube instantly to the clicked position, we calculate a unit vector pointing toward the target and add a scaled version of it to the cube’s position each frame:
// Calculate unit vector pointing toward target const direction = new Vector3().subVectors(targetPosition, cube.position).normalize(); // Scale by movement speed and add to current position cube.position.add(direction.multiplyScalar(movementSpeed)); - Proximity Check: We check the distance to the target each frame and only stop moving when we get very close:
const distanceToTarget = cube.position.distanceTo(targetPosition); if (distanceToTarget > 0.1) { // Keep moving } else { // Snap to final position and stop cube.position.copy(targetPosition); isMoving = false; } - Simultaneous Animations: The cube continues to rotate even while it’s moving, demonstrating how to combine multiple animation effects.
This interaction pattern can be extended to more complex scenarios like:
- Following predefined paths
- Navigating around obstacles
- Implementing character movement in games
- Creating interactive data visualizations
With these modifications, users can click anywhere in the scene and watch as the cube smoothly moves to that position while maintaining its rotation. This demonstrates a fundamental interaction pattern used in many 3D web applications.
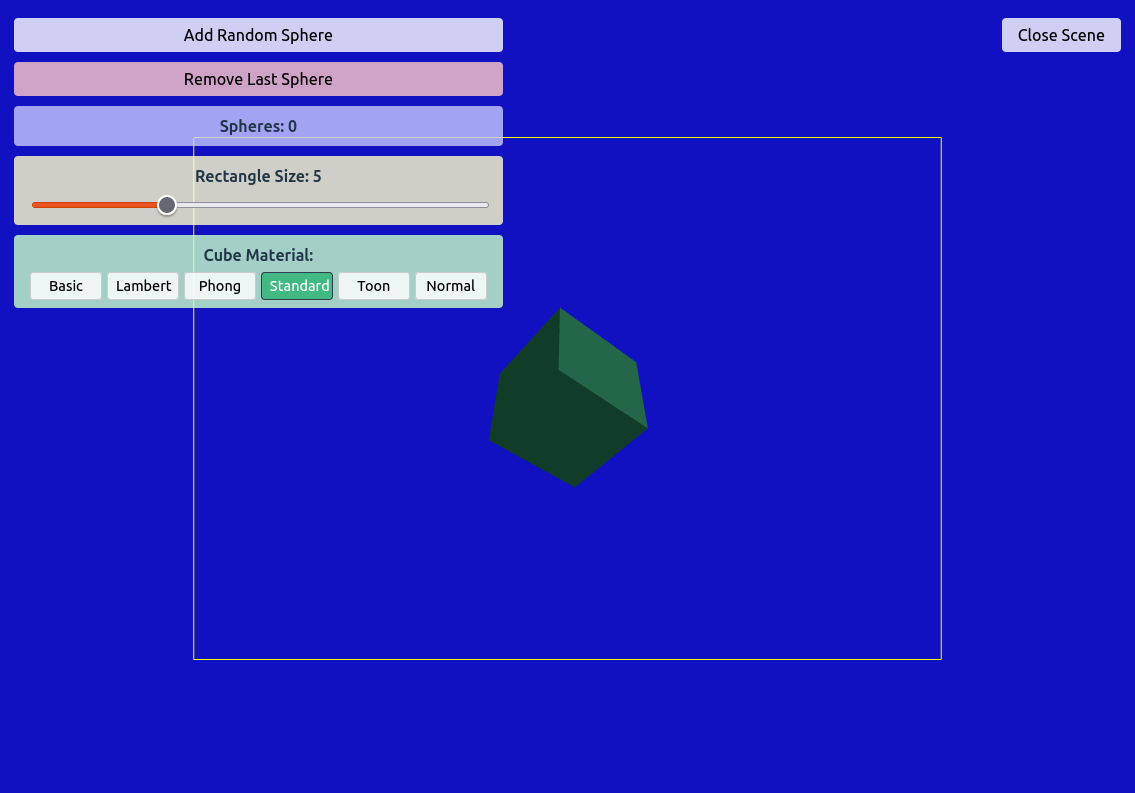
Adding and Removing Objects
One of the key strengths of a component-based approach is the ability to dynamically manage scene objects. In this section, we’ll implement functionality to add random spheres to our scene and remove them in a LIFO (Last In, First Out) manner.
1. Initialize Object Tracking
First, add variables to track our spheres:
let spheres: THREE.Mesh[] = [];
const sphereCount = ref(0);
The spheres array stores references to each sphere we add to the scene, while the reactive sphereCount variable allows us to display the count in our UI.
2. Adding Objects to the Scene
Let’s create a function to generate random spheres with different properties:
const addRandomSphere = () => {
  // Create a random position within a reasonable range
  const x = (Math.random() - 0.5) * 10;
  const y = (Math.random() - 0.5) * 10;
  const z = (Math.random() - 0.5) * 10;

  // Create a sphere with random size and color
  const radius = 0.2 + Math.random() * 0.5;
  const geometry = new THREE.SphereGeometry(radius, 32, 32);

  // Generate a random color
  const color = new THREE.Color(Math.random(), Math.random(), Math.random());

  const material = new THREE.MeshStandardMaterial({
    color: color,
    roughness: 0.7,
    metalness: 0.2
  });

  const sphere = new THREE.Mesh(geometry, material);
  sphere.position.set(x, y, z);

  // Add to scene and track in our array
  scene.add(sphere);
  spheres.push(sphere);
};
addRandomSphere Function:
This function creates a new sphere with random position, size, and color.
- Random Position:
Thex,y, andzcoordinates are generated usingMath.random(), which is adjusted to distribute spheres within a reasonable range.
const x = (Math.random() - 0.5) * 10;
const y = (Math.random() - 0.5) * 10;
const z = (Math.random() - 0.5) * 10;
- Random Size:
A random radius is calculated by starting with a base size (0.2) and adding a random value up to0.5.
const radius = 0.2 + Math.random() * 0.5;
- Random Color:
A random color is generated using Three.js’sColorclass. Each color component (red, green, blue) is set to a random value between 0 and 1.
const color = new THREE.Color(Math.random(), Math.random(), Math.random());
- Geometry & Material:
ASphereGeometryis created with the random radius and sufficient detail (32 segments). AMeshStandardMaterialis then used to assign the random color and preset physical properties (roughness and metalness).
const geometry = new THREE.SphereGeometry(radius, 32, 32);
const material = new THREE.MeshStandardMaterial({
  color: color,
  roughness: 0.7,
  metalness: 0.2
});
- Mesh and Scene Integration:
A mesh is created from the geometry and material, its position is set using the randomx,y, andzvalues, and then it is added to the scene. The sphere is also pushed into thespheresarray to track it for future operations.
const sphere = new THREE.Mesh(geometry, material);
sphere.position.set(x, y, z);
scene.add(sphere);
spheres.push(sphere);
3. Removing Objects and Cleaning Up Resources
Proper resource management is crucial when working with WebGL. Here’s how we implement object removal:
const removeLastSphere = () => {
  if (spheres.length === 0) return;

  // Get the last sphere (LIFO - stack behavior)
  const lastSphere = spheres.pop();

  if (lastSphere) {
    // Remove from scene
    scene.remove(lastSphere);

    // Dispose of resources
    if (lastSphere.geometry) lastSphere.geometry.dispose();
    if (lastSphere.material) {
      if (Array.isArray(lastSphere.material)) {
        lastSphere.material.forEach(material => material.dispose());
      } else {
        lastSphere.material.dispose();
      }
    }
  }
};
removeLastSphere Function:
This function removes the most recently added sphere from the scene.
- Check for Existing Spheres:
It first checks if thespheresarray is empty. If it is, the function simply returns.if (spheres.length === 0) return; - LIFO Removal:
The function uses a last-in, first-out (LIFO) pattern by using.pop()to remove the last sphere added.const lastSphere = spheres.pop(); - Scene Cleanup:
Once the sphere is retrieved, it is removed from the Three.js scene usingscene.remove(lastSphere). - Resource Disposal:
To avoid memory leaks, the sphere’s geometry and material resources are explicitly disposed. For materials, it checks if it’s an array or a single material and then calls their respectivedispose()methods.if (lastSphere) { scene.remove(lastSphere); if (lastSphere.geometry) lastSphere.geometry.dispose(); if (lastSphere.material) { if (Array.isArray(lastSphere.material)) { lastSphere.material.forEach(material => material.dispose()); } else { lastSphere.material.dispose(); } } }
4. Component Cleanup
We also need to update our component’s cleanup function to ensure all resources are disposed of when the component unmounts:
const cleanup = () => {
  // ... existing cleanup code

  // Clean up all spheres
  spheres.forEach(sphere => {
    if (sphere.geometry) sphere.geometry.dispose();
    if (sphere.material) {
      if (Array.isArray(sphere.material)) {
        sphere.material.forEach(material => material.dispose());
      } else {
        sphere.material.dispose();
      }
    }
  });

  // ... more cleanup code
};
Cleanup Update:
In the cleanup function, after all other scene components are cleaned up, the code iterates over the remaining spheres (if any) in the spheres array and disposes of their geometries and materials. This ensures that all objects are properly removed and no memory leaks occur when the component is unmounted.
spheres.forEach(sphere => {
  if (sphere.geometry) sphere.geometry.dispose();
  if (sphere.material) {
    if (Array.isArray(sphere.material)) {
      sphere.material.forEach(material => material.dispose());
    } else {
      sphere.material.dispose();
    }
  }
});
5. User Interface for Adding and Removing Objects
Finally, let’s add buttons to our template to give users control over adding and removing spheres:
<template>
  <div class="scene-container">
    <div ref="containerRef" class="three-container"></div>
    <button @click="emit('close')" class="close-button">Close Scene</button>
    <div class="controls-container">
      <button @click="addRandomSphere" class="add-sphere-button">Add Random Sphere</button>
      <button @click="removeLastSphere" class="remove-sphere-button">Remove Last Sphere</button>
      <div class="sphere-counter">Spheres: {{ sphereCount }}</div>
    </div>
  </div>
</template>
Template Updates for User Interaction:
Two buttons are added in the template to allow users to add or remove spheres:
- Add Random Sphere Button: Calls
addRandomSpherewhen clicked. - Remove Last Sphere Button: Calls
removeLastSpherewhen clicked.
This offers an interactive way for users to see objects dynamically added or removed from the scene.
And add some styling for our new controls:
.controls-container {
  position: absolute;
  top: 20px;
  left: 20px;
  display: flex;
  flex-direction: column;
  gap: 10px;
  z-index: 10;
}

.add-sphere-button {
  background-color: rgba(255, 255, 255, 0.8);
  border: none;
  border-radius: 4px;
  padding: 8px 16px;
  cursor: pointer;
}

.add-sphere-button:hover {
  background-color: rgba(255, 255, 255, 1);
}

.remove-sphere-button {
  background-color: rgba(255, 200, 200, 0.8);
  border: none;
  border-radius: 4px;
  padding: 8px 16px;
  cursor: pointer;
}

.remove-sphere-button:hover {
  background-color: rgba(255, 200, 200, 1);
}

.sphere-counter {
  background-color: rgba(200, 200, 255, 0.8);
  border-radius: 4px;
  padding: 8px 16px;
  text-align: center;
  font-weight: bold;
}
Styling for New Buttons:
New CSS classes are provided to style the add and remove sphere buttons. For example, the .remove-sphere-button is positioned absolutely in the scene and given a distinct background color to differentiate it from the close button.
Memory Management Considerations
WebGL applications can consume significant memory if resources aren’t properly managed. Our implementation follows these important patterns:
- Reference Tracking: We maintain an array of all created objects for easy reference
- Explicit Disposal: We call
.dispose()on both geometries and materials when removing objects - Comprehensive Cleanup: Our component’s cleanup function handles any remaining objects when unmounting
- Material Array Handling: We properly handle both single materials and material arrays
This pattern allows users to add dozens or even hundreds of objects to the scene without memory leaks. The LIFO approach (removing the most recently added sphere) provides an intuitive way to manage scene complexity.
Try clicking the “Add Random Sphere” button several times to populate your scene with colorful spheres of various sizes, then use “Remove Last Sphere” to clean up. You’ll notice each sphere has unique properties, demonstrating how Three.js objects can be procedurally generated with custom attributes.
Three.js Lines
- Adding lines with a size slider
Update Imports
import { onMounted, onBeforeUnmount, ref, computed, watch } from 'vue';
add variables
let viewportRectangle: THREE.LineSegments;
const rectangleSize = ref(5);
Update our init function
- Add before
Handle window resize
  // Create viewport rectangle
  createViewportRectangle();
- Add to the end of
onWindowResize
  // Update rectangle to match new aspect ratio
  createViewportRectangle();
- Add our rectangle and watcher for the size change
const createViewportRectangle = () => {
  // Remove existing rectangle if it exists
  if (viewportRectangle) {
    scene.remove(viewportRectangle);
    if (viewportRectangle.geometry) viewportRectangle.geometry.dispose();
    if (viewportRectangle.material) viewportRectangle.material.dispose();
  }

  // Get current aspect ratio
  const aspect = window.innerWidth / window.innerHeight;
  const size = rectangleSize.value;

  // Calculate width and height based on aspect ratio
  let width, height;
  if (aspect >= 1) {
    // Landscape or square
    width = size * aspect;
    height = size;
  } else {
    // Portrait
    width = size;
    height = size / aspect;
  }

  // Create the vertices for the rectangle
  const halfWidth = width / 2;
  const halfHeight = height / 2;

  const vertices = [
    // Rectangle in z=0 plane
    -halfWidth, -halfHeight, 0,  halfWidth, -halfHeight, 0,
    halfWidth, -halfHeight, 0,   halfWidth, halfHeight, 0,
    halfWidth, halfHeight, 0,   -halfWidth, halfHeight, 0,
    -halfWidth, halfHeight, 0,  -halfWidth, -halfHeight, 0
  ];

  // Create geometry and material
  const geometry = new THREE.BufferGeometry();
  geometry.setAttribute('position', new THREE.Float32BufferAttribute(vertices, 3));

  const material = new THREE.LineBasicMaterial({ color: 0xffff00 });

  // Create the line segments
  viewportRectangle = new THREE.LineSegments(geometry, material);
  scene.add(viewportRectangle);
};

// Watch for changes to rectangleSize and update the rectangle
watch(rectangleSize, () => {
  if (scene) {
    createViewportRectangle();
  }
});
- Add to the end of the
cleanupfunction
  // Clean up viewport rectangle
  if (viewportRectangle) {
    if (viewportRectangle.geometry) viewportRectangle.geometry.dispose();
    if (viewportRectangle.material) viewportRectangle.material.dispose();
  }
Update the template
<template>
  <div class="scene-container">
    <div ref="containerRef" class="three-container"></div>
    <button @click="emit('close')" class="close-button">Close Scene</button>
    <div class="controls-container">
      <button @click="addRandomSphere" class="add-sphere-button">Add Random Sphere</button>
      <button @click="removeLastSphere" class="remove-sphere-button">Remove Last Sphere</button>
      <div class="sphere-counter">Spheres: {{ sphereCount }}</div>
      <div class="rectangle-size-control">
        <label for="rectangle-size">Rectangle Size: {{ rectangleSize }}</label>
        <input
          type="range"
          id="rectangle-size"
          v-model="rectangleSize"
          min="1"
          max="15"
          step="0.5"
          class="slider"
        />
      </div>
    </div>
  </div>
</template>
Add new styles
.rectangle-size-control {
  background-color: rgba(255, 255, 200, 0.8);
  border-radius: 4px;
  padding: 8px 16px;
  display: flex;
  flex-direction: column;
}

.rectangle-size-control label {
  margin-bottom: 5px;
  font-weight: bold;
}

.slider {
  width: 100%;
  cursor: pointer;
}
Three.js Materials
Materials define how 3D objects appear when rendered. Three.js offers several material types, each with unique properties and performance considerations:
1. Material Types and Their Properties
- MeshBasicMaterial: Simple material not affected by lights. Good for performance or flat-colored objects.
- MeshLambertMaterial: Responds to light but only calculates lighting at vertices. Good balance of realism and performance.
- MeshPhongMaterial: More realistic with specular highlights and is calculated per pixel. Better for shiny surfaces.
- MeshStandardMaterial: Physically-based rendering with roughness and metalness properties. Most realistic but most computationally expensive.
- MeshToonMaterial: Creates cartoon-like appearances with stepped shading.
- MeshNormalMaterial: Colorizes based on surface normals. Useful for debugging geometry.
Let’s implement a material selector that allows users to switch between these material types to see the differences:
2. Adding Material Support to Our Component
First, add a reactive variable to track the current material type:
import { onMounted, onBeforeUnmount, ref, computed, watch, reactive } from 'vue';
import * as THREE from 'three';
import { OrbitControls } from 'three/examples/jsm/controls/OrbitControls';
import { Vector3 } from 'three';

// ... existing variables

// Material selection state
const materialType = ref('standard'); // 'basic', 'lambert', 'phong', 'standard', 'toon', or 'normal'
3. Implementing the Material Update Function
Now, create a function that updates the cube’s material based on the selected type:
const updateCubeMaterial = (type: string) => {
  // Store current position and rotation if cube exists
  const position = cube?.position.clone();
  const rotation = cube?.rotation.clone();

  // Create material based on selected type
  let material: THREE.Material;

  switch(type) {
    case 'basic':
      material = new THREE.MeshBasicMaterial({
        color: 0x42b883
      });
      break;
    case 'lambert':
      material = new THREE.MeshLambertMaterial({
        color: 0x42b883
      });
      break;
    case 'phong':
      material = new THREE.MeshPhongMaterial({
        color: 0x42b883,
        shininess: 60
      });
      break;
    case 'toon':
      material = new THREE.MeshToonMaterial({
        color: 0x42b883
      });
      break;
    case 'normal':
      material = new THREE.MeshNormalMaterial();
      break;
    case 'standard':
    default:
      material = new THREE.MeshStandardMaterial({
        color: 0x42b883,
        roughness: 0.5,
        metalness: 0.5
      });
      break;
  }

  // If cube already exists, update it
  if (cube) {
    // Dispose of old material to prevent memory leaks
    if (cube.material) {
      if (Array.isArray(cube.material)) {
        cube.material.forEach(m => m.dispose());
      } else {
        cube.material.dispose();
      }
    }

    // Update material
    cube.material = material;

    // Restore position and rotation if they existed
    if (position) cube.position.copy(position);
    if (rotation) cube.rotation.copy(rotation);
  } else {
    // Create new cube
    const geometry = new THREE.BoxGeometry();
    cube = new THREE.Mesh(geometry, material);
  }
};
This function handles several important tasks:
- Preserves Object State: Stores the cube’s current position and rotation before changing its material
- Creates Appropriate Material: Uses a switch statement to create the selected material type
- Memory Management: Properly disposes of the old material to prevent memory leaks
- State Restoration: Restores the cube’s position and rotation after changing its material
4. Modifying the Init Function
Update the cube creation in the init function to use our material function:
// Replace the existing cube creation code with:
const geometry = new THREE.BoxGeometry();
updateCubeMaterial(materialType.value);
scene.add(cube);
5. Adding UI Controls for Material Selection
Add buttons to the template to let users switch between material types:
<div class="material-control">
  <label>Cube Material:</label>
  <div class="material-buttons">
    <button
      @click="materialType = 'basic'; updateCubeMaterial('basic')"
      :class="{ active: materialType === 'basic' }"
      class="material-button"
    >
      Basic
    </button>
    <button
      @click="materialType = 'lambert'; updateCubeMaterial('lambert')"
      :class="{ active: materialType === 'lambert' }"
      class="material-button"
    >
      Lambert
    </button>
    <button
      @click="materialType = 'phong'; updateCubeMaterial('phong')"
      :class="{ active: materialType === 'phong' }"
      class="material-button"
    >
      Phong
    </button>
    <button
      @click="materialType = 'standard'; updateCubeMaterial('standard')"
      :class="{ active: materialType === 'standard' }"
      class="material-button"
    >
      Standard
    </button>
    <button
      @click="materialType = 'toon'; updateCubeMaterial('toon')"
      :class="{ active: materialType === 'toon' }"
      class="material-button"
    >
      Toon
    </button>
    <button
      @click="materialType = 'normal'; updateCubeMaterial('normal')"
      :class="{ active: materialType === 'normal' }"
      class="material-button"
    >
      Normal
    </button>
  </div>
</div>
Add corresponding styles:
.material-control {
  background-color: rgba(200, 255, 200, 0.8);
  border-radius: 4px;
  padding: 8px 16px;
  display: flex;
  flex-direction: column;
}

.material-control label {
  margin-bottom: 5px;
  font-weight: bold;
}

.material-buttons {
  display: flex;
  flex-wrap: wrap;
  gap: 5px;
}

.material-button {
  flex: 1;
  min-width: 70px;
  background-color: rgba(255, 255, 255, 0.8);
  border: 1px solid #ccc;
  border-radius: 4px;
  padding: 5px 8px;
  cursor: pointer;
  font-size: 0.9em;
}

.material-button:hover {
  background-color: rgba(255, 255, 255, 1);
}

.material-button.active {
  background-color: #42b883;
  color: white;
  border-color: #2c3e50;
}
6. Understanding the Material Types
Each material has specific properties and use cases:
MeshBasicMaterial
const basicMaterial = new THREE.MeshBasicMaterial({
  color: 0x42b883,
  wireframe: false
});
- Key Properties:
color,wireframe,map(texture) - Performance: Fastest to render
- Use Cases: UI elements, background objects, performance-critical scenes
- Lighting: Not affected by lights (always appears fully lit)
MeshLambertMaterial
const lambertMaterial = new THREE.MeshLambertMaterial({
  color: 0x42b883,
  emissive: 0x000000
});
- Key Properties:
color,emissive,map,emissiveMap - Performance: Good balance of performance and quality
- Use Cases: Most standard objects that need to be lit but don’t need reflections
- Lighting: Calculates lighting at vertices only and interpolates
MeshPhongMaterial
const phongMaterial = new THREE.MeshPhongMaterial({
  color: 0x42b883,
  specular: 0xffffff,
  shininess: 60
});
- Key Properties:
color,specular,shininess,map - Performance: More expensive than Lambert but less than Standard
- Use Cases: Objects that need reflections/highlights (like plastic or painted metal)
- Lighting: Per-pixel lighting with specular highlights
MeshStandardMaterial
const standardMaterial = new THREE.MeshStandardMaterial({
  color: 0x42b883,
  roughness: 0.5,
  metalness: 0.5
});
- Key Properties:
color,roughness,metalness,map,normalMap,roughnessMap,metalnessMap - Performance: Most expensive standard material
- Use Cases: Objects that need physically accurate materials
- Lighting: Physically-based rendering (PBR) with accurate light behavior
MeshToonMaterial
const toonMaterial = new THREE.MeshToonMaterial({
  color: 0x42b883
});
- Key Properties:
color,map,gradientMap - Performance: Similar to Lambert or Phong
- Use Cases: Cartoon-style rendering, cel-shaded looks
- Lighting: Quantized lighting (stepped shading rather than smooth)
MeshNormalMaterial
const normalMaterial = new THREE.MeshNormalMaterial({
  flatShading: false
});
- Key Properties:
flatShading - Performance: Relatively fast
- Use Cases: Debugging geometry, artistic effects
- Lighting: Not affected by scene lighting
7. Performance Optimizations
When working with materials, keep these performance tips in mind:
- Reuse Materials: When possible, reuse the same material instance across multiple objects:
const sharedMaterial = new THREE.MeshStandardMaterial({ color: 0x42b883 }); // Use for multiple objects const cube1 = new THREE.Mesh(geometry1, sharedMaterial); const cube2 = new THREE.Mesh(geometry2, sharedMaterial); - Material Complexity Ladder: Choose materials based on your performance needs:
- For highest performance: MeshBasicMaterial
- For balanced performance: MeshLambertMaterial
- For most realism: MeshStandardMaterial
- Proper Disposal: Always dispose of materials when removing objects:
if (mesh.material) { if (Array.isArray(mesh.material)) { mesh.material.forEach(m => m.dispose()); } else { mesh.material.dispose(); } }
8. Material Properties and Light Interaction
Different materials react to light in different ways:
- MeshBasicMaterial: Ignores all lights – always appears fully lit
- MeshLambertMaterial: Diffuse lighting only, no specular highlights
- MeshPhongMaterial: Diffuse + specular lighting
- MeshStandardMaterial: PBR lighting with roughness and metalness
- MeshToonMaterial: Cartoon-style stepped shading
- MeshNormalMaterial: Uses normal vectors for coloring, ignores lights
To see these differences clearly, try these experiments:
- Change the lighting intensity and observe how different materials respond
- Orbit around objects with different materials to see how highlights and shading change
- Try adding multiple light sources and observe how materials combine lighting contributions
The material selector in our app lets you switch between these materials at runtime, allowing you to directly compare their appearance and light interaction.
Performance Considerations
- Use simpler materials (like
MeshBasicMaterialorMeshLambertMaterial) for objects that don’t need photorealistic rendering - Limit the number of light sources, as they significantly impact performance
- Batch similar objects together where possible
- Implement level-of-detail techniques for complex scenes
Vue Component Lifecycle
Use Vue’s lifecycle hooks to properly initialize and clean up Three.js resources:
onMounted: Set up the Three.js sceneonBeforeUnmount: Clean up resources, remove event listeners, and stop animation loops
Conclusion
In this post, we explored how to integrate Three.js into a Vue application using TypeScript. We covered:
- Vue Integration: Leveraging Vue’s composition API and reactive state to manage a 3D scene.
- Scene Setup: Creating a Three.js scene with a spinning cube, ambient and directional lighting, and a responsive viewport.
- User Interaction: Implementing mouse events to move objects, and adding/removing spheres dynamically.
- Dynamic Materials: Switching between different material types to view various rendering styles.
- Additional Visuals: Drawing a responsive rectangle overlay that updates with the viewport size.
Continue to the next tutorial to learn about setting up Three.js lighting and textures.