In today’s interconnected digital ecosystem, APIs (Application Programming Interfaces) serve as the critical connective tissue between services and applications. Whether you’re a developer building integrations, a QA engineer validating functionality, or a product manager understanding system capabilities, mastering API testing is an essential skill.
Postman has emerged as the industry-standard tool for API development and testing, offering an intuitive interface combined with powerful functionality. This comprehensive guide will walk you through using Postman to effectively test REST APIs – from basic concepts to advanced workflows.
Who Should Use Postman?
- Developers: Test APIs during development, debug integration issues, and validate responses before implementing client-side code
- QA Engineers: Create automated test suites to verify API functionality, performance, and edge cases
- Technical Product Managers: Understand API capabilities, explore endpoints, and communicate requirements to development teams
- DevOps Engineers: Monitor API health, test deployment changes, and validate service integrations
- API Documentation Writers: Generate accurate documentation with real examples of requests and responses
Getting Started with Postman
Downloading and Installing
- Visit the official Postman website at www.postman.com
- Click the “Download” button prominently displayed on the homepage
- Select the appropriate version for your operating system (Windows, macOS, or Linux)
- Follow the installation instructions specific to your platform
- Launch Postman once installation completes
Initial Setup
Using Postman Without an Account
Postman offers a lightweight mode that doesn’t require account creation:
- When Postman launches for the first time, look for the “Skip signing in and take me straight to the app” option
- Click this link to begin using Postman immediately
- Note that without an account, you won’t be able to sync collections across devices or use team collaboration features
Creating a Free Account
For the full Postman experience:
- Launch Postman after installation
- Click “Create Account” or “Sign Up”
- Enter your email address and choose a strong password
- Verify your email address through the confirmation link
- Sign in to access all features, including cloud syncing and collaboration
Understanding the Interface Layout
The Postman interface is thoughtfully organized into several key areas:
- Left sidebar: Contains your collections, environments, and history of requests
- Main workspace: Houses the request builder and response viewer
- Top bar: Includes environment selector, workspace options, and search functionality
- Bottom panel: Shows the console, debugging information, and test results

Basic Usage: Your First API Request
Making a Simple GET Request
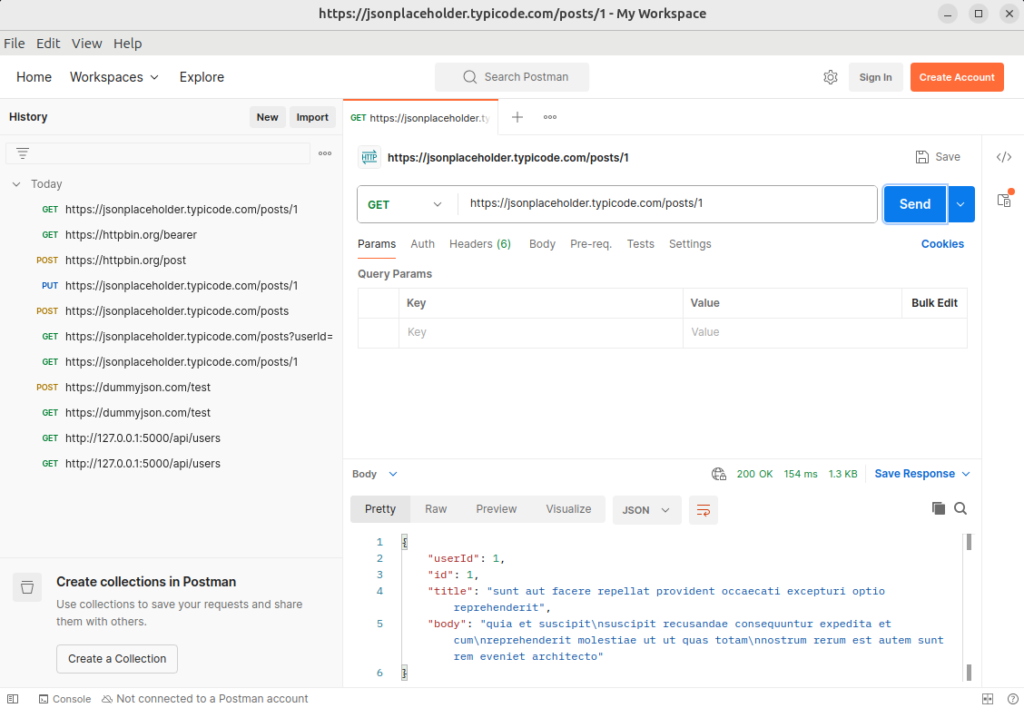
Let’s start with a basic GET request using a public API to demonstrate how Postman works:
- Click the “+” icon to open a new request tab
- Ensure “GET” is selected from the HTTP method dropdown
- Enter
https://jsonplaceholder.typicode.com/posts/1in the URL field- JSONPlaceholder is a free testing API that simulates a blog application
- Click the blue “Send” button to make the request
You should receive a response that looks something like this:
{
  "userId": 1,
  "id": 1,
  "title": "sunt aut facere repellat provident occaecati excepturi optio reprehenderit",
  "body": "quia et suscipit\nsuscipit recusandae consequuntur expedita
  et cum\nreprehenderit molestiae ut ut quas totam\nnostrum rerum est
  autem sunt rem eveniet architecto"
}
Understanding the Response
After sending the request, Postman displays a comprehensive response with several key components:
- Status code: A three-digit number (like 200 OK, 404 Not Found, or 500 Server Error) that indicates whether your request was successful. The first digit typically denotes the response category:
- 2xx codes indicate success (200 OK, 201 Created)
- 3xx codes indicate redirection (301 Moved Permanently)
- 4xx codes indicate client errors (400 Bad Request, 404 Not Found)
- 5xx codes indicate server errors (500 Internal Server Error)
- Response time: Shows how long the server took to process your request and return a response, measured in milliseconds. This metric is invaluable for performance testing and identifying API bottlenecks.
- Response size: Indicates the amount of data returned by the server. This helps you understand payload sizes for bandwidth optimization and mobile application planning.
- Response body: Contains the actual data returned by the API, typically in JSON format for REST APIs. Postman automatically formats and syntax-highlights the response for readability. You can toggle between “Pretty,” “Raw,” and “Preview” modes to view the response in different formats.
- Response headers: Metadata sent by the server providing information about the response, such as content type, caching directives, or server information. These headers often contain critical information for debugging.
Understanding Request Types
REST APIs use different HTTP methods (also called “verbs”) to indicate the type of operation being performed on a resource. Each has specific characteristics and use cases:
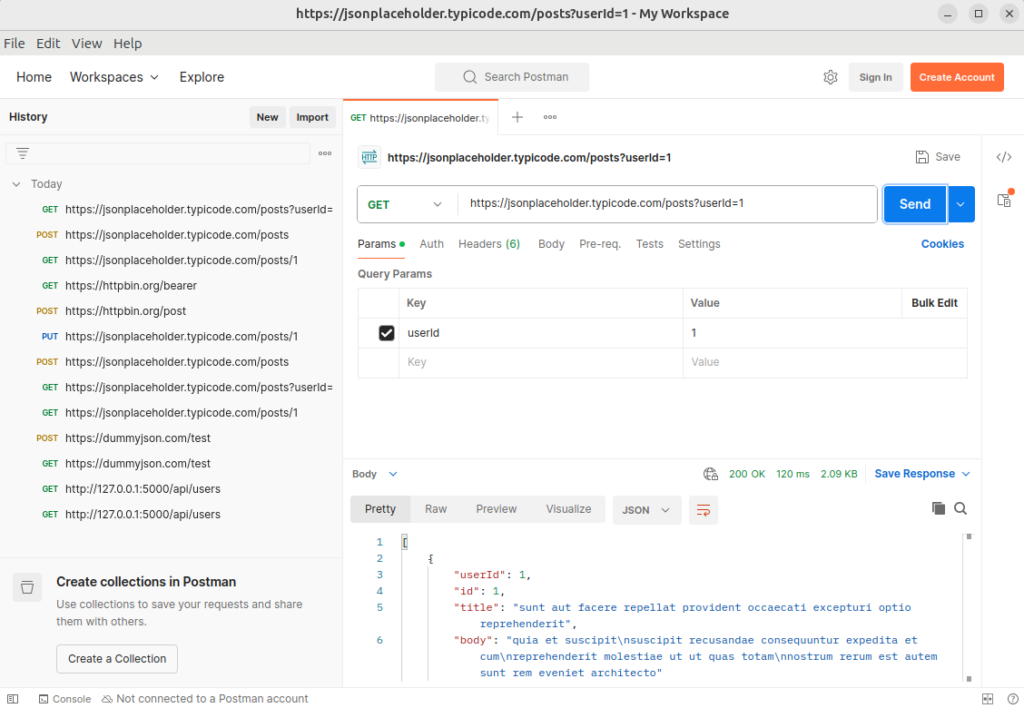
GET Requests
GET requests are designed to retrieve data from a specified resource without modifying it. They’re like asking a question without changing anything.
- Purpose: Retrieve existing data or resources (the “Read” in CRUD operations)
- Characteristics:
- Does not require a request body as all parameters are passed through the URL
- Safe operation – guarantees no modification of server data
- Idempotent – multiple identical requests produce the same result
- Results can be cached for performance optimization
Practical Example in Postman: To fetch a list of posts from JSONPlaceholder, select GET from the dropdown and enter: https://jsonplaceholder.typicode.com/posts?userId=1
This URL includes a query parameter to retrieve only posts from user ID 1. After clicking “Send,” Postman will display all matching posts without altering any data on the server.
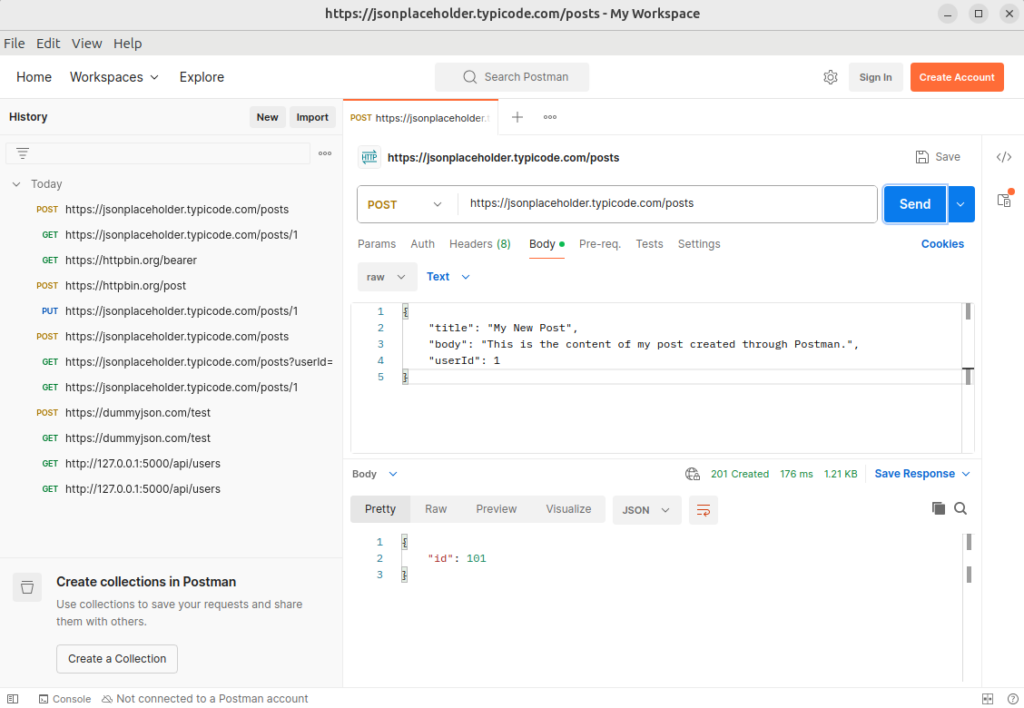
POST Requests
POST requests are used to submit data to create new resources on the server, similar to filling out and submitting a form.
- Purpose: Create new resources (the “Create” in CRUD)
- Characteristics:
- Requires a request body containing the data for the new resource
- Not idempotent – multiple identical requests typically create multiple resources
- Cannot be cached by default
- More secure for sensitive data as parameters are not visible in the URL
Practical Example in Postman: To create a new post, select POST from the dropdown and enter: https://jsonplaceholder.typicode.com/posts
Then navigate to the Body tab, select “raw” and “JSON” format from the dropdown, and enter:
{
    "title": "My New Post",
    "body": "This is the content of my post created through Postman.",
    "userId": 1
}
When you click “Send,” Postman will transmit this data to the server, which should create a new post and return a response with an ID assigned to your new resource.
PUT Requests
PUT requests replace an existing resource entirely with the data provided in the request.
- Purpose: Update existing resources by complete replacement (part of the “Update” in CRUD)
- Characteristics:
- Requires the complete resource data, not just the fields being changed
- Idempotent – multiple identical requests produce the same result
- Creates the resource if it doesn’t exist, or replaces it if it does
- Typically requires the resource identifier in the URL path
Practical Example in Postman: To update post with ID 1, select PUT from the dropdown and enter: https://jsonplaceholder.typicode.com/posts/1
Then in the Body tab, provide the complete post object with updated information:
{
    "id": 1,
    "title": "Updated Title",
    "body": "This post has been completely replaced with new content.",
    "userId": 1
}
After sending, the entire post resource will be replaced with this new data.
PATCH Requests
PATCH requests update parts of an existing resource without replacing the entire thing.
- Purpose: Partial updates to existing resources (another part of “Update” in CRUD)
- Characteristics:
- Only requires the specific fields being updated
- More efficient for small changes
- Preserves unmentioned fields in their current state
- Less bandwidth usage than PUT for minor updates
Practical Example in Postman: To update just the title of post 1, select PATCH from the dropdown and enter: https://jsonplaceholder.typicode.com/posts/1
Then in the Body tab:
{
    "title": "Updated Title Only"
}
This will only change the title while preserving all other fields.
DELETE Requests
DELETE requests remove specified resources from the server.
- Purpose: Remove existing resources (the “Delete” in CRUD)
- Characteristics:
- Usually doesn’t require a request body, as the resource is identified by the URL
- Returns a success status code when complete
- May return details of the removed resource in the response
- Idempotent – multiple identical requests have the same effect
Practical Example in Postman: To delete a post, select DELETE from the dropdown and enter: https://jsonplaceholder.typicode.com/posts/1
Click “Send” and the server will attempt to remove the specified resource and return a confirmation response.
Troubleshooting Tip: When working with DELETE requests, a common issue is receiving a 404 Not Found status. This could mean either the resource doesn’t exist or you don’t have permission to delete it. Check both the resource ID and your authentication.
Working with Request Components
Headers
Headers provide metadata about the request that helps the server understand how to process it:
- Content-Type: Tells the server what format the request body is in (e.g.,
application/json) - Authorization: Contains credentials for authenticating the request
- Accept: Specifies what format the client expects for the response
- User-Agent: Identifies the client making the request
- Custom headers: Many APIs require specific headers for functionality
Adding Headers in Postman:
- Click on the “Headers” tab in the request builder
- Enter key-value pairs for each required header
- Postman provides autocomplete suggestions for common headers
- Toggle headers on/off without deleting them using the checkboxes
Practical Example: Add these headers to your JSONPlaceholder POST request:
- Key:
Content-Type, Value:application/json - Key:
X-API-Version, Value:1.0(a custom header)
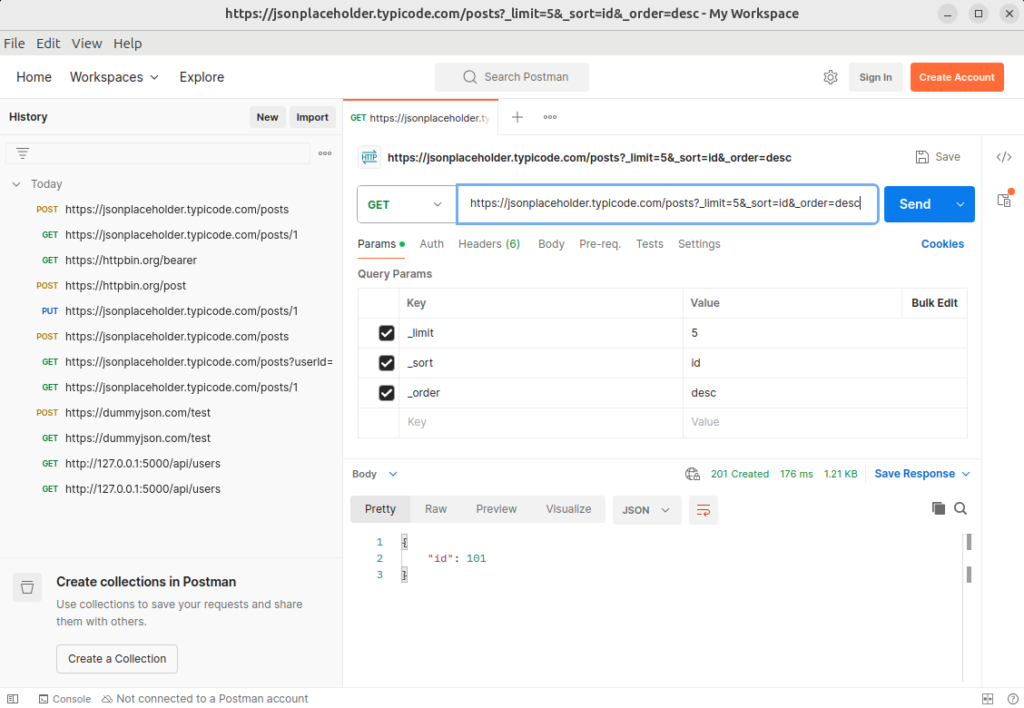
Query Parameters
Query parameters are added to the URL after a question mark (?) to filter, sort, or specify details about the request:
- Added to URL after “?” character
- Formatted as key-value pairs
- Multiple parameters joined with “&” symbol
- Commonly used for filtering, pagination, and sorting
Adding Query Parameters in Postman:
- Click on the “Params” tab next to Headers
- Add key-value pairs in the provided table
- Postman automatically encodes and appends them to your URL
Practical Example: For the JSONPlaceholder API, try:
- Key:
_limit, Value:5(limits results to 5 items) - Key:
_sort, Value:id(sorts results by ID) - Key:
_order, Value:desc(sorts in descending order)
Your URL will automatically update to: https://jsonplaceholder.typicode.com/posts?_limit=5&_sort=id&_order=desc
Request Body
The request body contains data sent to the server with POST, PUT, and PATCH requests. Postman supports multiple body formats:
- JSON (application/json): Most common for modern REST APIs
- Form data (multipart/form-data): Used for file uploads and form submissions
- URL encoded (application/x-www-form-urlencoded): Similar to form data but doesn’t support files
- Raw text (text/plain): Plain text content
- Binary: For sending file content directly
Setting Up a JSON Request Body:
- Select the “Body” tab
- Choose “raw” as the type
- Select “JSON” from the dropdown (automatically sets Content-Type header)
- Enter or paste your JSON data
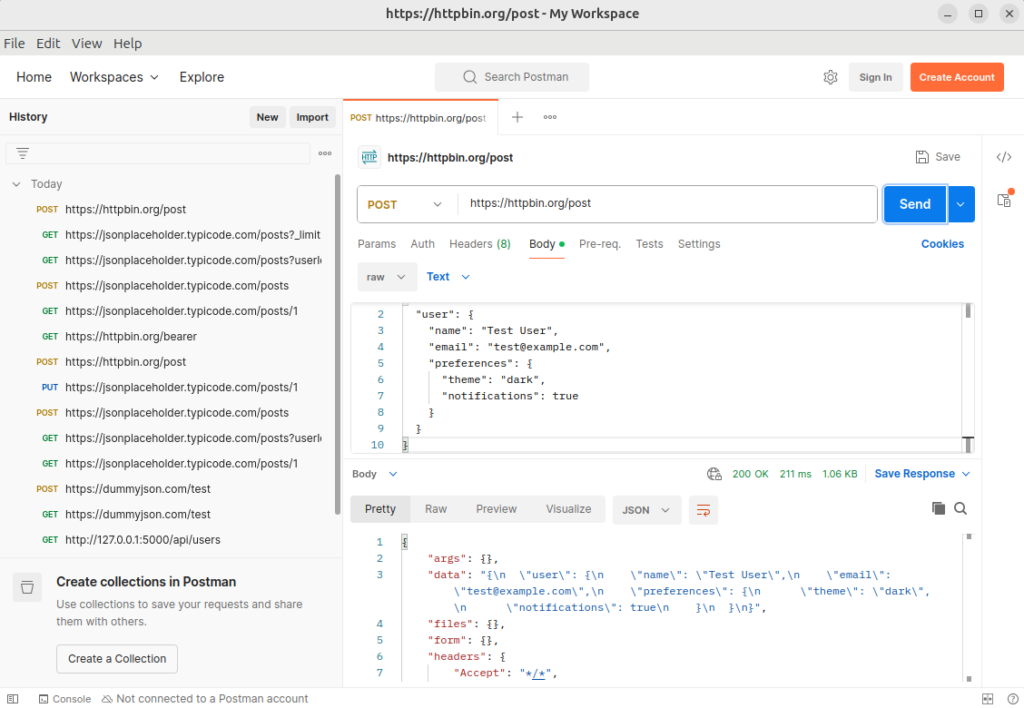
Try it yourself: Create a POST request to https://httpbin.org/post with this JSON body:
{
  "user": {
    "name": "Test User",
    "email": "test@example.com",
    "preferences": {
      "theme": "dark",
      "notifications": true
    }
  }
}
When you send this request, httpbin.org will echo back what it received, allowing you to confirm your request was properly formatted.
Essential Postman Features
Collections
Collections help organize related requests into logical groups, making it easier to manage and share API endpoints.
Creating a New Collection
- Click the “+” icon next to Collections in the sidebar
- Name your collection (e.g., “Weather API Testing”)
- Add an optional description that explains the purpose of this collection
- Click “Create” to save your new collection
Organizing Requests
- Create folders for related endpoints (e.g., “User Management,” “Products,” “Orders”)
- Use meaningful names that describe each request’s purpose
- Add descriptions to document expected behavior and requirements
- Maintain a consistent structure across projects
Practical Example: Create a “JSONPlaceholder Testing” collection with these folders:
- “Posts” (containing GET, POST, PUT, PATCH, and DELETE requests for posts)
- “Users” (containing requests related to user endpoints)
- “Comments” (for comment-related endpoints)
Save each request you’ve created so far into the appropriate folder by clicking “Save” and selecting the correct location.
Environments
Environments allow you to switch between different configurations (development, staging, production) without changing your requests.
Setting up Environments
- Click the “Environments” tab in the left sidebar
- Click the “+” button to create a new environment
- Name it (e.g., “Development”)
- Add variables as key-value pairs:
baseUrl:https://jsonplaceholder.typicode.comapiKey:your-test-key(if needed)userId:1
Using Environment Variables
Variables are referenced in requests using double curly braces: {{variable_name}}
To use your environment:
- Update your request URL to:
{{baseUrl}}/posts/{{postId}} - Set the “postId” variable to “1” in your environment
- Select your environment from the dropdown in the top right
- Send your request – Postman will substitute the variables with actual values
Practical Example: Create two environments: “Development” and “Production” with different base URLs. Use these in your requests to quickly switch between environments without editing each request.
Troubleshooting Tip: If your variables aren’t resolving, check that you have:
- Selected the correct environment from the dropdown
- Spelled variable names exactly the same in both environment and request
- Used double curly braces
{{like_this}}not single{not_like_this}
Authentication
Most production APIs require authentication to protect data and limit access. Postman supports various authentication methods:
Basic Auth
- Click the “Auth” tab in your request
- Select “Basic Auth” from the Type dropdown
- Enter username and password
- Postman automatically generates the Authorization header with Base64 encoding
Use case: Internal APIs, simple protection systems
API Keys
- Select “API Key” from the Authorization type dropdown
- Enter key name (e.g., “api_key”)
- Enter key value
- Choose to add it as a header, query param, or in the request body
Use case: Public APIs like weather services, mapping services
Bearer Tokens
- Select “Bearer Token” from the type dropdown
- Enter your token (without the word “Bearer”)
- Postman adds the “Authorization: Bearer [token]” header automatically
Use case: JWT authentication, OAuth 2.0 access tokens
OAuth 2.0
- Select “OAuth 2.0” from the type dropdown
- Configure grant type (Authorization Code, Client Credentials, etc.)
- Enter client ID, client secret, and other required parameters
- Click “Get New Access Token” to authenticate
- Use the token for subsequent requests
Practical Example: Set up Bearer Token authentication for a request:
- Create a new request
- Go to Authorization tab
- Select “Bearer Token”
- Enter:
eyJhbGciOiJIUzI1NiIsInR5cCI6IkpXVCJ9.eyJzdWIiOiIxMjM0NTY3ODkwIn0.dozjgNryP4J3jVmNHl0w5N_XgL0n3I9PlFUP0THsR8U - Send to
https://httpbin.org/bearerto verify the token is being sent correctly

Common Use Cases
API Testing
Postman excels at verifying API functionality through manual and automated testing:
- Verify endpoint responses match expected data structures
- Test different parameter combinations to ensure proper handling
- Check error handling by sending invalid data or parameters
- Validate data formats, types, and constraints
Try it yourself: Test error handling by sending a POST request to JSONPlaceholder without a required field and observe the error response.
API Development
For developers building APIs, Postman serves as an essential development companion:
- Debug requests and responses during implementation
- Test edge cases without building a full client application
- Simulate client behavior with various parameters and payload sizes
- Monitor performance and response times during development
Team Collaboration
Postman facilitates team collaboration through shared workspaces and collections:
- Share collections with team members for consistent testing
- Synchronize environments across the team while keeping sensitive values private
- Document APIs with examples and usage notes
- Track changes to APIs through version history
Conclusion
Postman has become an indispensable tool for API development and testing. By mastering its features, you can:
- Streamline your API testing workflow
- Improve development efficiency and quality
- Enhance team collaboration through shared collections
- Create better documentation for your APIs
- Automate testing to catch issues early