Programming Javascript 3D, ambient-light, canvas-textures, color-manipulation, directional-light, environment-mapping, image-textures, interactive-3D, lighting, materials, MeshStandardMaterial, OrbitControls, point-light, procedural-textures, shadow-mapping, spotlight, texture-generation, texture-mapping, texture-wrapping, textures, three.js, typescript, Vue, WebGL Craig 0 Comments
Three.js Lighting and Textures
In this article, we’ll explore how to implement advanced lighting and textures in Three.js within a Vue 3 application. Building on our previous overview of Three.js, we’ll dive deeper into creating realistic scenes with proper illumination and surface details. This is the second article in a series on Three.js:
- Getting Started with Three.js in Vue 3
- Three.js Lighting and Textures (this post)
- Physics and Collisions in Three.js
- Enhancing Three.js Scenes with Shadows and Fog
- Creating Three.js Characters with Skeletons
- Full 3D Scene Example with Three.js
Complete code for the series of blog posts is available on GitHub.
What We’ll Build
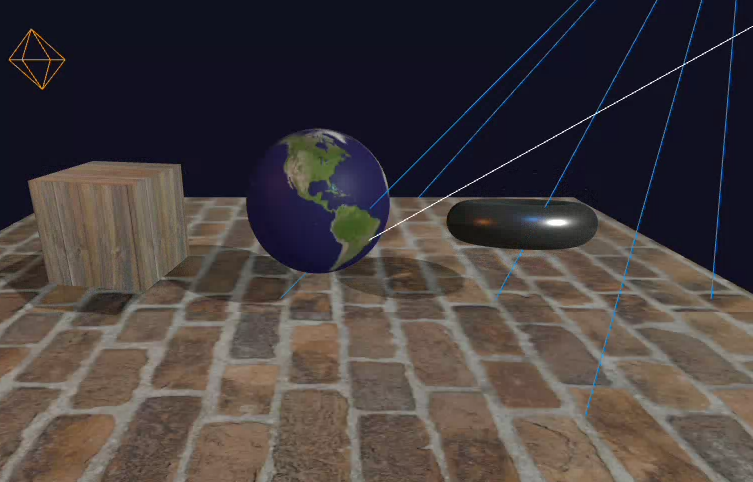
We’ll create an interactive 3D scene featuring multiple objects with different materials and textures:
- A wooden cube with image-based texture
- An earth sphere with a map texture
- A metallic torus with procedurally generated texture
- A brick floor with texture rotation and tiling
Each object will demonstrate different lighting and material properties, and we’ll provide UI controls to adjust lighting parameters and metal properties in real-time.
Lighting in Three.js
Three.js offers several types of lights that simulate different real-world lighting scenarios. Understanding these options helps create scenes with appropriate mood and depth.
Ambient Light
Ambient light illuminates all objects in the scene equally from all directions. It has no specific source and casts no shadows, but provides a base level of illumination.
// Create ambient light with white color and 0.5 intensity
ambientLight = new THREE.AmbientLight(0xffffff, ambientIntensity.value);
scene.add(ambientLight);
This light is useful for simulating environmental light bouncing off surfaces, preventing objects from appearing completely dark in shadowed areas.
Directional Light
Directional light emits parallel light rays in a specific direction, similar to sunlight. It can cast shadows and is positioned using coordinates.
// Create directional light (simulating sunlight)
directionalLight = new THREE.DirectionalLight(0xffffff, directionalIntensity.value);
directionalLight.position.set(5, 5, 5);
directionalLight.castShadow = true;
// Configure shadow properties
directionalLight.shadow.mapSize.width = 1024;
directionalLight.shadow.mapSize.height = 1024;
directionalLight.shadow.camera.near = 0.5;
directionalLight.shadow.camera.far = 20;
directionalLight.shadow.camera.left = -5;
directionalLight.shadow.camera.right = 5;
directionalLight.shadow.camera.top = 5;
directionalLight.shadow.camera.bottom = -5;
scene.add(directionalLight);
The shadow camera settings define the volume within which shadows will be calculated. Objects outside this volume won’t cast shadows, so it’s important to size it appropriately for your scene.
Point Light
Point light emits light in all directions from a single point, like a lightbulb. It has position, color, intensity, and a distance parameter that controls how far the light reaches.
// Create point light with orange color
pointLight = new THREE.PointLight(0xff9000, pointLightIntensity.value, 10);
pointLight.position.set(-2, 2, 1);
pointLight.castShadow = true;
scene.add(pointLight);
The third parameter (10) specifies the maximum range of the light’s effect.
Spot Light
Spot light emits light in a cone shape from a point, like a flashlight or spotlight. It has position, target, angle, penumbra (edge softness), and decay rate.
// Create spot light with blue color
spotLight = new THREE.SpotLight(0x0090ff, spotLightIntensity.value);
spotLight.position.set(2, 3, 2);
spotLight.angle = Math.PI / 6;  // 30 degrees
spotLight.penumbra = 0.2;       // Soft edges
spotLight.decay = 2;            // Light falloff
spotLight.distance = 10;        // Maximum range
spotLight.castShadow = true;
spotLight.shadow.mapSize.width = 1024;
spotLight.shadow.mapSize.height = 1024;

// Create and set target for the spotlight
const spotLightTarget = new THREE.Object3D();
spotLightTarget.position.set(2, 0, 0);
scene.add(spotLightTarget);
spotLight.target = spotLightTarget;

scene.add(spotLight);
The angle property controls the width of the cone, while penumbra softens the edges between light and shadow.
Light Helpers
To visualize light positions and directions during development, Three.js provides helper objects:
// Add directional light helper
const directionalHelper = new THREE.DirectionalLightHelper(directionalLight, 1);
scene.add(directionalHelper);

// Add point light helper
const pointLightHelper = new THREE.PointLightHelper(pointLight, 0.2);
scene.add(pointLightHelper);

// Add spot light helper
const spotLightHelper = new THREE.SpotLightHelper(spotLight);
scene.add(spotLightHelper);
These helpers display visual indicators showing the position, direction, and properties of each light source.
Working with Textures
Textures add detail and realism to 3D objects. Three.js supports both image-based textures and procedurally generated ones.
Loading Image Textures
To load image textures, we use the THREE.TextureLoader:
const loadTextures = async () => {
  return new Promise<void>((resolve) => {
    // Define texture URLs
    const textureUrls = {
      wood: 'https://upload.wikimedia.org/wikipedia/commons/thumb/3/3b/Beilstein_-_Billensbach_-_Tal_der_Appenklinge_-_Scheune_-_Tor_-_Detail_%281%29.jpg/1024px-Beilstein_-_Billensbach_-_Tal_der_Appenklinge_-_Scheune_-_Tor_-_Detail_%281%29.jpg',
      brick: 'https://upload.wikimedia.org/wikipedia/commons/thumb/8/8f/St_Michael%27s_Church%2C_Theydon_Mount%2C_tower_brickwork%2C_Essex%2C_England_03.jpg/1365px-St_Michael%27s_Church%2C_Theydon_Mount%2C_tower_brickwork%2C_Essex%2C_England_03.jpg',
      earth: 'https://upload.wikimedia.org/wikipedia/commons/thumb/8/8f/Whole_world_-_land_and_oceans_12000.jpg/1280px-Whole_world_-_land_and_oceans_12000.jpg',
    };

    let loadedCount = 0;
    const totalTextures = Object.keys(textureUrls).length;

    // Load each texture
    for (const [name, url] of Object.entries(textureUrls)) {
      textureLoader.load(
        url,
        (texture) => {
          textures[name] = texture;
          texture.wrapS = THREE.RepeatWrapping;
          texture.wrapT = THREE.RepeatWrapping;

          // Apply custom settings to brick texture
          if (name === 'brick') {
            texture.rotation = Math.PI / 2; // Rotate texture 90 degrees
            texture.repeat.set(2, 1);       // Repeat twice horizontally
          }

          loadedCount++;
          if (loadedCount === totalTextures) {
            resolve();
          }
        }
      );
    }
  });
};
This function loads multiple textures asynchronously and returns a Promise that resolves when all textures are loaded. For each texture, we can:
- Set wrapping behavior with
wrapSandwrapT - Rotate textures with the
rotationproperty - Tile textures with the
repeatproperty
Creating Procedural Textures
For more dynamic textures, we can generate them procedurally using HTML Canvas:
const createMetalTexture = () => {
  const metalCanvas = document.createElement('canvas');
  metalCanvas.width = 512;
  metalCanvas.height = 512;
  const ctx = metalCanvas.getContext('2d');

  if (ctx) {
    // Clear the canvas first
    ctx.clearRect(0, 0, 512, 512);

    // Parse the color and create lighter/darker variants
    const baseColor = metalColor.value;
    const lighterColor = lightenColor(baseColor, 30);
    const darkerColor = darkenColor(baseColor, 10);

    // Create metallic gradient background
    const gradient = ctx.createLinearGradient(0, 0, 512, 512);
    gradient.addColorStop(0, darkerColor);
    gradient.addColorStop(0.5, lighterColor);
    gradient.addColorStop(1, baseColor);
    ctx.fillStyle = gradient;
    ctx.fillRect(0, 0, 512, 512);

    // Add some scratches
    ctx.strokeStyle = 'rgba(255,255,255,0.2)';
    for (let i = 0; i < metalScratchCount.value; i++) {
      ctx.lineWidth = Math.random() * 2;
      ctx.beginPath();
      ctx.moveTo(Math.random() * 512, Math.random() * 512);
      ctx.lineTo(Math.random() * 512, Math.random() * 512);
      ctx.stroke();
    }

    // Add some darker spots
    ctx.fillStyle = 'rgba(0,0,0,0.1)';
    for (let i = 0; i < 30; i++) {
      const size = Math.random() * 20 + 5;
      ctx.beginPath();
      ctx.arc(Math.random() * 512, Math.random() * 512, size, 0, Math.PI * 2);
      ctx.fill();
    }
  }

  // Create texture from canvas
  const metalTexture = new THREE.CanvasTexture(metalCanvas);
  metalTexture.wrapS = THREE.RepeatWrapping;
  metalTexture.wrapT = THREE.RepeatWrapping;
  metalTexture.repeat.set(2, 2);

  return metalTexture;
};
This function draws a complex metal texture with:
- A gradient background based on the selected color
- Random white scratches with varying thickness
- Random dark spots of varying sizes
- Proper texture wrapping and tiling settings
Applying Materials and Textures
Once textures are loaded, we can apply them to different objects with appropriate material settings:
const createObjects = () => {
  // Create a textured cube with wood texture
  const cubeGeometry = new THREE.BoxGeometry(1, 1, 1);
  const cubeMaterial = new THREE.MeshStandardMaterial({
    map: textures.wood,
    roughness: 0.7,
    metalness: 0.2
  });
  cube = new THREE.Mesh(cubeGeometry, cubeMaterial);
  cube.position.set(-2, 0.5, 0);
  cube.castShadow = true;
  cube.receiveShadow = true;
  scene.add(cube);

  // Create a textured sphere with earth texture
  const sphereGeometry = new THREE.SphereGeometry(0.7, 32, 32);
  const sphereMaterial = new THREE.MeshStandardMaterial({
    map: textures.earth,
    roughness: 0.5,
    metalness: 0.1
  });
  sphere = new THREE.Mesh(sphereGeometry, sphereMaterial);
  sphere.position.set(0, 0.7, 0);
  sphere.castShadow = true;
  sphere.receiveShadow = true;
  scene.add(sphere);

  // Create a torus with procedural metal texture
  const torusGeometry = new THREE.TorusGeometry(0.5, 0.2, 32, 100);
  const metalTexture = createMetalTexture();

  const torusMaterial = new THREE.MeshStandardMaterial({
    map: metalTexture,
    roughness: metalRoughness.value,
    metalness: metalMetalness.value,
    envMapIntensity: 1.0
  });

  torus = new THREE.Mesh(torusGeometry, torusMaterial);
  torus.position.set(2, 0.5, 0);
  torus.castShadow = true;
  torus.receiveShadow = true;
  scene.add(torus);

  // Create a textured ground plane with brick texture
  const planeGeometry = new THREE.PlaneGeometry(10, 10);
  const planeMaterial = new THREE.MeshStandardMaterial({
    map: textures.brick,
    roughness: 0.9,
    metalness: 0.1,
    side: THREE.DoubleSide
  });
  plane = new THREE.Mesh(planeGeometry, planeMaterial);
  plane.rotation.x = -Math.PI / 2;
  plane.position.y = -0.5;
  plane.receiveShadow = true;
  scene.add(plane);
};
For each object, we:
- Create appropriate geometry
- Create a material with the texture and physical properties
- Configure shadow casting and receiving
- Position the object in the scene
Dynamic Material Updates
One powerful feature is the ability to update materials dynamically. Our component allows adjusting metal properties in real-time:
// Function to update the torus material
const updateTorusMaterial = () => {
  if (!torus) return;

  // Dispose of old texture if it exists
  if (torus.material) {
    const material = torus.material as THREE.MeshStandardMaterial;
    if (material.map) {
      material.map.dispose();
    }

    // Create new texture
    const newTexture = createMetalTexture();
    material.map = newTexture;
    material.roughness = Number(metalRoughness.value);
    material.metalness = Number(metalMetalness.value);

    // Force material and texture updates
    material.needsUpdate = true;
    newTexture.needsUpdate = true;
  }
};

// Watch for changes to metal properties
watch([metalRoughness, metalMetalness, metalScratchCount, metalColor], () => {
  // Use setTimeout to ensure the UI has updated before regenerating the texture
  setTimeout(() => {
    updateTorusMaterial();
  }, 10);
});
When any metal property changes, we:
- Dispose of the old texture to prevent memory leaks
- Generate a new procedural texture with updated parameters
- Update the material properties
- Mark both the material and texture as needing updates
Memory Management
Proper memory management is crucial when working with WebGL. Our component implements careful cleanup:
const cleanup = () => {
  // Cancel animation and remove event listeners
  if (animationFrameId) {
    cancelAnimationFrame(animationFrameId);
  }
  window.removeEventListener('resize', onWindowResize);

  // Remove renderer from DOM
  if (containerRef.value && renderer) {
    containerRef.value.removeChild(renderer.domElement);
  }

  // Dispose of controls
  if (controls) {
    controls.dispose();
  }

  // Dispose of geometries and materials
  [cube, sphere, plane, torus].forEach(mesh => {
    if (!mesh) return;

    if (mesh.geometry) mesh.geometry.dispose();
    if (mesh.material) {
      if (Array.isArray(mesh.material)) {
        mesh.material.forEach(material => material.dispose());
      } else {
        mesh.material.dispose();
      }
    }
  });

  // Dispose of textures
  Object.values(textures).forEach(texture => {
    texture.dispose();
  });

  // Dispose of any procedural textures
  if (torus && torus.material) {
    const material = torus.material as THREE.MeshStandardMaterial;
    if (material.map && material.map !== textures.wood) {
      material.map.dispose();
    }
  }
};
This function ensures all resources are properly disposed of when the component unmounts, preventing memory leaks:
- Cancels animation frames
- Removes event listeners
- Disposes of all geometries, materials, and textures
Interactive UI Controls
Our component includes UI controls to adjust lighting and material properties in real-time:
<div class="controls-container">
  <h3>Lighting Controls</h3>

  <div class="light-control">
    <label for="ambient-light">Ambient Light: {{ Number(ambientIntensity).toFixed(2) }}</label>
    <input
      type="range"
      id="ambient-light"
      v-model.number="ambientIntensity"
      min="0"
      max="1"
      step="0.05"
      class="slider"
    />
  </div>

  <!-- More lighting controls... -->

  <h3 class="section-title">Metal Controls</h3>

  <div class="metal-control">
    <label for="metal-roughness">Roughness: {{ Number(metalRoughness).toFixed(2) }}</label>
    <input
      type="range"
      id="metal-roughness"
      v-model.number="metalRoughness"
      min="0"
      max="1"
      step="0.05"
      class="slider"
    />
  </div>

  <!-- More metal controls... -->

  <button @click="forceTextureUpdate" class="update-button">
    Force Update Texture
  </button>
</div>
The Vue reactive system automatically updates the 3D scene when these values change, creating a responsive and interactive experience.
Putting it Together
Complete LightingTextureScene.vue Component
<script setup lang="ts">
import { onMounted, onBeforeUnmount, ref, watch } from 'vue';
import * as THREE from 'three';
import { OrbitControls } from 'three/examples/jsm/controls/OrbitControls';

const emit = defineEmits(['close']);

const containerRef = ref<HTMLDivElement | null>(null);
let scene: THREE.Scene;
let camera: THREE.PerspectiveCamera;
let renderer: THREE.WebGLRenderer;
let controls: OrbitControls;
let animationFrameId: number;

// Lighting controls
const ambientIntensity = ref<number>(0.5);
const directionalIntensity = ref<number>(1.0);
const pointLightIntensity = ref<number>(1.0);
const spotLightIntensity = ref<number>(1.0);

// Metal controls
const metalRoughness = ref<number>(0.3);
const metalMetalness = ref<number>(0.9);
const metalScratchCount = ref<number>(20);
const metalColor = ref<string>('#777777');

// Objects
let cube: THREE.Mesh;
let sphere: THREE.Mesh;
let plane: THREE.Mesh;
let torus: THREE.Mesh;

// Lights
let ambientLight: THREE.AmbientLight;
let directionalLight: THREE.DirectionalLight;
let pointLight: THREE.PointLight;
let spotLight: THREE.SpotLight;
let lightHelpers: THREE.Object3D[] = [];

// Texture loader
const textureLoader = new THREE.TextureLoader();
let textures: { [key: string]: THREE.Texture } = {};

// Helper functions for color manipulation
const lightenColor = (color: string, percent: number): string => {
  const num = parseInt(color.replace('#', ''), 16);
  const amt = Math.round(2.55 * percent);
  const R = Math.min(255, (num >> 16) + amt);
  const G = Math.min(255, ((num >> 8) & 0x00FF) + amt);
  const B = Math.min(255, (num & 0x0000FF) + amt);
  return '#' + (0x1000000 + (R << 16) + (G << 8) + B).toString(16).slice(1);
};

const darkenColor = (color: string, percent: number): string => {
  const num = parseInt(color.replace('#', ''), 16);
  const amt = Math.round(2.55 * percent);
  const R = Math.max(0, (num >> 16) - amt);
  const G = Math.max(0, ((num >> 8) & 0x00FF) - amt);
  const B = Math.max(0, (num & 0x0000FF) - amt);
  return '#' + (0x1000000 + (R << 16) + (G << 8) + B).toString(16).slice(1);
};

// Create procedural metal texture
const createMetalTexture = () => {
  const metalCanvas = document.createElement('canvas');
  metalCanvas.width = 512;
  metalCanvas.height = 512;
  const ctx = metalCanvas.getContext('2d');

  if (ctx) {
    // Clear the canvas first
    ctx.clearRect(0, 0, 512, 512);

    // Parse the color and create lighter/darker variants
    const baseColor = metalColor.value;
    const lighterColor = lightenColor(baseColor, 30);
    const darkerColor = darkenColor(baseColor, 10);

    // Create metallic gradient background
    const gradient = ctx.createLinearGradient(0, 0, 512, 512);
    gradient.addColorStop(0, darkerColor);
    gradient.addColorStop(0.5, lighterColor);
    gradient.addColorStop(1, baseColor);
    ctx.fillStyle = gradient;
    ctx.fillRect(0, 0, 512, 512);

    // Add some scratches
    ctx.strokeStyle = 'rgba(255,255,255,0.2)';
    for (let i = 0; i < metalScratchCount.value; i++) {
      ctx.lineWidth = Math.random() * 2;
      ctx.beginPath();
      ctx.moveTo(Math.random() * 512, Math.random() * 512);
      ctx.lineTo(Math.random() * 512, Math.random() * 512);
      ctx.stroke();
    }

    // Add some darker spots
    ctx.fillStyle = 'rgba(0,0,0,0.1)';
    for (let i = 0; i < 30; i++) {
      const size = Math.random() * 20 + 5;
      ctx.beginPath();
      ctx.arc(Math.random() * 512, Math.random() * 512, size, 0, Math.PI * 2);
      ctx.fill();
    }
  }

  // Create texture from canvas
  const metalTexture = new THREE.CanvasTexture(metalCanvas);
  metalTexture.wrapS = THREE.RepeatWrapping;
  metalTexture.wrapT = THREE.RepeatWrapping;
  metalTexture.repeat.set(2, 2);

  return metalTexture;
};

const init = async () => {
  if (!containerRef.value) return;

  // Create scene
  scene = new THREE.Scene();
  scene.background = new THREE.Color(0x111122);

  // Create camera
  camera = new THREE.PerspectiveCamera(
    75,
    window.innerWidth / window.innerHeight,
    0.1,
    1000
  );
  camera.position.set(0, 2, 5);

  // Create renderer
  renderer = new THREE.WebGLRenderer({ antialias: true });
  renderer.setSize(window.innerWidth, window.innerHeight);
  renderer.shadowMap.enabled = true;
  renderer.shadowMap.type = THREE.PCFSoftShadowMap;
  containerRef.value.appendChild(renderer.domElement);

  // Add orbit controls
  controls = new OrbitControls(camera, renderer.domElement);
  controls.enableDamping = true;

  // Load textures
  await loadTextures();

  // Add objects
  createObjects();

  // Add lights
  createLights();

  // Handle window resize
  window.addEventListener('resize', onWindowResize);

  // Animation loop
  const animate = () => {
    animationFrameId = requestAnimationFrame(animate);

    // Rotate objects
    if (cube) cube.rotation.y += 0.005;
    if (torus) torus.rotation.x += 0.005;

    controls.update();
    renderer.render(scene, camera);
  };

  animate();
};

const loadTextures = async () => {
  return new Promise<void>((resolve) => {
    // Load multiple textures
    const textureUrls = {
      wood: 'https://upload.wikimedia.org/wikipedia/commons/thumb/3/3b/Beilstein_-_Billensbach_-_Tal_der_Appenklinge_-_Scheune_-_Tor_-_Detail_%281%29.jpg/1024px-Beilstein_-_Billensbach_-_Tal_der_Appenklinge_-_Scheune_-_Tor_-_Detail_%281%29.jpg',
      brick: 'https://upload.wikimedia.org/wikipedia/commons/thumb/8/8f/St_Michael%27s_Church%2C_Theydon_Mount%2C_tower_brickwork%2C_Essex%2C_England_03.jpg/1365px-St_Michael%27s_Church%2C_Theydon_Mount%2C_tower_brickwork%2C_Essex%2C_England_03.jpg',
      earth: 'https://upload.wikimedia.org/wikipedia/commons/thumb/8/8f/Whole_world_-_land_and_oceans_12000.jpg/1280px-Whole_world_-_land_and_oceans_12000.jpg',
    };

    let loadedCount = 0;
    const totalTextures = Object.keys(textureUrls).length;

    for (const [name, url] of Object.entries(textureUrls)) {
      textureLoader.load(
        url,
        (texture) => {
          textures[name] = texture;
          texture.wrapS = THREE.RepeatWrapping;
          texture.wrapT = THREE.RepeatWrapping;
          if (name === 'brick') {
            texture.rotation = Math.PI / 2; // Rotate texture
            texture.repeat.set(2, 1);
          }

          loadedCount++;
          if (loadedCount === totalTextures) {
            resolve();
          }
        }
      );
    }
  });
};

const createObjects = () => {
  // Create a textured cube
  const cubeGeometry = new THREE.BoxGeometry(1, 1, 1);
  const cubeMaterial = new THREE.MeshStandardMaterial({
    map: textures.wood,
    roughness: 0.7,
    metalness: 0.2
  });
  cube = new THREE.Mesh(cubeGeometry, cubeMaterial);
  cube.position.set(-2, 0.5, 0);
  cube.castShadow = true;
  cube.receiveShadow = true;
  scene.add(cube);

  // Create a textured sphere
  const sphereGeometry = new THREE.SphereGeometry(0.7, 32, 32);
  const sphereMaterial = new THREE.MeshStandardMaterial({
    map: textures.earth,
    roughness: 0.5,
    metalness: 0.1
  });
  sphere = new THREE.Mesh(sphereGeometry, sphereMaterial);
  sphere.position.set(0, 0.7, 0);
  sphere.castShadow = true;
  sphere.receiveShadow = true;
  scene.add(sphere);

  // Create a torus with procedural metal texture
  const torusGeometry = new THREE.TorusGeometry(0.5, 0.2, 32, 100);
  const metalTexture = createMetalTexture();

  // Create material with the procedural texture
  const torusMaterial = new THREE.MeshStandardMaterial({
    map: metalTexture,
    roughness: metalRoughness.value,
    metalness: metalMetalness.value,
    envMapIntensity: 1.0
  });

  torus = new THREE.Mesh(torusGeometry, torusMaterial);
  torus.position.set(2, 0.5, 0);
  torus.castShadow = true;
  torus.receiveShadow = true;
  scene.add(torus);

  // Create a textured ground plane
  const planeGeometry = new THREE.PlaneGeometry(10, 10);
  const planeMaterial = new THREE.MeshStandardMaterial({
    map: textures.brick,
    roughness: 0.9,
    metalness: 0.1,
    side: THREE.DoubleSide
  });
  plane = new THREE.Mesh(planeGeometry, planeMaterial);
  plane.rotation.x = -Math.PI / 2;
  plane.position.y = -0.5;
  plane.receiveShadow = true;
  scene.add(plane);
};

const createLights = () => {
  // Ambient light
  ambientLight = new THREE.AmbientLight(0xffffff, ambientIntensity.value);
  scene.add(ambientLight);

  // Directional light (sun-like)
  directionalLight = new THREE.DirectionalLight(0xffffff, directionalIntensity.value);
  directionalLight.position.set(5, 5, 5);
  directionalLight.castShadow = true;
  directionalLight.shadow.mapSize.width = 1024;
  directionalLight.shadow.mapSize.height = 1024;
  directionalLight.shadow.camera.near = 0.5;
  directionalLight.shadow.camera.far = 20;
  directionalLight.shadow.camera.left = -5;
  directionalLight.shadow.camera.right = 5;
  directionalLight.shadow.camera.top = 5;
  directionalLight.shadow.camera.bottom = -5;
  scene.add(directionalLight);

  // Add directional light helper
  const directionalHelper = new THREE.DirectionalLightHelper(directionalLight, 1);
  scene.add(directionalHelper);
  lightHelpers.push(directionalHelper);

  // Point light
  pointLight = new THREE.PointLight(0xff9000, pointLightIntensity.value, 10);
  pointLight.position.set(-2, 2, 1);
  pointLight.castShadow = true;
  scene.add(pointLight);

  // Add point light helper
  const pointLightHelper = new THREE.PointLightHelper(pointLight, 0.2);
  scene.add(pointLightHelper);
  lightHelpers.push(pointLightHelper);

  // Spot light
  spotLight = new THREE.SpotLight(0x0090ff, spotLightIntensity.value);
  spotLight.position.set(2, 3, 2);
  spotLight.angle = Math.PI / 6;
  spotLight.penumbra = 0.2;
  spotLight.decay = 2;
  spotLight.distance = 10;
  spotLight.castShadow = true;
  spotLight.shadow.mapSize.width = 1024;
  spotLight.shadow.mapSize.height = 1024;
  scene.add(spotLight);

  // Target for spot light
  const spotLightTarget = new THREE.Object3D();
  spotLightTarget.position.set(2, 0, 0);
  scene.add(spotLightTarget);
  spotLight.target = spotLightTarget;

  // Add spot light helper
  const spotLightHelper = new THREE.SpotLightHelper(spotLight);
  scene.add(spotLightHelper);
  lightHelpers.push(spotLightHelper);
};

// Update light intensities when controls change
const updateLights = () => {
  if (ambientLight) ambientLight.intensity = ambientIntensity.value;
  if (directionalLight) directionalLight.intensity = directionalIntensity.value;
  if (pointLight) pointLight.intensity = pointLightIntensity.value;
  if (spotLight) spotLight.intensity = spotLightIntensity.value;

  // Update helpers
  lightHelpers.forEach(helper => {
    if (helper instanceof THREE.DirectionalLightHelper ||
        helper instanceof THREE.PointLightHelper ||
        helper instanceof THREE.SpotLightHelper) {
      helper.update();
    }
  });
};

const onWindowResize = () => {
  if (!camera || !renderer) return;

  camera.aspect = window.innerWidth / window.innerHeight;
  camera.updateProjectionMatrix();
  renderer.setSize(window.innerWidth, window.innerHeight);
};

const cleanup = () => {
  if (animationFrameId) {
    cancelAnimationFrame(animationFrameId);
  }

  window.removeEventListener('resize', onWindowResize);

  if (containerRef.value && renderer) {
    containerRef.value.removeChild(renderer.domElement);
  }

  if (controls) {
    controls.dispose();
  }

  // Dispose of geometries and materials
  [cube, sphere, plane, torus].forEach(mesh => {
    if (!mesh) return;

    if (mesh.geometry) mesh.geometry.dispose();
    if (mesh.material) {
      if (Array.isArray(mesh.material)) {
        mesh.material.forEach(material => material.dispose());
      } else {
        mesh.material.dispose();
      }
    }
  });

  // Dispose of textures
  Object.values(textures).forEach(texture => {
    texture.dispose();
  });

  // Dispose of any procedural textures
  if (torus && torus.material) {
    const material = torus.material as THREE.MeshStandardMaterial;
    if (material.map && material.map !== textures.wood) {
      material.map.dispose();
    }
  }
};

// Function to update the torus material
const updateTorusMaterial = () => {
  if (!torus) return;

  // Dispose of old texture if it exists
  if (torus.material) {
    const material = torus.material as THREE.MeshStandardMaterial;
    if (material.map) {
      material.map.dispose();
    }

    // Create new texture
    const newTexture = createMetalTexture();
    material.map = newTexture;
    material.roughness = Number(metalRoughness.value);
    material.metalness = Number(metalMetalness.value);

    // Force material and texture updates
    material.needsUpdate = true;
    newTexture.needsUpdate = true;

    // Log to confirm updates are happening
    console.log('Metal texture updated:', {
      color: metalColor.value,
      roughness: metalRoughness.value,
      metalness: metalMetalness.value,
      scratches: metalScratchCount.value
    });
  }
};

// Watch for changes to light intensities
watch([ambientIntensity, directionalIntensity, pointLightIntensity, spotLightIntensity], () => {
  updateLights();
});

// Watch for changes to metal properties
watch([metalRoughness, metalMetalness, metalScratchCount, metalColor], () => {
  // Use setTimeout to ensure the UI has updated before regenerating the texture
  setTimeout(() => {
    updateTorusMaterial();
  }, 10);
});

// Add a button to force update
const forceTextureUpdate = () => {
  updateTorusMaterial();
};

onMounted(() => {
  init();
});

onBeforeUnmount(() => {
  cleanup();
});
</script>

<template>
  <div class="scene-container">
    <div ref="containerRef" class="three-container"></div>
    <button @click="emit('close')" class="close-button">Close Scene</button>

    <div class="controls-container">
      <h3>Lighting Controls</h3>

      <div class="light-control">
        <label for="ambient-light">Ambient Light: {{ Number(ambientIntensity).toFixed(2) }}</label>
        <input
          type="range"
          id="ambient-light"
          v-model.number="ambientIntensity"
          min="0"
          max="1"
          step="0.05"
          class="slider"
        />
      </div>

      <div class="light-control">
        <label for="directional-light">Directional Light: {{ Number(directionalIntensity).toFixed(2) }}</label>
        <input
          type="range"
          id="directional-light"
          v-model.number="directionalIntensity"
          min="0"
          max="2"
          step="0.05"
          class="slider"
        />
      </div>

      <div class="light-control">
        <label for="point-light">Point Light (Orange): {{ Number(pointLightIntensity).toFixed(2) }}</label>
        <input
          type="range"
          id="point-light"
          v-model.number="pointLightIntensity"
          min="0"
          max="2"
          step="0.05"
          class="slider"
        />
      </div>

      <div class="light-control">
        <label for="spot-light">Spot Light (Blue): {{ Number(spotLightIntensity).toFixed(2) }}</label>
        <input
          type="range"
          id="spot-light"
          v-model.number="spotLightIntensity"
          min="0"
          max="2"
          step="0.05"
          class="slider"
        />
      </div>

      <h3 class="section-title">Metal Controls</h3>

      <div class="metal-control">
        <label for="metal-roughness">Roughness: {{ Number(metalRoughness).toFixed(2) }}</label>
        <input
          type="range"
          id="metal-roughness"
          v-model.number="metalRoughness"
          min="0"
          max="1"
          step="0.05"
          class="slider"
        />
      </div>

      <div class="metal-control">
        <label for="metal-metalness">Metalness: {{ Number(metalMetalness).toFixed(2) }}</label>
        <input
          type="range"
          id="metal-metalness"
          v-model.number="metalMetalness"
          min="0"
          max="1"
          step="0.05"
          class="slider"
        />
      </div>

      <div class="metal-control">
        <label for="metal-scratches">Scratch Count: {{ metalScratchCount }}</label>
        <input
          type="range"
          id="metal-scratches"
          v-model.number="metalScratchCount"
          min="0"
          max="50"
          step="1"
          class="slider"
        />
      </div>

      <div class="metal-control">
        <label for="metal-color">Metal Color:</label>
        <input
          type="color"
          id="metal-color"
          v-model="metalColor"
          class="color-picker"
        />
      </div>

      <button @click="forceTextureUpdate" class="update-button">
        Force Update Texture
      </button>

      <div class="instructions">
        <p>• Drag to rotate the view</p>
        <p>• Scroll to zoom in/out</p>
        <p>• Right-click drag to pan</p>
        <p>• Adjust sliders to change lighting and materials</p>
      </div>
    </div>
  </div>
</template>

<style scoped>
.scene-container {
  position: relative;
  width: 100%;
  height: 100vh;
}

.three-container {
  width: 100%;
  height: 100%;
}

.close-button {
  position: absolute;
  top: 20px;
  right: 20px;
  background-color: rgba(255, 255, 255, 0.8);
  border: none;
  border-radius: 4px;
  padding: 8px 16px;
  cursor: pointer;
  z-index: 10;
}

.close-button:hover {
  background-color: rgba(255, 255, 255, 1);
}

.controls-container {
  position: absolute;
  top: 20px;
  left: 20px;
  background-color: rgba(0, 0, 0, 0.7);
  color: white;
  border-radius: 8px;
  padding: 16px;
  width: 300px;
  display: flex;
  flex-direction: column;
  gap: 15px;
  z-index: 10;
}

.controls-container h3 {
  margin: 0 0 10px 0;
  text-align: center;
  color: #4283b8;
}

.section-title {
  margin-top: 10px !important;
  border-top: 1px solid rgba(255, 255, 255, 0.2);
  padding-top: 15px;
}

.light-control, .metal-control {
  display: flex;
  flex-direction: column;
  gap: 5px;
}

.light-control label, .metal-control label {
  font-size: 0.9em;
}

.color-picker {
  width: 100%;
  height: 30px;
  border: none;
  border-radius: 4px;
  cursor: pointer;
}

.update-button {
  background-color: #4283b8;
  color: white;
  border: none;
  border-radius: 4px;
  padding: 8px 16px;
  margin-top: 5px;
  cursor: pointer;
  font-weight: bold;
}

.update-button:hover {
  background-color: #336fa0;
}

.slider {
  width: 100%;
  cursor: pointer;
}

.instructions {
  margin-top: 15px;
  font-size: 0.85em;
  color: #ccc;
}

.instructions p {
  margin: 5px 0;
}
</style>
Update App.vue
Add new button and handler
First the handler to launch our component
const launchLightingScene = () => {
  showLightingScene.value = true;
  showScene.value = false;
};
Now update the template
<template>
  <div class="container">
    <div v-if="!showScene && !showLightingScene" class="launch-container">
      <h1>Three.js Demo</h1>
      <div class="button-container">
        <button @click="launchScene" class="launch-button">Launch 3D Scene</button>
        <button @click="launchLightingScene" class="launch-button lighting-button">Launch Lighting & Textures</button>
      </div>
    </div>
    <ThreeScene v-else-if="showScene" @close="closeScene" />
    <LightingTextureScene v-else-if="showLightingScene" @close="closeScene" />
  </div>
</template>
Finally add our new styles:
.lighting-button {
  background-color: #4283b8;
}

.lighting-button:hover {
  background-color: #336fa0;
}
Key Concepts Recap
- Lighting Types: Each light type (ambient, directional, point, spot) serves a specific purpose and creates different effects.
- Texture Sources: Textures can come from images or be generated procedurally for more dynamic effects.
- Material Properties: The
MeshStandardMaterialcombines textures with physical properties like roughness and metalness to create realistic surfaces. - Memory Management: Always dispose of Three.js resources when they’re no longer needed to prevent memory leaks.
- Reactive Updates: Vue’s reactivity system integrates well with Three.js, enabling dynamic updates to the 3D scene.
Conclusion
With proper lighting and textures, Three.js scenes become more realistic and visually appealing. This tutorial demonstrated how to implement various light types, load and generate textures, and create interactive controls to adjust scene properties in real-time.
Continue to the next tutorial to learn to add physics and collisions to your animation.