Programming Javascript 3D, 3D-rendering, ambient-light, directional-light, environmental-effects, fog, interactive-demo, lighting, OrbitControls, PCFShadowMap, real-time-graphics, scene-graph, shadow-maps, shadows, spotlight, three.js, typescript, visual-effects, Vue, web-development, WebGL Craig 0 Comments
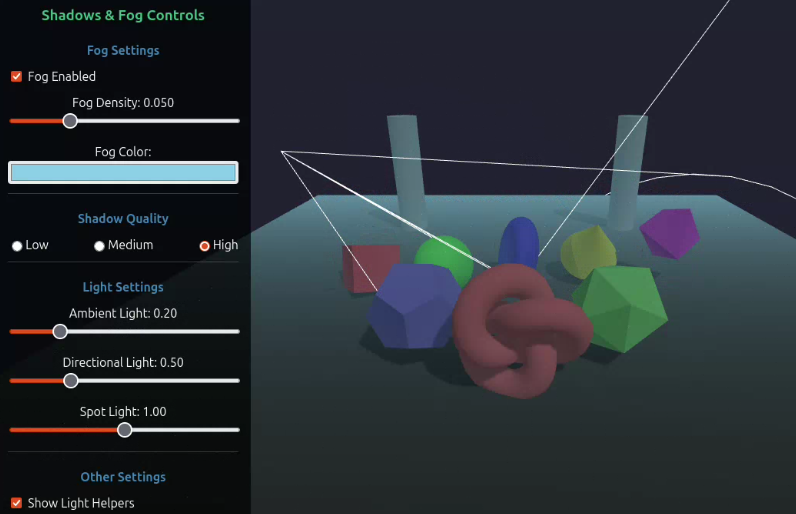
Enhancing Three.js Scenes with Shadows and Fog
Introduction
Three.js is a powerful 3D library that makes WebGL accessible for web developers. One of the key aspects of creating realistic 3D scenes is the implementation of environmental effects like shadows and fog. In this tutorial, we’ll explore how to add these effects to enhance the visual quality and depth perception in your Three.js applications. This is the fouth in a series of tutorials on Three.js:
- Getting Started with Three.js in Vue 3
- Three.js Lighting and Textures
- Physics and Collisions in Three.js
- Enhancing Three.js Scenes with Shadows and Fog (this post)
- Creating Three.js Characters with Skeletons
- Full 3D Scene Example with Three.js
Complete code for the series of blog posts is available on GitHub.
Why Add Shadows and Fog
Shadows
Shadows are crucial for:
- Creating a sense of realism and grounding objects in the scene
- Providing visual cues about object placement and relationships
- Enhancing depth perception by indicating the distance between objects
- Adding visual interest and contrast to your scene
Without shadows, 3D objects appear to float unnaturally, disconnected from their environment.
Fog
Fog effects help with:
- Creating atmospheric depth in your scenes
- Simulating real-world environmental conditions
- Controlling the visibility of distant objects
- Naturally fading out distant elements rather than having them abruptly cut off
- Focusing user attention on foreground elements
What We’re Going to Build
In this tutorial, we’ll create an interactive scene featuring:
- A variety of 3D objects (cubes, spheres, tori, and more) arranged on a floor
- Multiple light sources that cast shadows:
- Directional light (simulating sunlight)
- Spot light (creating dramatic focused lighting)
- Ambient light (providing global illumination)
- Customizable fog effect with adjustable density and color
- Interactive controls to modify shadow quality, light intensity, and fog parameters
- Animated objects and lights to demonstrate dynamic shadows
You’ll learn how to:
- Configure shadow maps with different quality settings
- Implement and customize exponential fog
- Properly set up objects to cast and receive shadows
- Debug light positions using helper visualizations
- Create a responsive, interactive 3D environment
Let’s dive into the code and see how these effects work in practice!
Three.js Fog and Shadows Component
<script setup lang="ts">
import { onMounted, onBeforeUnmount, ref, watch } from 'vue';
import * as THREE from 'three';
import { OrbitControls } from 'three/examples/jsm/controls/OrbitControls';

const emit = defineEmits(['close']);

const containerRef = ref<HTMLDivElement | null>(null);
let scene: THREE.Scene;
let camera: THREE.PerspectiveCamera;
let renderer: THREE.WebGLRenderer;
let controls: OrbitControls;
let animationFrameId: number;

// Scene objects
let floor: THREE.Mesh;
let shapes: THREE.Mesh[] = [];
let spotLight: THREE.SpotLight;
let directionalLight: THREE.DirectionalLight;
let ambientLight: THREE.AmbientLight;
let spotLightHelper: THREE.SpotLightHelper;
let directionalLightHelper: THREE.DirectionalLightHelper;

// Controls
const fogEnabled = ref(true);
const fogDensity = ref(0.05);
const fogColor = ref('#88ccee');
const shadowQuality = ref('high'); // 'low', 'medium', 'high'
const spotLightIntensity = ref(1.0);
const directionalLightIntensity = ref(0.5);
const ambientLightIntensity = ref(0.2);
const showHelpers = ref(true);
const animateObjects = ref(true);

const init = () => {
  if (!containerRef.value) return;

  // Create scene
  scene = new THREE.Scene();
  scene.background = new THREE.Color(0x222233);

  // Setup fog
  updateFog();

  // Create camera
  camera = new THREE.PerspectiveCamera(
    75,
    window.innerWidth / window.innerHeight,
    0.1,
    100
  );
  camera.position.set(0, 5, 10);

  // Create renderer
  renderer = new THREE.WebGLRenderer({ antialias: true });
  renderer.setSize(window.innerWidth, window.innerHeight);
  renderer.shadowMap.enabled = true;
  updateShadowQuality();
  containerRef.value.appendChild(renderer.domElement);

  // Add orbit controls
  controls = new OrbitControls(camera, renderer.domElement);
  controls.enableDamping = true;
  controls.dampingFactor = 0.05;

  // Create floor
  createFloor();

  // Create objects
  createObjects();

  // Add lights
  createLights();

  // Handle window resize
  window.addEventListener('resize', onWindowResize);

  // Animation loop
  const animate = () => {
    animationFrameId = requestAnimationFrame(animate);

    if (animateObjects.value) {
      // Animate shapes
      shapes.forEach((shape, index) => {
        const speed = 0.01 + (index * 0.005);
        shape.rotation.x += speed;
        shape.rotation.y += speed * 0.8;

        // Make shapes hover up and down
        const time = Date.now() * 0.001;
        const offset = index * (Math.PI / 4);
        shape.position.y = 1 + Math.sin(time + offset) * 0.5;
      });

      // Animate spotlight position in a circular motion
      if (spotLight) {
        const time = Date.now() * 0.0005;
        const radius = 5;
        spotLight.position.x = Math.sin(time) * radius;
        spotLight.position.z = Math.cos(time) * radius;
        spotLight.position.y = 5 + Math.sin(time * 2) * 1;

        // Update spotlight target to always point at the center
        spotLight.target.position.set(0, 0, 0);
        spotLight.target.updateMatrixWorld();

        // Update helper
        if (spotLightHelper) {
          spotLightHelper.update();
        }
      }
    }

    controls.update();
    renderer.render(scene, camera);
  };

  animate();
};

const createFloor = () => {
  // Create a large floor
  const floorGeometry = new THREE.PlaneGeometry(20, 20);
  const floorMaterial = new THREE.MeshStandardMaterial({
    color: 0x444444,
    roughness: 0.8,
    metalness: 0.2
  });
  floor = new THREE.Mesh(floorGeometry, floorMaterial);
  floor.rotation.x = -Math.PI / 2;
  floor.receiveShadow = true;
  scene.add(floor);
};

const createObjects = () => {
  // Create different shapes with different materials
  const colors = [0xff4444, 0x44ff44, 0x4444ff, 0xffff44, 0xff44ff];
  const geometries = [
    new THREE.BoxGeometry(1.2, 1.2, 1.2), // Cube
    new THREE.SphereGeometry(0.8, 32, 32), // Sphere
    new THREE.TorusGeometry(0.7, 0.3, 16, 100), // Torus (donut)
    new THREE.ConeGeometry(0.8, 1.5, 32), // Cone
    new THREE.OctahedronGeometry(0.9, 0) // Octahedron
  ];

  const names = ["Cube", "Sphere", "Torus", "Cone", "Octahedron"];

  for (let i = 0; i < 5; i++) {
    const material = new THREE.MeshStandardMaterial({
      color: colors[i],
      roughness: 0.7,
      metalness: 0.2
    });

    const shape = new THREE.Mesh(geometries[i], material);
    shape.position.set((i - 2) * 2, 1, 0);
    shape.castShadow = true;
    shape.receiveShadow = true;
    shape.name = names[i]; // Add name for debugging

    scene.add(shape);
    shapes.push(shape);
  }

  // Add some interesting structures in the foreground
  const foregroundShapes = [
    {
      geometry: new THREE.DodecahedronGeometry(1, 0),
      position: new THREE.Vector3(-2, 1, 3),
      color: 0x8888ff
    },
    {
      geometry: new THREE.TorusKnotGeometry(0.7, 0.3, 64, 8),
      position: new THREE.Vector3(0, 1, 4),
      color: 0xff8888
    },
    {
      geometry: new THREE.IcosahedronGeometry(1, 0),
      position: new THREE.Vector3(2, 1, 3),
      color: 0x88ff88
    }
  ];

  // Add columns in the background
  const backgroundColumns = [
    {
      geometry: new THREE.CylinderGeometry(0.5, 0.5, 4, 16),
      position: new THREE.Vector3(-4, 2, -5),
      color: 0x888888
    },
    {
      geometry: new THREE.CylinderGeometry(0.5, 0.5, 4, 16),
      position: new THREE.Vector3(4, 2, -5),
      color: 0x888888
    }
  ];

  foregroundShapes.forEach(item => {
    const material = new THREE.MeshStandardMaterial({
      color: item.color,
      roughness: 0.9,
      metalness: 0.1
    });

    const shape = new THREE.Mesh(item.geometry, material);
    shape.position.copy(item.position);
    shape.castShadow = true;
    shape.receiveShadow = true;

    scene.add(shape);
  });

  backgroundColumns.forEach(item => {
    const material = new THREE.MeshStandardMaterial({
      color: item.color,
      roughness: 0.9,
      metalness: 0.1
    });

    const shape = new THREE.Mesh(item.geometry, material);
    shape.position.copy(item.position);
    shape.castShadow = true;
    shape.receiveShadow = true;

    scene.add(shape);
  });
};

const createLights = () => {
  // Ambient light
  ambientLight = new THREE.AmbientLight(0xffffff, ambientLightIntensity.value);
  scene.add(ambientLight);

  // Directional light (sun-like)
  directionalLight = new THREE.DirectionalLight(0xffffff, directionalLightIntensity.value);
  directionalLight.position.set(5, 10, 5);
  directionalLight.castShadow = true;

  // Configure shadow properties
  directionalLight.shadow.mapSize.width = 1024;
  directionalLight.shadow.mapSize.height = 1024;
  directionalLight.shadow.camera.near = 0.5;
  directionalLight.shadow.camera.far = 30;
  directionalLight.shadow.camera.left = -10;
  directionalLight.shadow.camera.right = 10;
  directionalLight.shadow.camera.top = 10;
  directionalLight.shadow.camera.bottom = -10;

  scene.add(directionalLight);

  // Directional light helper
  directionalLightHelper = new THREE.DirectionalLightHelper(directionalLight, 1);
  directionalLightHelper.visible = showHelpers.value;
  scene.add(directionalLightHelper);

  // Spot light
  spotLight = new THREE.SpotLight(0xffffff, spotLightIntensity.value, 15, Math.PI / 6, 0.5, 1);
  spotLight.position.set(0, 5, 0);
  spotLight.castShadow = true;

  // Configure shadow properties
  spotLight.shadow.mapSize.width = 1024;
  spotLight.shadow.mapSize.height = 1024;
  spotLight.shadow.camera.near = 0.5;
  spotLight.shadow.camera.far = 20;

  // Add spotlight target
  const spotLightTarget = new THREE.Object3D();
  spotLightTarget.position.set(0, 0, 0);
  scene.add(spotLightTarget);
  spotLight.target = spotLightTarget;

  scene.add(spotLight);

  // Spot light helper
  spotLightHelper = new THREE.SpotLightHelper(spotLight);
  spotLightHelper.visible = showHelpers.value;
  scene.add(spotLightHelper);
};

const updateFog = () => {
  if (fogEnabled.value) {
    const color = new THREE.Color(fogColor.value);
    scene.fog = new THREE.FogExp2(color, fogDensity.value);
  } else {
    scene.fog = null;
  }
};

const updateShadowQuality = () => {
  if (!renderer) return;

  switch (shadowQuality.value) {
    case 'low':
      renderer.shadowMap.type = THREE.BasicShadowMap;
      if (directionalLight) {
        directionalLight.shadow.mapSize.width = 512;
        directionalLight.shadow.mapSize.height = 512;
      }
      if (spotLight) {
        spotLight.shadow.mapSize.width = 512;
        spotLight.shadow.mapSize.height = 512;
      }
      break;
    case 'medium':
      renderer.shadowMap.type = THREE.PCFShadowMap;
      if (directionalLight) {
        directionalLight.shadow.mapSize.width = 1024;
        directionalLight.shadow.mapSize.height = 1024;
      }
      if (spotLight) {
        spotLight.shadow.mapSize.width = 1024;
        spotLight.shadow.mapSize.height = 1024;
      }
      break;
    case 'high':
      renderer.shadowMap.type = THREE.PCFSoftShadowMap;
      if (directionalLight) {
        directionalLight.shadow.mapSize.width = 2048;
        directionalLight.shadow.mapSize.height = 2048;
      }
      if (spotLight) {
        spotLight.shadow.mapSize.width = 2048;
        spotLight.shadow.mapSize.height = 2048;
      }
      break;
  }

  renderer.shadowMap.needsUpdate = true;
};

const updateLightIntensities = () => {
  if (ambientLight) ambientLight.intensity = ambientLightIntensity.value;
  if (directionalLight) directionalLight.intensity = directionalLightIntensity.value;
  if (spotLight) spotLight.intensity = spotLightIntensity.value;
};

const toggleHelpers = () => {
  if (directionalLightHelper) directionalLightHelper.visible = showHelpers.value;
  if (spotLightHelper) spotLightHelper.visible = showHelpers.value;
};

const onWindowResize = () => {
  if (!camera || !renderer) return;

  camera.aspect = window.innerWidth / window.innerHeight;
  camera.updateProjectionMatrix();
  renderer.setSize(window.innerWidth, window.innerHeight);
};

const cleanup = () => {
  if (animationFrameId) {
    cancelAnimationFrame(animationFrameId);
  }

  window.removeEventListener('resize', onWindowResize);

  if (containerRef.value && renderer) {
    containerRef.value.removeChild(renderer.domElement);
  }

  if (controls) {
    controls.dispose();
  }

  // Dispose of geometries and materials
  if (floor) {
    if (floor.geometry) floor.geometry.dispose();
    if (floor.material) {
      if (Array.isArray(floor.material)) {
        floor.material.forEach(m => m.dispose());
      } else {
        floor.material.dispose();
      }
    }
  }

  shapes.forEach(shape => {
    if (shape.geometry) shape.geometry.dispose();
    if (shape.material) {
      if (Array.isArray(shape.material)) {
        shape.material.forEach(m => m.dispose());
      } else {
        shape.material.dispose();
      }
    }
  });
};

// Watch for changes to controls
watch([fogEnabled, fogDensity, fogColor], updateFog);
watch(shadowQuality, updateShadowQuality);
watch([ambientLightIntensity, directionalLightIntensity, spotLightIntensity], updateLightIntensities);
watch(showHelpers, toggleHelpers);

onMounted(() => {
  init();
});

onBeforeUnmount(() => {
  cleanup();
});
</script>

<template>
  <div class="scene-container">
    <div ref="containerRef" class="three-container"></div>
    <button @click="emit('close')" class="close-button">Close Scene</button>

    <div class="controls-container">
      <h3>Shadows & Fog Controls</h3>

      <div class="control-section">
        <h4>Fog Settings</h4>

        <div class="control-group">
          <label class="toggle-label">
            <input type="checkbox" v-model="fogEnabled" />
            <span class="toggle-text">Fog {{ fogEnabled ? 'Enabled' : 'Disabled' }}</span>
          </label>
        </div>

        <div class="control-group" v-if="fogEnabled">
          <label for="fog-density">Fog Density: {{ fogDensity.toFixed(3) }}</label>
          <input
            type="range"
            id="fog-density"
            v-model.number="fogDensity"
            min="0.001"
            max="0.2"
            step="0.001"
            class="slider"
          />
        </div>

        <div class="control-group" v-if="fogEnabled">
          <label for="fog-color">Fog Color:</label>
          <input
            type="color"
            id="fog-color"
            v-model="fogColor"
            class="color-picker"
          />
        </div>
      </div>

      <div class="control-section">
        <h4>Shadow Quality</h4>

        <div class="control-group radio-group">
          <label class="radio-label">
            <input type="radio" v-model="shadowQuality" value="low" />
            <span>Low</span>
          </label>
          <label class="radio-label">
            <input type="radio" v-model="shadowQuality" value="medium" />
            <span>Medium</span>
          </label>
          <label class="radio-label">
            <input type="radio" v-model="shadowQuality" value="high" />
            <span>High</span>
          </label>
        </div>
      </div>

      <div class="control-section">
        <h4>Light Settings</h4>

        <div class="control-group">
          <label for="ambient-light">Ambient Light: {{ ambientLightIntensity.toFixed(2) }}</label>
          <input
            type="range"
            id="ambient-light"
            v-model.number="ambientLightIntensity"
            min="0"
            max="1"
            step="0.05"
            class="slider"
          />
        </div>

        <div class="control-group">
          <label for="directional-light">Directional Light: {{ directionalLightIntensity.toFixed(2) }}</label>
          <input
            type="range"
            id="directional-light"
            v-model.number="directionalLightIntensity"
            min="0"
            max="2"
            step="0.05"
            class="slider"
          />
        </div>

        <div class="control-group">
          <label for="spot-light">Spot Light: {{ spotLightIntensity.toFixed(2) }}</label>
          <input
            type="range"
            id="spot-light"
            v-model.number="spotLightIntensity"
            min="0"
            max="2"
            step="0.05"
            class="slider"
          />
        </div>
      </div>

      <div class="control-section">
        <h4>Other Settings</h4>

        <div class="control-group">
          <label class="toggle-label">
            <input type="checkbox" v-model="showHelpers" />
            <span class="toggle-text">Show Light Helpers</span>
          </label>
        </div>

        <div class="control-group">
          <label class="toggle-label">
            <input type="checkbox" v-model="animateObjects" />
            <span class="toggle-text">Animate Shapes</span>
          </label>
        </div>
      </div>

      <div class="instructions">
        <p>• Drag to rotate the view</p>
        <p>• Scroll to zoom in/out</p>
        <p>• Right-click drag to pan</p>
      </div>
    </div>
  </div>
</template>

<style scoped>
.scene-container {
  position: relative;
  width: 100%;
  height: 100vh;
}

.three-container {
  width: 100%;
  height: 100%;
}

.close-button {
  position: absolute;
  top: 20px;
  right: 20px;
  background-color: rgba(255, 255, 255, 0.8);
  border: none;
  border-radius: 4px;
  padding: 8px 16px;
  cursor: pointer;
  z-index: 10;
}

.close-button:hover {
  background-color: rgba(255, 255, 255, 1);
}

.controls-container {
  position: absolute;
  top: 20px;
  left: 20px;
  background-color: rgba(0, 0, 0, 0.7);
  color: white;
  border-radius: 8px;
  padding: 16px;
  width: 300px;
  max-height: 90vh;
  overflow-y: auto;
  display: flex;
  flex-direction: column;
  gap: 10px;
  z-index: 10;
}

.controls-container h3 {
  margin: 0 0 10px 0;
  text-align: center;
  color: #42b883;
}

.control-section {
  border-bottom: 1px solid rgba(255, 255, 255, 0.2);
  padding-bottom: 10px;
  margin-bottom: 10px;
}

.control-section:last-child {
  border-bottom: none;
  padding-bottom: 0;
  margin-bottom: 0;
}

.control-section h4 {
  margin: 0 0 10px 0;
  color: #4283b8;
  font-size: 1em;
}

.control-group {
  margin-bottom: 10px;
}

.control-group:last-child {
  margin-bottom: 0;
}

.slider {
  width: 100%;
  cursor: pointer;
}

.color-picker {
  width: 100%;
  height: 30px;
  border: none;
  border-radius: 4px;
  cursor: pointer;
}

.toggle-label {
  display: flex;
  align-items: center;
  cursor: pointer;
}

.toggle-label input {
  margin-right: 8px;
}

.radio-group {
  display: flex;
  justify-content: space-between;
}

.radio-label {
  display: flex;
  align-items: center;
  cursor: pointer;
}

.radio-label input {
  margin-right: 4px;
}

.instructions {
  margin-top: 15px;
  font-size: 0.85em;
  color: #ccc;
}

.instructions p {
  margin: 5px 0;
}
</style>
Setting Up the Three.js Environment
First, we need to set up our basic Three.js environment. This involves creating a scene, camera, renderer, and adding some basic controls:
// Initial setup of core Three.js components
const init = () => {
  if (!containerRef.value) return;

  // Create scene
  scene = new THREE.Scene();
  scene.background = new THREE.Color(0x222233);  // Dark blue-gray background

  // Setup fog (we'll initialize it based on user preferences)
  updateFog();

  // Create camera with appropriate field of view and frustum
  camera = new THREE.PerspectiveCamera(
    75,                                         // Field of view (in degrees)
    window.innerWidth / window.innerHeight,     // Aspect ratio
    0.1,                                        // Near clipping plane
    100                                         // Far clipping plane
  );
  camera.position.set(0, 5, 10);                // Position camera above and away from center

  // Create WebGL renderer with antialiasing for smoother edges
  renderer = new THREE.WebGLRenderer({ antialias: true });
  renderer.setSize(window.innerWidth, window.innerHeight);

  // This line enables shadow mapping in the renderer - critical first step!
  renderer.shadowMap.enabled = true;

  // Apply shadow quality settings based on user preferences
  updateShadowQuality();

  containerRef.value.appendChild(renderer.domElement);

  // Add OrbitControls for camera manipulation with mouse/touch
  controls = new OrbitControls(camera, renderer.domElement);
  controls.enableDamping = true;        // Adds inertia to camera movement
  controls.dampingFactor = 0.05;        // Controls the smoothness of the inertia

  // Build our scene elements
  createFloor();
  createObjects();
  createLights();

  // Handle window resize events
  window.addEventListener('resize', onWindowResize);

  // Start animation loop...
}
Creating Animated Objects
Animation brings our scene to life and helps demonstrate how shadows interact with moving objects:
// Animation loop with dynamic shadows and lighting
const animate = () => {
  animationFrameId = requestAnimationFrame(animate);

  if (animateObjects.value) {
    // Animate each shape with slightly different speeds for variety
    shapes.forEach((shape, index) => {
      // Increasing rotation speed for each object
      const speed = 0.01 + (index * 0.005);
      shape.rotation.x += speed;
      shape.rotation.y += speed * 0.8;

      // Make shapes hover up and down with sine wave motion
      // Note how this affects the cast shadows dynamically
      const time = Date.now() * 0.001;           // Convert to seconds and slow down
      const offset = index * (Math.PI / 4);      // Offset each object in the wave
      shape.position.y = 1 + Math.sin(time + offset) * 0.5;  // Oscillate around y=1
    });

    // Animate spotlight in a circular motion to show dynamic lighting
    if (spotLight) {
      const time = Date.now() * 0.0005;
      const radius = 5;

      // Circular motion in the xz plane
      spotLight.position.x = Math.sin(time) * radius;
      spotLight.position.z = Math.cos(time) * radius;

      // Slight up/down motion
      spotLight.position.y = 5 + Math.sin(time * 2) * 1;

      // Always point the spotlight at the center of the scene
      // This creates dynamic, moving shadows as the light shifts
      spotLight.target.position.set(0, 0, 0);
      spotLight.target.updateMatrixWorld();

      // Keep the helper visualization in sync with the light
      if (spotLightHelper) {
        spotLightHelper.update();
      }
    }
  }

  // Apply damping effect for smoother camera motion
  controls.update();

  // Render the scene from the camera's perspective
  renderer.render(scene, camera);
};
Understanding Shadows in Three.js
Shadows in Three.js aren’t enabled by default and require proper configuration. Let’s explore how they work:
Shadow Maps
Three.js uses shadow maps to render shadows. When a light source is configured to cast shadows, the engine renders the scene from the light’s perspective to generate a depth map. This map is then used to determine which areas should be in shadow.
// Enable shadow mapping on the renderer
renderer.shadowMap.enabled = true;
renderer.shadowMap.type = THREE.PCFSoftShadowMap; // Default is PCFShadowMap
The shadow map is essentially a texture that represents the scene as “seen” from the light source. Areas visible to the light are illuminated, while areas obscured by objects are in shadow.
Shadow Map Types
Three.js offers different shadow map types, each with trade-offs between quality and performance:
- BasicShadowMap: Fast but low quality, with hard shadow edges
- PCFShadowMap: Smoother edges using Percentage Closer Filtering (default)
- PCFSoftShadowMap: Softer shadows with better quality but higher performance cost
- VSMShadowMap: Variance Shadow Maps, good for certain scenarios but can cause light bleeding
Here’s how we implement different shadow quality levels in our code:
const updateShadowQuality = () => {
  if (!renderer) return;

  switch (shadowQuality.value) {
    case 'low':
      // BasicShadowMap gives us hard-edged, pixelated shadows but at high performance
      renderer.shadowMap.type = THREE.BasicShadowMap;

      // Lower resolution shadow maps for improved performance
      if (directionalLight) {
        directionalLight.shadow.mapSize.width = 512;
        directionalLight.shadow.mapSize.height = 512;
      }
      if (spotLight) {
        spotLight.shadow.mapSize.width = 512;
        spotLight.shadow.mapSize.height = 512;
      }
      break;

    case 'medium':
      // PCFShadowMap gives smoother shadows with acceptable performance
      renderer.shadowMap.type = THREE.PCFShadowMap;

      // Medium resolution shadow maps
      if (directionalLight) {
        directionalLight.shadow.mapSize.width = 1024;
        directionalLight.shadow.mapSize.height = 1024;
      }
      if (spotLight) {
        spotLight.shadow.mapSize.width = 1024;
        spotLight.shadow.mapSize.height = 1024;
      }
      break;

    case 'high':
      // PCFSoftShadowMap gives the softest, most realistic shadows
      renderer.shadowMap.type = THREE.PCFSoftShadowMap;

      // High resolution shadow maps for the best quality
      if (directionalLight) {
        directionalLight.shadow.mapSize.width = 2048;
        directionalLight.shadow.mapSize.height = 2048;
      }
      if (spotLight) {
        spotLight.shadow.mapSize.width = 2048;
        spotLight.shadow.mapSize.height = 2048;
      }
      break;
  }

  // Force a refresh of the shadow maps
  renderer.shadowMap.needsUpdate = true;
};
Configuring Objects
For shadows to work, you need to explicitly set which objects cast shadows and which receive them:
// Object that casts a shadow
mesh.castShadow = true;

// Object that receives shadows from other objects
floor.receiveShadow = true;
In our scene, we set both properties for most objects so they can cast shadows onto the floor and onto each other:
const createObjects = () => {
  // Create different shapes with different materials
  const colors = [0xff4444, 0x44ff44, 0x4444ff, 0xffff44, 0xff44ff];
  const geometries = [
    new THREE.BoxGeometry(1.2, 1.2, 1.2),        // Cube
    new THREE.SphereGeometry(0.8, 32, 32),       // Sphere
    new THREE.TorusGeometry(0.7, 0.3, 16, 100),  // Torus (donut)
    new THREE.ConeGeometry(0.8, 1.5, 32),        // Cone
    new THREE.OctahedronGeometry(0.9, 0)         // Octahedron
  ];

  const names = ["Cube", "Sphere", "Torus", "Cone", "Octahedron"];

  for (let i = 0; i < 5; i++) {
    const material = new THREE.MeshStandardMaterial({
      color: colors[i],
      roughness: 0.7,  // Controls diffuse light scattering
      metalness: 0.2   // Controls reflectivity
    });

    const shape = new THREE.Mesh(geometries[i], material);
    shape.position.set((i - 2) * 2, 1, 0);  // Spread objects in a row

    // These two lines are critical for shadows to work!
    shape.castShadow = true;      // The object will cast shadows
    shape.receiveShadow = true;   // The object can show shadows from other objects

    shape.name = names[i];        // Add name for debugging

    scene.add(shape);
    shapes.push(shape);
  }

  // More object creation code...
};
The floor is particularly important as it primarily receives shadows from other objects:
const createFloor = () => {
  // Create a large floor plane
  const floorGeometry = new THREE.PlaneGeometry(20, 20);
  const floorMaterial = new THREE.MeshStandardMaterial({
    color: 0x444444,
    roughness: 0.8,
    metalness: 0.2
  });

  floor = new THREE.Mesh(floorGeometry, floorMaterial);

  // Rotate floor to lie flat on the xz plane
  floor.rotation.x = -Math.PI / 2;

  // The floor primarily receives shadows from other objects
  floor.receiveShadow = true;

  scene.add(floor);
};
Light Sources and Shadows
Not all light types in Three.js can cast shadows. In our demo:
- Directional Light: Casts parallel shadows (like sunlight)
- Spot Light: Casts cone-shaped shadows
- Ambient Light: Cannot cast shadows (provides global illumination)
Here’s how we set up our lights with shadow capabilities:
const createLights = () => {
  // Ambient light provides overall scene illumination without shadows
  ambientLight = new THREE.AmbientLight(0xffffff, ambientLightIntensity.value);
  scene.add(ambientLight);

  // Directional light (sun-like)
  directionalLight = new THREE.DirectionalLight(0xffffff, directionalLightIntensity.value);
  directionalLight.position.set(5, 10, 5);

  // Enable shadow casting for this light
  directionalLight.castShadow = true;

  // Configure shadow properties - these define the shadow map resolution
  // and the area that will be covered by the shadow camera
  directionalLight.shadow.mapSize.width = 1024;
  directionalLight.shadow.mapSize.height = 1024;

  // Shadow camera settings (orthographic for directional light)
  directionalLight.shadow.camera.near = 0.5;
  directionalLight.shadow.camera.far = 30;

  // Shadow camera frustum - must be large enough to contain all objects
  // that should cast shadows, but as small as possible for better resolution
  directionalLight.shadow.camera.left = -10;
  directionalLight.shadow.camera.right = 10;
  directionalLight.shadow.camera.top = 10;
  directionalLight.shadow.camera.bottom = -10;

  scene.add(directionalLight);

  // Add helper to visualize the light's position and direction
  directionalLightHelper = new THREE.DirectionalLightHelper(directionalLight, 1);
  directionalLightHelper.visible = showHelpers.value;
  scene.add(directionalLightHelper);

  // Spot light setup
  spotLight = new THREE.SpotLight(
    0xffffff,                  // Color
    spotLightIntensity.value,  // Intensity
    15,                        // Distance (how far the light reaches)
    Math.PI / 6,               // Angle (30 degrees)
    0.5,                       // Penumbra (softness of the edge)
    1                          // Decay (how quickly light diminishes with distance)
  );
  spotLight.position.set(0, 5, 0);

  // Enable shadow casting for the spotlight
  spotLight.castShadow = true;

  // Configure shadow properties
  spotLight.shadow.mapSize.width = 1024;
  spotLight.shadow.mapSize.height = 1024;
  spotLight.shadow.camera.near = 0.5;
  spotLight.shadow.camera.far = 20;

  // Add spotlight target - this determines where the spotlight points
  const spotLightTarget = new THREE.Object3D();
  spotLightTarget.position.set(0, 0, 0);
  scene.add(spotLightTarget);
  spotLight.target = spotLightTarget;

  scene.add(spotLight);

  // Spot light helper
  spotLightHelper = new THREE.SpotLightHelper(spotLight);
  spotLightHelper.visible = showHelpers.value;
  scene.add(spotLightHelper);
};
For shadow mapping to work properly, we need to pay special attention to the shadow camera’s frustum (the volume where shadows will be calculated). If an object is outside this frustum, it won’t cast shadows correctly.
Shadow Performance Tips
- Use appropriate shadow map sizes based on your needs (512 for low quality, 2048+ for high quality)
- Limit the number of shadow-casting lights (each additional light significantly increases render time)
- Configure shadow camera frustums to be as tight as possible around your scene
- Consider using shadow map cascades for large scenes with varying detail levels
- For mobile or low-power devices, consider disabling shadows or using the BasicShadowMap type
Implementing Fog in Three.js
Three.js supports two types of fog:
1. Linear Fog (THREE.Fog)
Linear fog increases linearly with distance and requires three parameters:
- Color
- Near (distance at which fog begins)
- Far (distance at which fog becomes completely opaque)
scene.fog = new THREE.Fog(color, near, far);
2. Exponential Fog (THREE.FogExp2)
Exponential fog increases exponentially with distance, creating a more realistic effect:
// The fog implementation in our demo
const updateFog = () => {
  if (fogEnabled.value) {
    // Parse the color from UI (hex string) to THREE.Color
    const color = new THREE.Color(fogColor.value);

    // Create exponential fog with the given color and density
    // Higher density values make the fog thicker
    scene.fog = new THREE.FogExp2(color, fogDensity.value);
  } else {
    // Remove fog when disabled
    scene.fog = null;
  }
};
Exponential fog is often more realistic as atmospheric density follows exponential patterns in nature. The density parameter controls how quickly objects fade into the fog with distance.
Fog Performance Tips
- Exponential fog (FogExp2) is slightly more efficient than linear fog
- Fog calculation is done per-vertex in some cases and per-pixel in others
- When using fog with complex shaders, the performance impact increases
- Test performance on lower-end devices to ensure smooth operation
Memory Management and Clean-up
In complex Three.js applications, proper resource disposal is crucial to prevent memory leaks:
const cleanup = () => {
  // Cancel any pending animation frames
  if (animationFrameId) {
    cancelAnimationFrame(animationFrameId);
  }

  // Remove event listeners
  window.removeEventListener('resize', onWindowResize);

  // Remove the renderer from the DOM
  if (containerRef.value && renderer) {
    containerRef.value.removeChild(renderer.domElement);
  }

  // Dispose of OrbitControls
  if (controls) {
    controls.dispose();
  }

  // Dispose of geometries and materials
  if (floor) {
    if (floor.geometry) floor.geometry.dispose();
    if (floor.material) {
      if (Array.isArray(floor.material)) {
        floor.material.forEach(m => m.dispose());
      } else {
        floor.material.dispose();
      }
    }
  }

  // Dispose of all shape resources
  shapes.forEach(shape => {
    if (shape.geometry) shape.geometry.dispose();
    if (shape.material) {
      if (Array.isArray(shape.material)) {
        shape.material.forEach(m => m.dispose());
      } else {
        shape.material.dispose();
      }
    }
  });
};
Conclusion
Shadows and fog are powerful tools for enhancing the realism and visual appeal of your Three.js applications. By mastering these effects, you can create more immersive and visually compelling 3D experiences on the web.
The interactive demo in this tutorial allows you to experiment with different settings and see their effects in real-time, helping you understand how to implement these features in your own projects.
Continue to the skeleton and character animation tutorial.