Building a Dynamic LangGraphJS React Chatbot
LangGraph React Chatbots combine the power of AI language models with interactive React components to create dynamic chat interfaces that go beyond simple text responses. This tutorial demonstrates how to build a chat application that renders specialized UI components like maps, quizzes, and weather displays directly in the conversation flow.
By the end of this tutorial, you’ll learn how to:
- Create a responsive React frontend for your chatbot
- Implement a proper LangGraph agent backend
- Build dynamic, interactive UI components
- Set up streaming responses for real-time interaction
- Connect your chatbot to OpenAI’s language models
Prerequisites
Before starting, ensure you have:
- Node.js (version 16 or higher)
- npm (Node Package Manager)
- Basic knowledge of React and TypeScript
- An OpenAI API key for LLM integration
To get started with either React to LangGraph.JS read our introductory guides:
LangGraph Architecture Overview
LangGraph builds on LangChain to create graph-based agents where:
- Nodes represent different processing steps or states
- Edges define transitions between states
- State persists information across transitions
Unlike simple chains, LangGraph allows for complex flow control, conditional branching, and cyclic execution patterns. In this tutorial, we use LangGraph to:
- Route user messages to appropriate handlers
- Generate dynamic UI components based on request content
- Maintain conversation context across interactions
Setting Up the Project Structure
Start by creating a new React application with TypeScript:
npx create-react-app langgraph-react-chatbot --template typescript
cd langgraph-react-chatbot
This command uses Create React App to scaffold a new TypeScript-based project. Create React App configures webpack, Babel, ESLint, and other build tools automatically, saving you from complex configuration. The TypeScript template adds type checking capabilities, helping catch errors during development rather than at runtime.
Environment Configuration
Create a .env file in the project root for API keys:
OPENAI_API_KEY=your-openai-api-key
Environment variables keep sensitive information like API keys out of your code repository. By storing your OpenAI API key in a .env file, you prevent exposing it publicly while making it available to your application. This file should be added to .gitignore to ensure it doesn’t get committed to version control.
Adding Styling with Tailwind CSS
Install and configure Tailwind CSS:
npm install -D tailwindcss@3 postcss autoprefixer
These commands install Tailwind CSS and its dependencies. Tailwind is a utility-first CSS framework that lets you build custom designs without writing custom CSS. We need to use version 3 of tailwindcss as LeafletJS doesn’t support version 4 yet.
Update tailwind.config.js:
module.exports = {
  content: [
    "./src/**/*.{js,jsx,ts,tsx}",
  ],
  theme: {
    extend: {},
  },
  plugins: [],
}
This configuration tells Tailwind which files to scan for class names. The content array specifies file patterns to search for Tailwind class usage. Tailwind then generates only the CSS needed for those classes, significantly reducing the final CSS file size. The theme.extend section allows you to customize Tailwind’s default design system.
Create postcss.config.js:
module.exports = {
  plugins: [
    require('tailwindcss'),
    require('autoprefixer'),
  ],
}
Add Tailwind directives to src/index.css:
@tailwind base;
@tailwind components;
@tailwind utilities;
These directives inject Tailwind’s base styles, component classes, and utility classes into your CSS. The base directive adds normalize.css-like resets, components adds pre-designed component classes, and utilities adds all the utility classes like flex, p-4, etc. PostCSS replaces these directives with the actual CSS during build.
Installing Required Dependencies
# Core dependencies for LangGraph integration
npm install @langchain/core @langchain/langgraph @langchain/langgraph-sdk @langchain/openai openai zod uuid dotenv

# Development dependencies
npm install -D @types/uuid ts-node

# UI component dependencies
npm install leaflet react-leaflet @types/leaflet axios
This installs several packages:
- LangChain packages provide the foundation for creating LLM applications
@langchain/langgraphenables graph-based agent construction@langchain/openaiprovides OpenAI model integrationszodhandles runtime data validationuuidgenerates unique identifiersdotenvloads environment variablesleafletandreact-leafletcreate interactive mapsaxiosmakes HTTP requests to external APIs- TypeScript definition packages (
@types/*) provide type information for libraries
Building a Basic Chatbot Interface
Start with a simple chatbot interface before adding complex functionality:
Creating the Basic Chatbot Component
Create src/Chatbot.tsx:
import React, { useState, useRef, useEffect } from 'react';
import { renderComponent } from './components';

interface Message {
  id: number;
  type: 'human' | 'assistant';
  content: string;
  ui?: {
    type: string;
    props: any;
  };
}

const Chatbot: React.FC = () => {
  const [inputValue, setInputValue] = useState('');
  const [messages, setMessages] = useState<Message[]>([]);
  const [isLoading, setIsLoading] = useState(false);
  const messagesEndRef = useRef<HTMLDivElement>(null);

  // Function to handle message submission
  const handleSubmit = async (e: React.FormEvent) => {
    e.preventDefault();
    if (inputValue.trim() === '') return;

    const userMessage: Message = {
      id: Date.now(),
      type: 'human',
      content: inputValue
    };

    setMessages(prev => [...prev, userMessage]);
    setInputValue('');
    setIsLoading(true);

    try {
      // Send request to the LangGraph agent server
      const response = await fetch('http://localhost:3001/invoke', {
        method: 'POST',
        headers: {
          'Content-Type': 'application/json'
        },
        body: JSON.stringify({
          messages: [{ role: 'human', content: userMessage.content }]
        })
      });

      if (!response.ok) {
        throw new Error(`Server responded with ${response.status}: ${response.statusText}`);
      }

      const data = await response.json();

      // Process the response
      if (data.messages && data.messages.length > 0) {
        // Get the assistant's response (last message)
        const assistantMessage = data.messages[data.messages.length - 1];

        if (assistantMessage.role === 'assistant') {
          setMessages(prev => [...prev, {
            id: Date.now(),
            type: 'assistant',
            content: assistantMessage.content,
            ui: assistantMessage.ui
          } as Message]);
        }
      }

    } catch (error) {
      console.error('Error sending message:', error);
      // Add an error message
      setMessages(prev => [...prev, {
        id: Date.now(),
        type: 'assistant',
        content: 'Sorry, I encountered an error processing your request.'
      } as Message]);
    } finally {
      setIsLoading(false);
    }
  };

  // Handle component-generated events
  const handleComponentEvent = async (message: string) => {
    // This function handles messages sent from components
    // as a result of user interactions like button clicks
    const userMessage: Message = {
      id: Date.now(),
      type: 'human',
      content: message
    };

    setMessages(prev => [...prev, userMessage]);
    setIsLoading(true);

    // Process the component-generated message like a regular user message
    try {
      const response = await fetch('http://localhost:3001/invoke', {
        method: 'POST',
        headers: { 'Content-Type': 'application/json' },
        body: JSON.stringify({
          messages: [{ role: 'human', content: message }]
        })
      });

      const data = await response.json();

      if (data.messages && data.messages.length > 0) {
        const assistantMessage = data.messages[data.messages.length - 1];

        if (assistantMessage.role === 'assistant') {
          setMessages(prev => [...prev, {
            id: Date.now(),
            type: 'assistant',
            content: assistantMessage.content,
            ui: assistantMessage.ui
          } as Message]);
        }
      }
    } catch (error) {
      console.error('Error processing component event:', error);
      setMessages(prev => [...prev, {
        id: Date.now(),
        type: 'assistant',
        content: 'Sorry, I encountered an error processing your request.'
      } as Message]);
    } finally {
      setIsLoading(false);
    }
  };

  // Auto-scroll to bottom when messages change
  useEffect(() => {
    messagesEndRef.current?.scrollIntoView({ behavior: 'smooth' });
  }, [messages]);

  return (
    <div className="flex flex-col h-screen bg-gray-100">
      <div className="p-4 bg-blue-600 text-white">
        <h1 className="text-xl font-bold">LangGraph Chatbot</h1>
      </div>

      <div className="flex-1 overflow-auto p-4">
        <div className="max-w-3xl mx-auto space-y-4">
          {messages.map((msg) => (
            <div key={msg.id}
                 className={`flex ${msg.type === 'human' ? 'justify-end' : 'justify-start'}`}>
              <div
                className={`p-3 rounded-lg max-w-xs md:max-w-md lg:max-w-lg ${
                  msg.type === 'human'
                    ? 'bg-blue-500 text-white'
                    : 'bg-white shadow'
                }`}>
                {/* Regular text content */}
                <p>{msg.content}</p>

                {/* Render UI component if present */}
                {msg.ui && (
                  <div className="mt-3">
                    {renderComponent(msg.ui.type, msg.ui.props, handleComponentEvent)}
                  </div>
                )}
              </div>
            </div>
          ))}
          <div ref={messagesEndRef} />
        </div>
      </div>

      <form onSubmit={handleSubmit} className="border-t bg-white p-4">
        <div className="max-w-3xl mx-auto flex">
          <input
            type="text"
            value={inputValue}
            onChange={(e) => setInputValue(e.target.value)}
            placeholder="Type your message..."
            disabled={isLoading}
            className="flex-1 border border-gray-300 rounded-l-lg px-4
            py-2 focus:outline-none focus:ring-2 focus:ring-blue-500"
          />
          <button
            type="submit"
            disabled={isLoading}
            className="bg-blue-600 text-white px-4 py-2 rounded-r-lg
              hover:bg-blue-700 focus:outline-none focus:ring-2
              focus:ring-blue-500 disabled:bg-blue-400"
          >
            {isLoading ? "Thinking..." : "Send"}
          </button>
        </div>
      </form>
    </div>
  );
};

export default Chatbot;
This component creates the chat interface with three main parts:
- State Management:
inputValue: Tracks the text input field valuemessages: Maintains chat history including both user and AI messagesisLoading: Indicates when the system is processing a request
- Event Handlers:
handleSubmit: Processes user text input, sends it to the backend, and handles the responsehandleComponentEvent: Processes events from UI components like button clicks, treating them as new user messages
- UI Rendering:
- Messages are displayed differently based on whether they’re from the human or AI
- The
renderComponentfunction dynamically renders UI components sent by the backend - Auto-scrolling keeps the newest messages visible
- A loading state prevents multiple submissions while waiting for responses
The component uses the fetch API to communicate with the LangGraph backend, sending user messages and receiving responses that may include both text and UI component specifications.
Update App Component
Replace the content in src/App.tsx:
import React from 'react';
import Chatbot from './Chatbot';
import './index.css';

const App: React.FC = () => {
  return (
    <div className="App">
      <Chatbot />
    </div>
  );
};

export default App;
This is a simple component that serves as the entry point for the React application. It imports and renders the Chatbot component we created earlier, making it the main interface of the app. It also imports the CSS file that contains our Tailwind directives. By keeping the App component minimal, we maintain a clear separation of concerns and make testing easier.
Creating Custom UI Components
Now, implement reusable UI components that the chatbot renders based on content type:
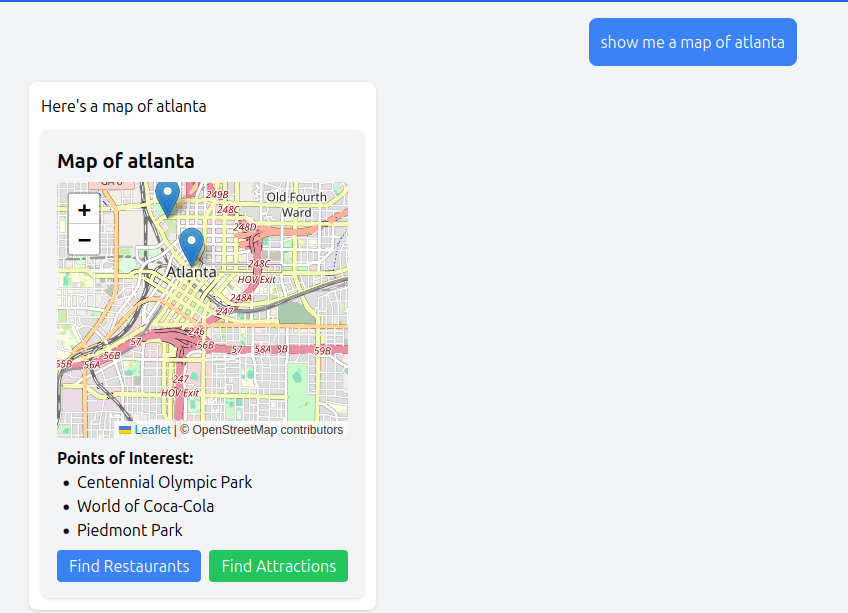
Map Component
Our Map component leverages LeafletJS. For more information on LeafletJS read our guide, LeafletJS article.
Create src/components/MapComponent.tsx:
import React, { useEffect, useRef } from 'react';
import 'leaflet/dist/leaflet.css';
import L from 'leaflet';

interface MapComponentProps {
  location: string;
  center: [number, number];
  zoom: number;
  points?: Array<{lat: number; lng: number; label: string}>;
  onEvent?: (message: string) => void;
}

const MapComponent: React.FC<MapComponentProps> = (props) => {
  const { location, center, zoom, points, onEvent } = props;
  const mapRef = useRef<HTMLDivElement>(null);
  const leafletMap = useRef<L.Map | null>(null);

  // Handle button clicks
  const handleButtonClick = (message: string) => {
    if (onEvent) {
      onEvent(message);
    }
  };

  // Initialize the map when component mounts
  useEffect(() => {
    if (mapRef.current && !leafletMap.current) {
      // Fix for Leaflet icon rendering in React
      delete (L.Icon.Default.prototype as any)._getIconUrl;
      L.Icon.Default.mergeOptions({
        iconRetinaUrl: require('leaflet/dist/images/marker-icon-2x.png'),
        iconUrl: require('leaflet/dist/images/marker-icon.png'),
        shadowUrl: require('leaflet/dist/images/marker-shadow.png'),
      });

      // Initialize the map
      leafletMap.current = L.map(mapRef.current).setView(center, zoom);

      // Add the OpenStreetMap tile layer
      L.tileLayer('https://{s}.tile.openstreetmap.org/{z}/{x}/{y}.png', {
        attribution: '© OpenStreetMap contributors'
      }).addTo(leafletMap.current);

      // Add markers for points of interest
      if (points) {
        points.forEach(point => {
          L.marker([point.lat, point.lng])
           .bindPopup(point.label)
           .addTo(leafletMap.current!);
        });
      }
    }

    // Cleanup function
    return () => {
      if (leafletMap.current) {
        leafletMap.current.remove();
        leafletMap.current = null;
      }
    };
  }, [center, zoom, points]);

  return (
    <div className="bg-gray-100 p-4 rounded-lg shadow">
      <h2 className="text-xl font-bold">Map of {location}</h2>
      <div
        ref={mapRef}
        className="h-64 w-full rounded mt-2"
      ></div>
      {points && points.length > 0 && (
        <div className="mt-2">
          <h3 className="font-semibold">Points of Interest:</h3>
          <ul className="list-disc pl-5">
            {points.map((point, i) => (
              <li key={i}>{point.label}</li>
            ))}
          </ul>
        </div>
      )}
      <div className="mt-2 flex space-x-2">
        <button
          onClick={() => handleButtonClick(`Show me restaurants near ${location}`)}
          className="px-3 py-1 bg-blue-500 text-white rounded hover:bg-blue-600"
        >
          Find Restaurants
        </button>
        <button
          onClick={() => handleButtonClick(`Show me attractions in ${location}`)}
          className="px-3 py-1 bg-green-500 text-white rounded hover:bg-green-600"
        >
          Find Attractions
        </button>
      </div>
    </div>
  );
};

export default MapComponent;
The MapComponent creates an interactive map using Leaflet, a popular open-source mapping library:
- Props and Refs:
- The component accepts location details, map center coordinates, zoom level, and optional points of interest
mapRefreferences the DOM element where the map will be renderedleafletMapmaintains a reference to the Leaflet map instance for cleanup
- Map Initialization:
- The
useEffecthook creates the map when the component mounts - Special configuration fixes Leaflet icon paths, which can break in React’s build system
- The map is configured with OpenStreetMap tiles and markers for points of interest
- A cleanup function removes the map when the component unmounts to prevent memory leaks
- The
- Interactive Features:
- Buttons allow users to request more information about the location
- The
handleButtonClickfunction sends new queries back to the main chat interface - Points of interest are displayed both as map markers and in a list below the map
This component demonstrates how dynamic UI elements can enhance a chat interface by visualizing geographical information and providing contextual interaction options.
Weather Component
Create src/components/WeatherComponent.tsx:
import React from 'react';

interface WeatherComponentProps {
  city: string;
  temperature: string;
  condition: string;
  icon: string;
  onEvent?: (message: string) => void;
}

const WeatherComponent: React.FC<WeatherComponentProps> = ({
  city,
  temperature,
  condition,
  icon,
  onEvent
}) => {
  // Handle button clicks
  const handleButtonClick = (message: string) => {
    if (onEvent) {
      onEvent(message);
    }
  };

  return (
    <div className="bg-blue-50 p-4 rounded-lg shadow-md">
      <h3 className="text-lg font-semibold mb-2">Weather for {city}</h3>
      <div className="flex items-center mb-3">
        <span className="text-3xl mr-3">{icon}</span>
        <div>
          <div className="text-xl font-medium">{temperature}</div>
          <div className="text-sm text-gray-600">{condition}</div>
        </div>
      </div>
      <div className="mt-2 flex space-x-2">
        <button
          onClick={() => handleButtonClick(`What's the forecast for ${city} this week?`)}
          className="px-3 py-1 bg-blue-500 text-white rounded hover:bg-blue-600"
        >
          Get Forecast
        </button>
        <button
          onClick={() => handleButtonClick(`What should I wear in ${city} today?`)}
          className="px-3 py-1 bg-green-500 text-white rounded hover:bg-green-600"
        >
          Clothing Advice
        </button>
      </div>
    </div>
  );
};

export default WeatherComponent;
The WeatherComponent displays weather information in a visually appealing card format:
- Simple State-Less Design:
- Unlike the Map component, this component doesn’t require complex initialization or cleanup
- It’s a functional component that renders based solely on its props
- Interactive Elements:
- Two buttons provide contextual follow-up actions related to weather information
- Clicking a button generates a new message that’s passed back to the main chat interface
- This creates a conversational flow where UI components lead to new interactions
- Visual Design:
- Weather information is presented with a weather icon, temperature, and condition
- The blue background creates visual differentiation from other component types
- Consistent styling with the rest of the application maintains a cohesive look and feel
This component shows how even simple UI elements can enhance the chat experience by presenting structured data in a readable format and providing contextual actions.
Quiz Component
Create src/components/QuizComponent.tsx:
import React, { useState } from 'react';

interface QuizComponentProps {
  question: string;
  options: string[];
  correctIndex: number;
  explanation?: string;
  onEvent?: (message: string) => void;
}

const QuizComponent: React.FC<QuizComponentProps> = ({
  question,
  options,
  correctIndex,
  explanation,
  onEvent
}) => {
  const [selectedIndex, setSelectedIndex] = useState<number | null>(null);
  const [showAnswer, setShowAnswer] = useState(false);

  // Handle button clicks
  const handleButtonClick = (message: string) => {
    if (onEvent) {
      onEvent(message);
    }
  };

  const handleCheck = () => {
    if (selectedIndex !== null) {
      setShowAnswer(true);
    }
  };

  return (
    <div className="bg-indigo-50 p-4 rounded-lg shadow-md">
      <h2 className="text-xl font-bold text-indigo-800">{question}</h2>

      <div className="mt-4 space-y-2">
        {options.map((option, index) => (
          <div
            key={index}
            onClick={() => !showAnswer && setSelectedIndex(index)}
            className={`p-3 rounded cursor-pointer border ${
              showAnswer
                ? index === correctIndex
                  ? 'bg-green-100 border-green-500'
                  : selectedIndex === index
                    ? 'bg-red-100 border-red-500'
                    : 'bg-white border-gray-300'
                : selectedIndex === index
                  ? 'bg-indigo-100 border-indigo-500'
                  : 'bg-white border-gray-300 hover:border-indigo-300'
            }`}
          >
            <div className="flex items-center">
              <div className={`w-6 h-6 rounded-full flex items-center justify-center mr-2 ${
                showAnswer
                  ? index === correctIndex
                    ? 'bg-green-500 text-white'
                    : selectedIndex === index
                      ? 'bg-red-500 text-white'
                      : 'bg-gray-200'
                  : selectedIndex === index
                    ? 'bg-indigo-500 text-white'
                    : 'bg-gray-200'
              }`}>
                {String.fromCharCode(65 + index)}
              </div>
              {option}
            </div>
          </div>
        ))}
      </div>

      {showAnswer && explanation && (
        <div className="mt-4 p-3 bg-blue-50 border border-blue-200 rounded">
          <p className="text-blue-800"><strong>Explanation:</strong> {explanation}</p>
        </div>
      )}

      <div className="mt-4 flex space-x-3">
        {!showAnswer ? (
          <button
            onClick={handleCheck}
            disabled={selectedIndex === null}
            className={`px-4 py-2 rounded text-white ${
              selectedIndex === null
                ? 'bg-gray-400 cursor-not-allowed'
                : 'bg-indigo-600 hover:bg-indigo-700'
            }`}
          >
            Check Answer
          </button>
        ) : (
          <button
            onClick={() => handleButtonClick("Give me another quiz question")}
            className="px-4 py-2 bg-indigo-600 text-white rounded hover:bg-indigo-700"
          >
            Next Question
          </button>
        )}
      </div>
    </div>
  );
};

export default QuizComponent;
The QuizComponent creates an interactive quiz experience with several key features:
- Local Component State:
selectedIndextracks which option the user has selectedshowAnswerdetermines whether to reveal the correct answer- This local state management makes the component self-contained and reusable
- Interactive Quiz Flow:
- Users click on an option to select their answer
- The Check Answer button validates their selection
- Color coding provides visual feedback (green for correct, red for incorrect)
- After answering, an explanation appears and the user can request another question
- Dynamic Styling:
- Complex conditional className logic changes the appearance based on selection state
- Letter indicators (A, B, C, D) are automatically generated for each option
- The component maintains different visual states for unanswered, selected, correct, and incorrect options
- Communication Pattern:
- When requesting a new question, the component sends a message through
onEventback to the main chat interface - This allows the quiz experience to continue as a natural part of the conversation
- When requesting a new question, the component sends a message through
This component demonstrates how interactive elements can create engaging experiences within a chat interface, providing immediate feedback and maintaining conversational context.
Typed Component Registry
Create src/components/index.tsx:
import React from 'react';
import MapComponent from './MapComponent';
import WeatherComponent from './WeatherComponent';
import QuizComponent from './QuizComponent';

// Define the component registry type for better type safety
type ComponentRegistry = {
  [key: string]: React.ComponentType<any>;
};

export const componentRegistry: ComponentRegistry = {
  MapComponent,
  WeatherComponent,
  QuizComponent
};

// Updated renderComponent function that passes the event handler
export function renderComponent(
  type: string,
  props: any,
  onEvent?: (message: string) => void
) {
  const Component = componentRegistry[type as keyof typeof componentRegistry];

  if (!Component) {
    console.error(`Component type "${type}" not found in registry`);
    return null;
  }

  // Pass the onEvent handler to the component
  return <Component {...props} onEvent={onEvent} />;
}
The component registry implements a pattern for dynamic component rendering:
- Registry Pattern:
- The
componentRegistryobject maps component names to their React component implementations - This pattern allows the system to reference components by name (as strings) at runtime
- New components can be added to the registry without changing the rendering logic
- The
- Type Safety:
- The
ComponentRegistrytype ensures all entries are valid React components - The
keyof typeof componentRegistrytype assertion ensures we only look up valid component names - TypeScript helps catch errors when accessing the registry with invalid component names
- The
- Dynamic Rendering:
- The
renderComponentfunction takes a component type, props, and an event handler - It looks up the corresponding component in the registry and renders it with the provided props
- Error handling prevents crashes when an unknown component type is requested
- The
- Event Propagation:
- The
onEventhandler is passed down to each rendered component - This creates a communication channel from dynamically rendered components back to the parent
- Components can trigger new messages in the conversation through this handler
- The
This pattern enables the server to specify not just what UI component to render, but also what properties and data it should display, creating a flexible and extensible system.
Setting Up the LangGraph Agent
Now, set up a proper LangGraph agent to process user messages and generate appropriate responses:
Create the LangGraph Agent Structure
mkdir -p src/agent
This command creates a directory structure for the agent code. Keeping the agent code in a dedicated directory separates concerns and makes the project structure clearer. The -p flag creates parent directories if they don’t exist.
Create Agent Types and State
Create src/agent/types.ts:
// Define the structure of messages in our agent state
export interface AgentState {
  messages: {
    role: 'human' | 'assistant';
    content: string;
    ui?: {
      type: string;
      props: any;
    };
  }[];
  map?: any;
}
This file defines TypeScript interfaces that structure the agent’s data:
- AgentState Interface:
- Represents the full state maintained by the LangGraph agent
messagesis an array of all messages in the conversationcontextis an optional object for storing additional information
Create Node Handlers
Node handlers are specialized functions that process specific types of user requests in our LangGraph agent. Each handler is responsible for generating appropriate responses and UI components for a particular domain (maps, weather, quizzes). These handlers form the core processing logic of our chatbot.
Create src/agent/handlers.ts:
import { AgentState } from './types.js';
import { ChatOpenAI } from '@langchain/openai';

// Initialize the LLM
const llm = new ChatOpenAI({
  temperature: 0.7,
  modelName: "gpt-3.5-turbo",
});

// Function to get map coordinates and points of interest using the LLM
const getMapCoordinates = async (location: string) => {
  const prompt = `
    I need the geographical coordinates and points of interest for ${location}.

    Your response should be in the following JSON format:
    {
      "center": [latitude, longitude],
      "zoom": 13,
      "points": [
        {"lat": latitude1, "lng": longitude1, "label": "Point of Interest 1"},
        {"lat": latitude2, "lng": longitude2, "label": "Point of Interest 2"},
        {"lat": latitude3, "lng": longitude3, "label": "Point of Interest 3"}
      ]
    }

    Make sure:
    1. The coordinates are accurate for the location
    2. The points array contains 2-4 major landmarks or points of interest
    3. The zoom level is appropriate (10-15 is good for cities)

    Return only the JSON object with no additional text.
  `;

  try {
    const response = await llm.invoke([
      {
        role: "system",
        content: "You are a helpful geographic information system that provides \
        accurate coordinates and points of interest for locations."
      },
      {
        role: "user",
        content: prompt
      }
    ]);

    // Parse the response to extract the JSON
    const content = response.content.toString();
    const jsonMatch = content.match(/```json\n([\s\S]*?)\n```/) ||
                      content.match(/{[\s\S]*}/);

    const jsonString = jsonMatch ? jsonMatch[1] || jsonMatch[0] : content;

    // Parse the JSON
    const mapData = JSON.parse(jsonString);

    return {
      center: mapData.center,
      zoom: mapData.zoom,
      points: mapData.points
    };
  } catch (error) {
    console.error("Error generating map coordinates:", error);
    // Fallback to default coordinates if there's an error
    return {
      center: [40.7128, -74.0060], // New York default
      zoom: 13,
      points: [
        { lat: 40.7484, lng: -73.9857, label: "Empire State Building" },
        { lat: 40.7580, lng: -73.9855, label: "Times Square" }
      ]
    };
  }
};

export const mapHandler = async ({ messages, map }: AgentState) => {
  const lastMessage = messages[messages.length - 1];

  // Extract location from message
  const locationMatch = lastMessage.content.match(/map of (.+)/i) ||
                        lastMessage.content.match(/show me (.+) map/i);
  const location = locationMatch ? locationMatch[1] : "New York";

  // Get coordinates and points of interest using the LLM
  const mapData = await getMapCoordinates(location);

  // Return the custom component
  return {
    map,
    messages: [...messages, {
      role: "assistant",
      content: `Here's a map of ${location}`,
      ui: {
        type: "MapComponent",
        props: {
          location,
          center: mapData.center,
          zoom: mapData.zoom,
          points: mapData.points
        }
      }
    }]
  };
};

export const weatherHandler = async ({ messages }: AgentState) => {
  const lastMessage = messages[messages.length - 1];

  // Extract city from message
  const cityMatch = lastMessage.content.match(/weather (?:in|for) (.+)/i);
  const city = cityMatch ? cityMatch[1] : "New York";

  return {
    messages: [...messages, {
      role: "assistant",
      content: `Here's the current weather for ${city}`,
      ui: {
        type: "WeatherComponent",
        props: {
          city,
          temperature: "72°F",
          condition: "Sunny",
          icon: "☀️ "
        }
      }
    }]
  };
};

// Function to generate a quiz question using the LLM
const generateQuizQuestion = async (topic: string) => {
  const prompt = `
    Generate a multiple-choice quiz question about ${topic}.

    Your response should be in the following JSON format:
    {
      "question": "The question text",
      "options": ["Option A", "Option B", "Option C", "Option D"],
      "correctIndex": 0, // Index of the correct answer (0-based)
      "explanation": "Explanation of why the answer is correct"
    }

    Make sure:
    1. The question is clear and educational
    2. All options are plausible but only one is correct
    3. The options are not labeled with A, B, C, D in the text
    4. The correctIndex is the 0-based index of the correct option
    5. The explanation is informative and explains why the answer is correct

    Return only the JSON object with no additional text.
  `;

  try {
    const response = await llm.invoke([
      {
        role: "system",
        content: "You are a helpful quiz generator that creates educational multiple-choice questions."
      },
      {
        role: "user",
        content: prompt
      }
    ]);

    // Parse the response to extract the JSON
    const content = response.content.toString();
    const jsonMatch = content.match(/```json\n([\s\S]*?)\n```/) ||
                      content.match(/{[\s\S]*}/);

    const jsonString = jsonMatch ? jsonMatch[1] || jsonMatch[0] : content;

    // Parse the JSON
    const quizData = JSON.parse(jsonString);

    return {
      question: quizData.question,
      options: quizData.options,
      correctIndex: quizData.correctIndex,
      explanation: quizData.explanation
    };
  } catch (error) {
    console.error("Error generating quiz question:", error);
    // Fallback to a default question if there's an error
    return {
      question: "What is the capital of France?",
      options: ["London", "Berlin", "Paris", "Madrid"],
      correctIndex: 2,
      explanation: "Paris is the capital and most populous city of France."
    };
  }
};

export const quizHandler = async ({ messages }: AgentState) => {
  const lastMessage = messages[messages.length - 1];

  // Extract topic from message
  const content = lastMessage.content.toLowerCase();
  let topic = "general knowledge"; // default topic

  // Try to identify a specific topic from the message
  const topicMatch = content.match(/quiz (?:about|on) (.+)/i) ||
                     content.match(/question (?:about|on) (.+)/i);

  if (topicMatch) {
    topic = topicMatch[1];
  } else if (content.includes('science')) {
    topic = 'science';
  } else if (content.includes('history')) {
    topic = 'history';
  } else if (content.includes('geography') || content.includes('capitals')) {
    topic = 'geography';
  } else if (content.includes('sports')) {
    topic = 'sports';
  } else if (content.includes('movies') || content.includes('films')) {
    topic = 'movies';
  } else if (content.includes('music')) {
    topic = 'music';
  } else if (content.includes('literature') || content.includes('books')) {
    topic = 'literature';
  }

  // Generate a quiz question using the LLM
  const quizQuestion = await generateQuizQuestion(topic);

  return {
    messages: [...messages, {
      role: "assistant",
      content: `Here's a quiz question about ${topic}:`,
      ui: {
        type: "QuizComponent",
        props: {
          ...quizQuestion
        }
      }
    }]
  };
};
This file implements the core processing logic of our LangGraph chatbot through several specialized handlers:
- LLM Configuration:
- The code initializes the OpenAI language model with appropriate parameters
- Error handling ensures the application can function even if API credentials are missing
- The
temperaturesetting (0.7) balances creativity and determinism in responses
- Map Handler:
- Extracts location information from user queries using regex pattern matching
- Utilizes the LLM to generate accurate geographical coordinates and points of interest
- Constructs a map UI component with the retrieved data
- Implements fallback to default coordinates (New York) if errors occur
- Weather Handler:
- Identifies city names in weather queries using regex patterns
- In a production version, this would call a weather API with the extracted city
- Returns a WeatherComponent with the appropriate properties
- Demonstrates how to structure component-specific data
- Quiz Handler:
- Uses both regex and keyword matching to identify quiz topics
- Leverages the LLM to generate educational multiple-choice questions
- Ensures questions have context-appropriate options and explanations
- Returns a QuizComponent with all required properties
- Default Handler:
- Processes general queries that don’t match specialized handlers
- Provides informative responses using the LLM
- Promotes discovery of the chatbot’s specialized capabilities
- Maintains conversation context by passing the message history
- Helper Functions:
getMapCoordinatesandgenerateQuizQuestionencapsulate LLM interactions- Both include structured prompting techniques to obtain specific formats
- Both implement robust error handling and sensible defaults
- Response parsing includes regex to handle various LLM output formats
- State Management Pattern:
- Each handler returns an updated state object with new messages
- The immutable update pattern (
{...state, messages: [...messages, newMessage]}) prevents side effects - This functional approach aligns with LangGraph’s state management principles
- Type safety is maintained through the
AgentStateinterface
- Error Handling Strategy:
- Every handler includes try/catch blocks to prevent crashes
- Error responses are user-friendly and suggest alternative actions
- Detailed error logging helps with debugging
- Fallback mechanisms ensure the conversation can continue even after errors
This modular design allows for easy extension – adding new handlers or enhancing existing ones requires minimal changes to the overall system. The pattern of extracting information, generating appropriate responses, and returning updated state objects provides a consistent approach across all handlers.
Create Agent Router
The router is a crucial component in our LangGraph agent architecture. It analyzes each user message and determines which specialized handler should process it. By implementing a routing mechanism, we enable the agent to respond with the appropriate UI component based on message content.
Create src/agent/router.ts:
import { AgentState } from './types.js';

export const routeMessage = async (state: AgentState): Promise<string> => {
  const lastMessage = state.messages[state.messages.length - 1];
  const content = lastMessage.content.toLowerCase();

  if (content.includes('map')) {
    return 'map_handler';
  } else if (content.includes('weather')) {
    return 'weather_handler';
  } else if (content.includes('quiz') || content.includes('question')) {
    return 'quiz_handler';
  } else {
    // For anything else, return a default node
    return 'default_handler';
  }
};
This routing function implements a simple yet effective message classification system:
- Message Extraction:
- The function first retrieves the most recent message from the state’s message array
- This focuses processing on just the user’s current request rather than the entire conversation history
- Content Analysis:
- The message content is converted to lowercase to enable case-insensitive keyword matching
- Simple
includes()checks determine the message intent (map request, weather query, etc.) - Multiple keywords can trigger the same handler (e.g., both “quiz” and “question” route to the quiz handler)
- Deterministic Routing:
- The function returns a string identifier that corresponds to node names in the LangGraph
- Each returned value matches a specific handler node registered in the graph
- The default handler catches any message that doesn’t match the defined categories
- Async Design:
- The function is async to allow for future enhancements like LLM-based classification
- This provides flexibility to incorporate more sophisticated routing techniques later
This pattern makes it easy to expand the chatbot’s capabilities by simply adding new keyword checks and corresponding handlers without modifying the core architecture.
Create Main LangGraph Agent Graph
The LangGraph agent graph defines the flow of conversation processing through different nodes and edges. It’s the core of our application’s intelligence, routing user messages to appropriate handlers and managing the conversation state.
Create src/agent/index.ts:
import { ChatOpenAI } from '@langchain/openai';
import { AgentState } from './types.js';
import { mapHandler, weatherHandler, quizHandler } from './handlers.js';

// Define the default response handler
const defaultHandler = async (state: AgentState) => {
  return {
    messages: [...state.messages, {
      role: 'assistant',
      content: "I can help you with maps, weather, and quizzes. Just ask \
      me something like 'Show me a map of Paris', 'What's the weather in \
      Seattle?', or 'Give me a quiz about capitals'."
    }]
  };
};

// Simple router function
const routeRequest = (input: any) => {
  const messages = input.messages || [];
  if (messages.length === 0) {
    return 'default';
  }

  const lastMessage = messages[messages.length - 1];
  const content = lastMessage.content.toLowerCase();

  if (content.includes('map')) {
    return 'map';
  } else if (content.includes('weather')) {
    return 'weather';
  } else if (content.includes('quiz') || content.includes('question')) {
    return 'quiz';
  } else {
    return 'default';
  }
};

// Export the handler function for use in the server
export const handler = async (input: any) => {
  try {
    const route = routeRequest(input);
    const state: AgentState = {
      messages: input.messages || []
    };

    let result;
    switch (route) {
      case 'map':
        result = await mapHandler(state);
        break;
      case 'weather':
        result = await weatherHandler(state);
        break;
      case 'quiz':
        result = await quizHandler(state);
        break;
      default:
        result = await defaultHandler(state);
        break;
    }

    return result;
  } catch (error) {
    console.error("Error processing request:", error);
    return {
      messages: [
        ...(input.messages || []),
        {
          role: 'assistant',
          content: "I'm sorry, I encountered an error processing your request."
        }
      ]
    };
  }
};

// Create a dummy graph object with an invoke method for compatibility
export const graph = {
  invoke: async (input: any, options?: any) => {
    return await handler(input);
  }
};
This code establishes the core architecture of our LangGraph agent:
- Graph Creation:
StateGraph<AgentState>creates a typed graph where nodes operate on our definedAgentStatetype- This ensures type safety throughout the graph’s operation
- The
builderpattern makes it easy to construct a complex graph incrementally
- Node Registration:
- Each specialized handler (
mapHandler,weatherHandler, etc.) is registered as a node in the graph - Each handler is a function that processes the state and returns an updated state
- The handlers are defined in a separate file for better code organization
- Each specialized handler (
- Edge Definition:
- Edges define the possible transitions between nodes
- In this simple graph, each handler leads to the
ENDnode, which terminates graph execution - More complex flows could have conditional edges that create multi-step processing
- Entry Point Configuration:
- The
routeMessagefunction determines which node to execute based on the user’s message - It analyzes the content and returns the name of the appropriate handler node
- This creates dynamic routing based on message intent
- The
- HTTP Request Handler:
- The
handlerfunction wraps the graph’s invoke method for HTTP server integration - It creates a proper state object from the request body
- Error handling ensures the server always returns a valid response, even when errors occur
- The
This graph architecture separates concerns by routing different types of requests to specialized handlers while maintaining shared state. The compiled graph optimizes execution flow and provides a unified interface through the invoke method.
Register UI Components for LangGraph
Create src/agent/ui.tsx:
// This file exports component mappings for LangGraph SDK
import MapComponent from '../components/MapComponent';
import QuizComponent from '../components/QuizComponent';
import WeatherComponent from '../components/WeatherComponent';

// This file exports the mapping between component types and React components
export default {
  MapComponent,
  WeatherComponent,
  QuizComponent
};
This file registers React components for use with the LangGraph SDK:
- Component Registration:
- Components are imported from their source files
- They’re exported in an object where keys match the component names used in the backend
- This mapping allows LangGraph to instantiate the correct component based on the response
- Integration with LangGraph SDK:
- The LangGraph SDK uses this mapping to render components in the UI
- When the backend specifies a component type, the SDK looks it up in this object
- The file follows a specific format expected by the SDK
This registration system creates a bridge between the backend’s component specifications and the frontend’s actual React components, ensuring they can be dynamically instantiated at runtime.
Setting Up the Server
Create a server to handle communication between the React frontend and LangGraph agent:
Create Server Implementation
Create src/agent/server.ts:
import http from 'http';
import { IncomingMessage, ServerResponse } from 'http';
import { ChatOpenAI } from '@langchain/openai';
import { CallbackManager } from '@langchain/core/callbacks/manager';
import { BaseCallbackHandler } from '@langchain/core/callbacks/base';
import { handler, graph } from './index.js';

// Parse request body
const getRequestBody = async (req: IncomingMessage): Promise<any> => {
  return new Promise((resolve) => {
    let body = '';
    req.on('data', (chunk) => {
      body += chunk.toString();
    });
    req.on('end', () => {
      try {
        resolve(JSON.parse(body));
      } catch (e) {
        resolve({});
      }
    });
  });
};

const sendEvent = (res: ServerResponse, event: any) => {
  res.write(`data: ${JSON.stringify(event)}\n\n`);
};

const server = http.createServer(async (req: IncomingMessage, res: ServerResponse) => {
  // Set CORS headers
  res.setHeader('Access-Control-Allow-Origin', '*');
  res.setHeader('Access-Control-Allow-Methods', 'POST, OPTIONS');
  res.setHeader('Access-Control-Allow-Headers', 'Content-Type');

  if (req.method === 'OPTIONS') {
    res.writeHead(200);
    res.end();
    return;
  }

  if (req.method === 'POST' && req.url === '/invoke') {
    // Handle standard (non-streaming) requests
    const body = await getRequestBody(req);

    try {
      const result = await handler(body);
      res.writeHead(200, { 'Content-Type': 'application/json' });
      res.end(JSON.stringify(result));
    } catch (error) {
      console.error('Error processing request:', error);
      res.writeHead(500, { 'Content-Type': 'application/json' });
      res.end(JSON.stringify({ error: 'An error occurred processing your request' }));
    }
  } else if (req.method === 'POST' && req.url === '/stream') {
    // Handle streaming requests
    const body = await getRequestBody(req);

    // Set headers for SSE
    res.writeHead(200, {
      'Content-Type': 'text/event-stream',
      'Cache-Control': 'no-cache',
      'Connection': 'keep-alive'
    });

    try {
      // For streaming, we'll just use the regular handler and stream the result
      const result = await handler(body);

      // Send the start event
      sendEvent(res, { type: 'start' });

      // Send the result as a token
      sendEvent(res, {
        type: 'token',
        token: JSON.stringify(result)
      });

      // Send the end event and close the connection
      sendEvent(res, { type: 'end' });
      res.end();
    } catch (error) {
      console.error('Error processing stream:', error);
      sendEvent(res, { type: 'error', error: 'An error occurred processing your request' });
      res.end();
    }
  } else {
    res.writeHead(404, { 'Content-Type': 'application/json' });
    res.end(JSON.stringify({ error: 'Not found' }));
  }
});

const PORT = process.env.PORT || 3001;
server.listen(PORT, () => {
  console.log(`Server listening on port ${PORT}`);
});
The server implementation is intentionally lightweight, using only Node.js core modules for simplicity. For production applications, you might consider using a framework like Express for more robust request handling.
Create LangGraph Configuration
Create langgraph.json in the root directory:
{
  "node_version": "20",
  "graphs": {
    "agent": "./src/agent/index.ts:graph"
  },
  "ui": {
    "agent": "./src/agent/ui.tsx"
  }
}
This configuration file defines how LangGraph SDK integrates with the application:
- Environment Configuration:
node_versionspecifies which Node.js version to use
- Graph Registration:
- The
graphsobject maps names to exported graph objects - The path format
./src/agent/index.ts:graphpoints to thegraphexport from the index.ts file - This allows the LangGraph SDK to find and load the agent graph
- The
- UI Component Registration:
- The
uiobject maps graph names to their corresponding UI component mapping files - This tells LangGraph where to find the React components for rendering responses
- The
This configuration file is used by LangGraph SDK tools to deploy and manage the agent, providing a standardized way to define the relationship between server-side logic and client-side components.
Running the Application
Set up scripts to run the application:
Update package.json with Scripts
"scripts": {
  "start": "react-scripts start",
  "build": "react-scripts build",
  "start:agent": "node --loader ts-node/esm src/agent/server.ts",
  "build:agent": "rm -rf dist && tsc -p tsconfig.agent.json",
  "dev": "concurrently \"npm run start\" \"npm run start:agent\"",
}
We also need to set "type": "module" in the package.json
npm i -D concurrently
Install concurrently if you want to run npm dev.
These npm scripts streamline development and deployment workflows:
- Development Scripts:
start: Runs the React frontend development serverstart:agent: Runs the LangGraph agent serverdev: Runs both servers concurrently for local development
- Build Scripts:
build: Compiles the React app for productionbuild:agent: Compiles the TypeScript agent code for production
- Workflow Integration:
- Running
npm run devlaunches both the frontend and backend in development mode - This simplifies the development workflow by using a single command
- The
concurrentlypackage runs multiple npm scripts in parallel
- Running
These scripts make it easier to manage the different components of the application during both development and production deployment.
Create Agent TypeScript Config
Create tsconfig.agent.json in the root directory:
{
  "compilerOptions": {
    "target": "ES2020",
    "module": "NodeNext",
    "moduleResolution": "NodeNext",
    "esModuleInterop": true,
    "outDir": "dist",
    "strict": true,
    "skipLibCheck": true
  },
  "include": ["src/agent/**/*"]
}
This TypeScript configuration is specific to the agent code:
- Modern JavaScript Target:
target: "ES2020"compiles to modern JavaScript for Node.js environments- This allows use of newer JavaScript features like optional chaining and nullish coalescing
- Module System:
module: "NodeNext"andmoduleResolution: "NodeNext"use Node.js’s native ESM system- This aligns with modern Node.js practices and enables better tree-shaking
- Strict Type Checking:
strict: trueenables all strict type-checking options- This catches more potential errors during compilation
- Output Configuration:
outDir: "dist"places compiled JavaScript files in the dist directoryincluderestricts compilation to only files in the agent directory
Having a separate TypeScript configuration for the agent code allows for different compilation settings from the React frontend, optimizing each part of the application for its specific environment.
Run the Application
- Start both the frontend and backend:
npm run dev
- Or run them separately:
# Terminal 1 - Start the agent server
npm run start:agent

# Terminal 2 - Start the React application
npm start
- Access the application at http://localhost:3000
These commands start the application in development mode:
- Combined Startup:
npm run devstarts both the frontend and backend servers concurrently- This is the simplest way to run the entire application during development
- Separate Startup:
- Running the servers separately provides more control and clearer logging
- The agent server runs on port 3001 by default
- The React application runs on port 3000 by default
- Browser Access:
- Once running, the application is accessed through the browser
- The frontend communicates with the backend via API calls
- The typical development workflow involves making changes, seeing them reflected in real time, and interacting with the application to test functionality
This development setup provides a smooth experience with hot reloading for both frontend and backend code changes.
Conclusion
You’ve now built a dynamic, component-based chatbot that combines the power of React for the frontend and LangGraph for the backend. This architecture enables your chatbot to go beyond simple text responses by offering interactive UI components that enhance user engagement.
This implementation provides:
- Dynamic UI Components: The chatbot can render maps, weather displays, quizzes, and potentially any React component
- LangGraph Integration: Properly structured LangGraph agent with state management and routing logic
- Type Safety: TypeScript types throughout for better code quality
- Error Handling: Comprehensive error handling in both the UI and agent
- Testing Support: Component testing structure to ensure reliability
The modular design makes it easy to add new component types as your application’s needs grow, while the LLM integration provides intelligent routing and response generation for a natural conversation experience.