Javascript Programming bundling, calculator app, Chromium, cross-platform, desktop application, Electron, electron-builder, installers, javascript, Linux, macOS, Node.js, npm, packaging, react, React components, responsive design, state management, Tutorial, UI components, web technologies, Windows Craig 0 Comments
Creating a React Calculator App and Converting it to an Electron Desktop Application
Introduction
In this blog post, we’ll walk through the process of creating a React Calculator App and converting it into an Electron Desktop Application. This journey will take us from setting up a basic React project to packaging a fully functional desktop application that can run on various operating systems.
Setting Up Your React Calculator App
First, let’s create our React project:
npx create-react-app calculator-app
cd calculator-app
Now, let’s replace the contents of src/App.js with our calculator code:
import React, { useState } from 'react';
import './App.css';

function App() {
  const [display, setDisplay] = useState('0');
  const [previousValue, setPreviousValue] = useState(null);
  const [operation, setOperation] = useState(null);
  const [shouldResetDisplay, setShouldResetDisplay] = useState(false);

  const numberButtons = [7, 8, 9, 4, 5, 6, 1, 2, 3, 0];
  const operationButtons = ['+', '-', '*', '/'];

  const handleNumberClick = (number) => {
    if (display === '0' || shouldResetDisplay) {
      setDisplay(number.toString());
      setShouldResetDisplay(false);
    } else {
      setDisplay(display + number.toString());
    }
  };

  const handleOperationClick = (op) => {
    if (previousValue === null) {
      setPreviousValue(parseFloat(display));
    } else if (operation) {
      const result = calculate(previousValue, parseFloat(display), operation);
      setPreviousValue(result);
      setDisplay(result.toString());
    }
    setOperation(op);
    setShouldResetDisplay(true);
  };

  const handleEqualsClick = () => {
    if (previousValue !== null && operation) {
      const result = calculate(previousValue, parseFloat(display), operation);
      setDisplay(result.toString());
      setPreviousValue(null);
      setOperation(null);
    }
  };

  const handleClearClick = () => {
    setDisplay('0');
    setPreviousValue(null);
    setOperation(null);
    setShouldResetDisplay(false);
  };

  const calculate = (a, b, operation) => {
    switch (operation) {
      case '+': return a + b;
      case '-': return a - b;
      case '*': return a * b;
      case '/': return a / b;
      default: return b;
    }
  };

  return (
    <div className="calculator">
      <div className="display">{display}</div>
      <div className="buttons">
        <div className="numbers">
          {numberButtons.map((num) => (
            <button key={num} onClick={() => handleNumberClick(num)}>{num}</button>
          ))}
          <button onClick={handleEqualsClick}>=</button>
        </div>
        <div className="operations">
          {operationButtons.map((op) => (
            <button key={op} onClick={() => handleOperationClick(op)}>{op}</button>
          ))}
          <button onClick={handleClearClick}>C</button>
        </div>
      </div>
    </div>
  );
}

export default App;
Now, let’s add some basic styling. Replace the contents of src/App.css with the following:
.calculator {
  width: 300px;
  margin: 50px auto;
  background-color: #f0f0f0;
  border-radius: 10px;
  padding: 20px;
  box-shadow: 0 0 10px rgba(0, 0, 0, 0.1);
}

.display {
  background-color: #fff;
  padding: 10px;
  font-size: 24px;
  text-align: right;
  margin-bottom: 10px;
  border-radius: 5px;
}

.buttons {
  display: flex;
}

.numbers {
  flex: 3;
  display: grid;
  grid-template-columns: repeat(3, 1fr);
  gap: 5px;
}

.operations {
  flex: 1;
  display: grid;
  grid-template-columns: 1fr;
  gap: 5px;
  margin-left: 5px;
}

button {
  padding: 10px;
  font-size: 18px;
  border: none;
  background-color: #e0e0e0;
  cursor: pointer;
  border-radius: 5px;
  transition: background-color 0.2s;
}

button:hover {
  background-color: #d0d0d0;
}

.operations button {
  background-color: #f0a030;
  color: white;
}

.operations button:hover {
  background-color: #e09020;
}

.numbers button:last-child {
  grid-column: span 3;
}
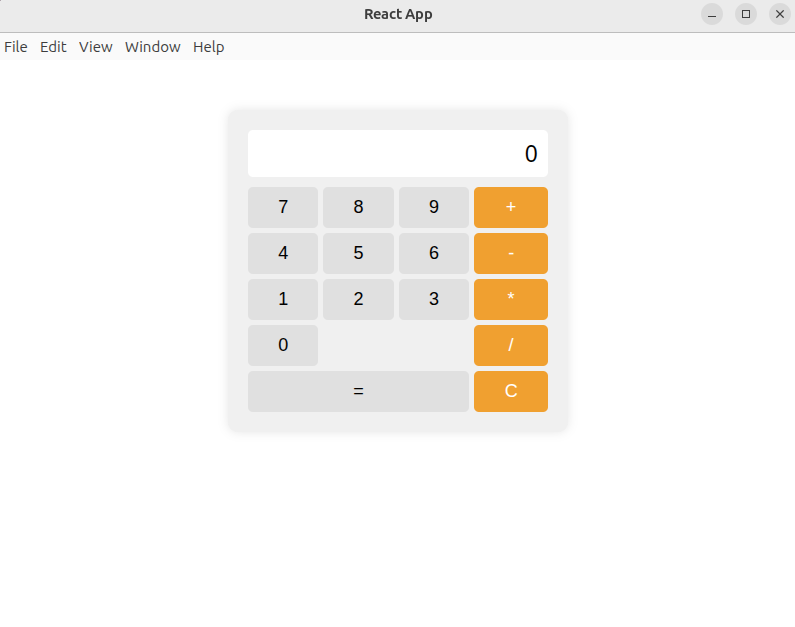
Testing Your Calculator App
Now that we have our React Calculator App code and styling in place, let’s test it to make sure everything is working correctly.
- Make sure you’re in your project directory:
cd calculator-app - Start the development server:
npm start - Your default web browser should open automatically and display your calculator app at
http://localhost:3000. If it doesn’t, you can manually open this URL in your browser. - Test the calculator functionality:
- Click on number buttons to input numbers
- Use the operation buttons (+, -, *, /) to perform calculations
- Press the equals (=) button to see the result
- Use the clear (C) button to reset the calculator
- Verify that the calculator works as expected:
- Numbers should appear on the display when clicked
- Operations should work correctly (e.g., 5 + 3 = 8, 10 – 4 = 6, etc.)
- The clear button should reset the display to 0
If everything is working correctly, you now have a fully functional React Calculator App ready for the next step: integrating with Electron.
Converting React App to Electron Desktop Application
When it comes to converting a React app to an Electron desktop application, the process may seem daunting at first. However, with the right guidance and tools, it can be a smooth transition that opens up a whole new world of possibilities for your app.
One of the main advantages of converting your React app to an Electron desktop application is the ability to package it as a standalone executable file that can be installed and run on users’ computers without needing a web browser. This can greatly improve the user experience and accessibility of your app.
Setting Up Electron
To get started with the conversion process, you will need to have a basic understanding of Electron and how it works. Electron is a framework that allows you to build cross-platform desktop applications using web technologies such as HTML, CSS, and JavaScript. It essentially combines the power of Node.js and Chromium to create desktop applications that can interact with the underlying operating system.
Setting up your React app to work with Electron involves a few key steps. First, you will need to install Electron as a dependency in your project. You can do this by running the following command in your project directory:
npm install electron concurrently cross-env wait-on --save-dev
If running on Debian/Ubuntu install the rpm package sudo apt-get install rpm
Creating the Main Electron File
Next, you will need to create a main Electron file that will serve as the entry point for your desktop application. This file will typically be named main.js and will contain code to create an Electron window and load your React app inside it. Here is an example of what a basic src/main.js file might look like:
const { app, BrowserWindow } = require('electron');
const path = require('path');
const url = require('url');

let mainWindow;

function createWindow() {
  mainWindow = new BrowserWindow({
    width: 800,
    height: 600,
    webPreferences: {
      nodeIntegration: true,
      contextIsolation: false
    }
  });

  mainWindow.loadURL(
    process.env.ELECTRON_START_URL ||
    url.format({
      pathname: path.join(__dirname, 'index.html'),
      protocol: 'file:',
      slashes: true
    })
  );

  mainWindow.on('closed', () => {
    mainWindow = null;
  });
}

app.on('ready', createWindow);

app.on('window-all-closed', () => {
  if (process.platform !== 'darwin') {
    app.quit();
  }
});

app.on('activate', () => {
  if (mainWindow === null) {
    createWindow();
  }
});
This code sets up a basic Electron window and loads your React app. The ELECTRON_START_URL environment variable allows you to load your React app from the development server during development.
Modifying Your React App for Electron
To ensure your React app works seamlessly with Electron, you’ll need to make a few modifications to your project.
Updating package.json
First, let’s update the package.json file to include scripts for running and building your Electron app. We also add the electron main script "main": "src/main.js". Finally we added description, license, author, and homepage which are required for building the electron app:
{
  "name": "calculator-app",
  "version": "0.1.0",
  "private": true,
  "description": "Calculator App",
  "license": "MIT",
  "author": {
    "name": "me",
    "email": "fake@example.com",
    "url": "http://localhost:3000"
  },
  "homepage": "http://localhost:3000",
  "dependencies": {
    "react": "^17.0.2",
    "react-dom": "^17.0.2",
    "react-scripts": "4.0.3"
  },
  "devDependencies": {
    "electron": "^13.0.0",
    "concurrently": "^6.2.0",
    "wait-on": "^5.3.0"
  },
  "main": "src/main.js",
  "scripts": {
    "start": "react-scripts start",
    "build": "react-scripts build",
    "test": "react-scripts test",
    "eject": "react-scripts eject",
    "electron:serve": "concurrently -k \"cross-env BROWSER=none npm start\" \"npm run electron:start\"",
    "electron:build": "npm run build && electron-builder -c.extraMetadata.main=build/electron.js",
    "electron:start": "wait-on tcp:3000 && electron ."
  },
  "eslintConfig": {
    "extends": [
      "react-app",
      "react-app/jest"
    ]
  },
  "browserslist": {
    "production": [
      ">0.2%",
      "not dead",
      "not op_mini all"
    ],
    "development": [
      "last 1 chrome version",
      "last 1 firefox version",
      "last 1 safari version"
    ]
  }
}
Creating an Electron Entry Point
Next, create a new file called electron.js in the public folder:
const path = require('path');
const { app, BrowserWindow } = require('electron');
const isDev = require('electron-is-dev');

function createWindow() {
  const win = new BrowserWindow({
    width: 800,
    height: 600,
    webPreferences: {
      nodeIntegration: true,
      contextIsolation: false,
    },
  });

  win.loadURL(
    isDev
      ? 'http://localhost:3000'
      : `file://${path.join(__dirname, '../build/index.html')}`
  );

  if (isDev) {
    win.webContents.openDevTools({ mode: 'detach' });
  }
}

app.whenReady().then(createWindow);

app.on('window-all-closed', () => {
  if (process.platform !== 'darwin') {
    app.quit();
  }
});

app.on('activate', () => {
  if (BrowserWindow.getAllWindows().length === 0) {
    createWindow();
  }
});
This file sets up the Electron application and loads your React app, either from the development server or from the built files.
Running Your Electron App
Now you can run your Electron app in development mode using:
npm run electron:serve
This command will start both your React development server and the Electron app.
Packaging and Distributing Your Calculator App
Now that you’ve successfully converted your React Calculator App into an Electron desktop application, it’s time to package and distribute it to your users. This process involves creating installers for different operating systems, which users can download and use to install your app on their computers.
Packaging Your App
To package your Electron app, we’ll use a popular tool called electron-builder. This tool simplifies the process of creating distributable packages for Windows, macOS, and Linux.
First, install electron-builder as a development dependency:
npm install electron-builder --save-dev
Next, add a build configuration to your package.json file:
{
  ...
  "build": {
    "appId": "com.yourcompany.calculator",
    "productName": "Calculator",
    "files": [
      "build/**/*",
      "node_modules/**/*"
    ],
    "directories": {
      "buildResources": "assets"
    },
    "mac": {
      "category": "public.app-category.utilities"
    },
    "win": {
      "target": [
        "nsis"
      ]
    },
    "linux": {
      "target": [
        "deb",
        "rpm",
        "AppImage"
      ],
      "category": "Utility"
    }
  }
}
This configuration tells electron-builder how to package your app for different platforms.
Building Your App
To build your app for distribution, run the following command:
npm run electron:build
This command will create a dist folder in your project directory containing the packaged app for your current operating system.
Customizing Your Installer
You can customize the installer by adding icons, license agreements, and other branding elements. For example, to add a custom icon:
- Create an
assetsfolder in your project root. - Add your icon files (e.g.,
icon.icofor Windows,icon.icnsfor macOS,icon.pngfor Linux). - Update the
buildconfiguration inpackage.json:
{
  ...
  "build": {
    ...
    "mac": {
      "icon": "assets/icon.icns"
    },
    "win": {
      "icon": "assets/icon.ico"
    },
    "linux": {
      "icon": "assets/icon.png"
    }
  }
}
Based on the blog post content, here’s a conclusion to wrap up your React calculator and Electron desktop application tutorial:
Conclusion
In this comprehensive guide, we’ve walked through the entire process of building a functional calculator app with React and transforming it into a cross-platform desktop application using Electron. We’ve covered several key aspects of the development process:
- Creating the React foundation – Building a calculator with proper state management, event handling, and CSS styling
- Integrating with Electron – Setting up the necessary configuration to bridge web and desktop technologies
- Development workflow – Establishing scripts that allow for efficient testing across environments
- Packaging and distribution – Using electron-builder to create installable packages for Windows, macOS, and Linux
- Customization options – Adding professional touches like custom icons and branding
This project demonstrates the power of combining React’s component-based architecture with Electron’s desktop capabilities. The result is an application that maintains the flexibility and developer experience of web technologies while providing the distribution and installation experience of native desktop software.
By following this approach, you can take virtually any React web application and convert it to a desktop experience, opening new channels for distributing your software to users who prefer or require desktop applications.