Programming Javascript 3D, 3D-programming, animation, CANNON.js, character-animation, collision-detection, game-development, GLTF, interactive-controls, lighting, physics-simulation, raycasting, real-time-rendering, shadows, skeletal-animation, three.js, typescript, Vue, web-development, WebGL Craig 0 Comments
Full 3D Scene Example with Three.js
Welcome to the final part of our Three.js tutorial series! In this comprehensive tutorial, we’ll tie together everything we’ve learned about Three.js and build a complete interactive 3D scene with:
- Character animation and movement
- Physics simulation
- Dynamic lighting
- Environmental effects
- Interactive controls
This example demonstrates how to combine various Three.js features into a cohesive application, showing how these individual components can work together to create an immersive 3D experience on the web. This is built upon the lessons of the previous tutorials:
- Getting Started with Three.js in Vue 3
- Three.js Lighting and Textures
- Physics and Collisions in Three.js
- Enhancing Three.js Scenes with Shadows and Fog
- Creating Three.js Characters with Skeletons
- Full 3D Scene Example with Three.js (this post)
Complete code for the series of blog posts is available on GitHub.
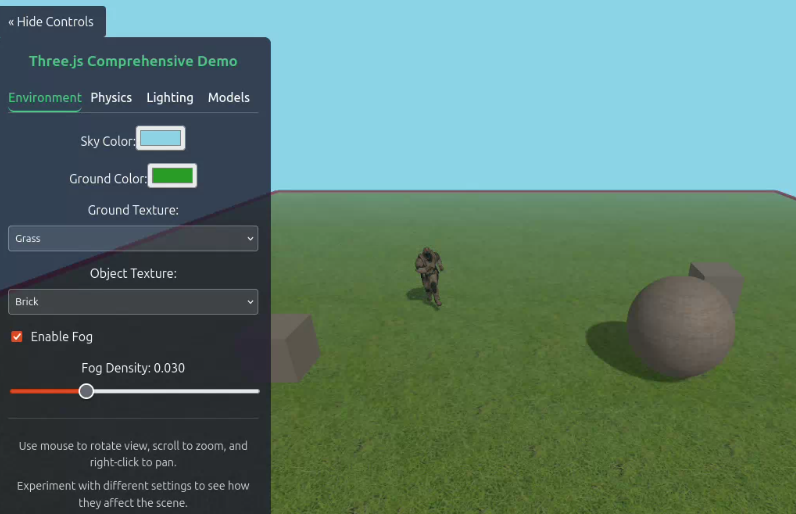
What We’re Going to Build
We’ll create a fully interactive 3D environment featuring:
- Animated Character: A 3D character that can walk, run, and jump with realistic animations
- Physics Simulation: Objects that fall, bounce, and collide realistically
- Dynamic Lighting: Configurable lights including ambient, directional, and spotlight
- Environmental Effects: Fog, shadows, and textured surfaces
- Interactive Controls: Camera controls and character movement
- User Interface: A control panel to modify scene parameters in real-time
This project builds on concepts from our previous tutorials:
- Shadows and fog from our environmental effects tutorial
- Skeletal animation from our character animation tutorial
- 3D rendering basics from our introduction to Three.js
Let’s dive into the implementation!
Setting Up the Project
Our project uses Vue.js for the UI and component structure, but the Three.js concepts apply to any framework or vanilla JavaScript. We’ll use:
- Three.js: Core 3D library
- CANNON.js: Physics engine
- GLTFLoader: For loading animated models
- OrbitControls: For camera manipulation
<script setup lang="ts">
import { onMounted, onBeforeUnmount, ref, watch } from 'vue';
import * as THREE from 'three';
import { OrbitControls } from 'three/examples/jsm/controls/OrbitControls';
import * as CANNON from 'cannon-es';
import { GLTFLoader } from 'three/examples/jsm/loaders/GLTFLoader';
import { DRACOLoader } from 'three/examples/jsm/loaders/DRACOLoader';

// Component state and variables
const containerRef = ref<HTMLDivElement | null>(null);
const loadingProgress = ref(0);
const isLoading = ref(true);
const activeTab = ref('environment');
const showControls = ref(true);

// Scene variables
let scene: THREE.Scene;
let camera: THREE.PerspectiveCamera;
let renderer: THREE.WebGLRenderer;
let controls: OrbitControls;
let animationFrameId: number;

// Physics world
let world: CANNON.World;
const timeStep = 1/60;

// Environment settings, physics settings, lighting, etc.
// ... (Various ref variables for UI controls)
Initializing the 3D Scene
The initialization process establishes our 3D environment and sets up all necessary components:
const init = async () => {
  if (!containerRef.value) return;

  // Create scene
  scene = new THREE.Scene();

  // Create camera with appropriate field of view and position
  camera = new THREE.PerspectiveCamera(
    75,                                      // Field of view (degrees)
    window.innerWidth / window.innerHeight,  // Aspect ratio
    0.1,                                     // Near clipping plane
    1000                                     // Far clipping plane
  );
  camera.position.set(0, 5, 10);  // Position slightly above and behind initial character position

  // Configure renderer with shadows enabled
  renderer = new THREE.WebGLRenderer({ antialias: true });
  renderer.setSize(window.innerWidth, window.innerHeight);
  renderer.shadowMap.enabled = true;
  renderer.shadowMap.type = THREE.PCFSoftShadowMap;  // Higher quality shadows
  containerRef.value.appendChild(renderer.domElement);

  // Add orbit controls for camera manipulation
  controls = new OrbitControls(camera, renderer.domElement);
  controls.enableDamping = true;  // Smooth camera movement

  // Setup physics world, environment, lights, ground, and load models
  setupPhysicsWorld();
  await loadTextures();
  setupEnvironment();
  setupLights();
  createGround();
  await loadModel();

  // Add initial physics objects to the scene
  addSphere(3, 8, 3, 1);
  addBox(5, 10, 0, 1, 1, 1);
  addBox(-5, 12, 3, 1, 1, 1);

  // Set up event handlers and start the animation loop
  window.addEventListener('resize', onWindowResize);
  animate();

  // Loading complete
  isLoading.value = false;
};
Physics World Integration
We use CANNON.js to handle physics simulation. This adds realistic movement and collisions to our objects:
const setupPhysicsWorld = () => {
  world = new CANNON.World({
    gravity: new CANNON.Vec3(0, gravityStrength.value, 0)  // Downward gravity
  });

  // Broad-phase collision detection algorithm for better performance
  world.broadphase = new CANNON.SAPBroadphase(world);

  // Allow objects to sleep when at rest (performance optimization)
  world.allowSleep = true;
};
This function creates the foundation for our physics simulation:
- Creating the World Object:
new CANNON.World()initializes the physics simulation environment- The
gravityproperty sets the gravitational force as a 3D vector (0, -Y, 0), meaning gravity pulls objects downward along the Y-axis gravityStrength.valueis a reactive variable that allows users to adjust gravity intensity through the UI
- Collision Detection Optimization:
SAPBroadphase(Sweep and Prune algorithm) is set as the broadphase collision detection method- Broadphase collision detection is the first step in determining which objects might be colliding
- This algorithm organizes objects along axes to quickly rule out pairs that cannot possibly collide, significantly improving performance in scenes with many objects
- Sleep States:
world.allowSleep = trueenables objects to “sleep” (become inactive in physics calculations) when they’ve been stationary for a while- This is a crucial optimization that reduces CPU usage, as the physics engine doesn’t waste cycles calculating physics for non-moving objects
Adding Physics Objects
Here’s how we add physics-enabled objects to our scene:
const addSphere = (x: number, y: number, z: number, radius: number) => {
  // Three.js visual sphere
  const sphereGeometry = new THREE.SphereGeometry(radius, 32, 32);

  // Create material based on selected texture
  let sphereMaterial: THREE.MeshStandardMaterial;

  if (selectedObjectTexture.value !== 'none' && textures[selectedObjectTexture.value]) {
    sphereMaterial = new THREE.MeshStandardMaterial({
      map: textures[selectedObjectTexture.value],
      roughness: 0.7,
      metalness: 0.3
    });
  } else {
    sphereMaterial = new THREE.MeshStandardMaterial({
      color: Math.random() * 0xffffff,  // Random color if no texture
      roughness: 0.7,
      metalness: 0.3
    });
  }

  // Create the visual sphere
  const sphereMesh = new THREE.Mesh(sphereGeometry, sphereMaterial);
  sphereMesh.position.set(x, y, z);
  sphereMesh.castShadow = true;
  sphereMesh.receiveShadow = true;
  scene.add(sphereMesh);

  // Create the physics sphere body
  const sphereShape = new CANNON.Sphere(radius);
  const sphereBody = new CANNON.Body({
    mass: 1,  // Mass affects physics behavior
    shape: sphereShape,
    position: new CANNON.Vec3(x, y, z),
    material: new CANNON.Material({ restitution: bounciness.value })
  });
  world.addBody(sphereBody);

  // Track objects for updating and cleanup
  meshes.push(sphereMesh);
  bodies.push(sphereBody);
  objectCount.value++;
};
This function demonstrates the dual-representation approach needed when using a physics engine with Three.js:
- Visual Representation (Three.js):
- Creates a sphere geometry and applies a material (textured or colored)
- Sets up shadow properties for realistic rendering
- Adds the mesh to the Three.js scene for visualization
- Physical Representation (CANNON.js):
- Creates a corresponding sphere shape in the physics engine
- Creates a physical body with properties like:
mass: Determines how the object responds to forces (0 would make it immovable)shape: The collision geometry (a sphere matching the visual representation)position: Initial position matching the visual spherematerial: Physics properties includingrestitution(bounciness)
- Adds the physics body to the CANNON.js world
- Tracking Objects:
- Stores references to both the mesh and body in arrays
- These references are used to:
- Synchronize positions between physics and visual objects
- Clean up resources when objects are removed
- Track how many objects exist in the scene
Character Animation and Control
The heart of our interactive experience is the animated character. It combines model loading, animation management, input handling, and collision detection to create lifelike character movement.
const loadModel = async () => {
  return new Promise<void>((resolve) => {
    // Set up DRACO loader for compressed models
    const dracoLoader = new DRACOLoader();
    dracoLoader.setDecoderPath('https://www.gstatic.com/draco/versioned/decoders/1.5.6/');

    // Set up GLTF loader with DRACO support
    const gltfLoader = new GLTFLoader();
    gltfLoader.setDRACOLoader(dracoLoader);

    // Load a glTF resource (soldier model with animations)
    gltfLoader.load(
      'https://threejs.org/examples/models/gltf/Soldier.glb',
      (gltf) => {
        character = gltf.scene;
        character.scale.set(1, 1, 1);
        character.position.set(characterPosition.value.x, characterPosition.value.y, characterPosition.value.z);

        // Set up shadows for all character mesh parts
        character.traverse((node) => {
          if (node instanceof THREE.Mesh) {
            node.castShadow = true;
            node.receiveShadow = true;
          }
        });
        scene.add(character);

        // Initialize animation system
        characterMixer = new THREE.AnimationMixer(character);
        mixers.push(characterMixer);

        // Map animation names to more readable ones and set up actions
        if (gltf.animations.length > 0) {
          const animationMap: Record<string, number> = {
            'idle': 0,  // Usually the first animation
            'walk': 1,  // Walking animation
            'run': 3    // Running animation
          };

          // Create actions for each animation
          Object.entries(animationMap).forEach(([name, index]) => {
            if (index < gltf.animations.length) {
              characterActions[name] = characterMixer.clipAction(gltf.animations[index]);
            }
          });

          // Play the idle animation by default
          if (characterActions['idle']) {
            characterActions['idle'].play();
          } else if (gltf.animations.length > 0) {
            const action = characterMixer.clipAction(gltf.animations[0]);
            action.play();
          }
        }

        // Set up keyboard controls
        setupCharacterControls();

        modelLoaded.value = true;
        loadingProgress.value += 20;
        resolve();
      },
      // Loading progress callback
      (xhr) => {
        const progress = (xhr.loaded / xhr.total) * 20;
        loadingProgress.value += progress - (loadingProgress.value % 20);
      },
      // Error callback
      (error) => {
        console.error('An error happened while loading the model:', error);
        resolve(); // Resolve anyway to continue
      }
    );
  });
};
This function handles several sophisticated processes:
- DRACO Decompression:
- DRACO is a library for compressing 3D meshes to reduce file size
- The DRACOLoader decompresses these models on the client side
- This significantly reduces download times for complex character models
- GLTF Loading:
- GLTF is the standard format for 3D models in web applications
- It includes not just geometry, but also materials, animations, and skeleton data
- The GLTFLoader processes this format, creating Three.js objects from the data
- Shadow Configuration:
- The
traverse()method walks through all nodes in the model hierarchy - It enables shadow casting and receiving on each mesh component of the character
- This ensures the character both casts shadows on the environment and receives shadows from other objects
- The
- Animation System Setup:
AnimationMixeris created to control animation playback- Each animation from the GLTF file is mapped to a named action for easier reference
- The mapping system uses indices to identify specific animations in the file
- This approach accommodates different character models with varying animation orders
- Initial Animation:
- The idle animation is played by default
- Fallback logic plays the first available animation if the expected idle animation isn’t found
- This ensures the character is never in a static pose
- Error Handling and Progress Tracking:
- Progress updates the UI loading indicator
- Error handling ensures the application continues even if character loading fails
- The Promise-based approach allows other initialization to continue in parallel
Character Movement System
The character movement system implements WASD-style controls with support for running, turning, and jumping:
const setupCharacterControls = () => {
  // Add keyboard event listeners
  window.addEventListener('keydown', handleKeyDown);
  window.addEventListener('keyup', handleKeyUp);
};

const handleKeyDown = (event: KeyboardEvent) => {
  switch (event.key.toLowerCase()) {
    case 'w':
      characterControls.value.moveForward = true;
      updateCharacterAnimation();
      break;
    case 's':
      characterControls.value.moveBackward = true;
      updateCharacterAnimation();
      break;
    case 'a':
      characterControls.value.moveLeft = true;
      updateCharacterAnimation();
      break;
    case 'd':
      characterControls.value.moveRight = true;
      updateCharacterAnimation();
      break;
    case 'q':
      characterControls.value.turnLeft = true;
      break;
    case 'e':
      characterControls.value.turnRight = true;
      break;
    case ' ': // Space bar
      if (!isJumping.value && isGrounded.value) {
        characterControls.value.jump = true;
        isJumping.value = true;
        isGrounded.value = false;
        jumpVelocity.value = jumpStrength.value;
        updateCharacterAnimation();
      }
      break;
    case 'shift':
      // Increase speed for running
      characterMovementSpeed.value = 0.15;
      updateCharacterAnimation();
      break;
  }
};
The movement system uses:
- State Tracking:
- Boolean flags track which keys are currently pressed
- This approach handles multiple simultaneous key presses correctly
- State is maintained in a reactive object allowing components to react to changes
- Conditional Jumping:
- Jump is only allowed when the character is grounded (not already in the air)
- Jump velocity is set based on configurable jump strength
- Physics state flags are updated to enable gravity calculations
- Speed Control:
- Shift key toggles between walking and running speeds
- Speed changes trigger animation updates to match the visual appearance with movement speed
- Animation Coupling:
- Each movement change calls
updateCharacterAnimation()to ensure animations match the movement state - This maintains synchronization between visual appearance and logical state
- Each movement change calls
Character Animation Management
To provide realistic movement, we switch between animations based on character state:
const updateCharacterAnimation = () => {
  if (!character || !characterMixer || Object.keys(characterActions).length === 0) return;

  // Determine which animation to play based on movement
  let newAnimation = 'idle';

  // If jumping, keep current animation
  if (isJumping.value) {
    return; // Keep current animation during jump
  }

  // Check if any movement keys are pressed
  if (characterControls.value.moveForward ||
      characterControls.value.moveBackward ||
      characterControls.value.moveLeft ||
      characterControls.value.moveRight) {

    // Use run animation if shift is pressed (higher movement speed)
    newAnimation = characterMovementSpeed.value > 0.1 ? 'run' : 'walk';
  }

  // Only change animation if it's different from current
  if (newAnimation !== currentAnimation.value) {
    // Fade out current animation
    if (characterActions[currentAnimation.value]) {
      characterActions[currentAnimation.value].fadeOut(0.2);
    }

    // Fade in new animation
    if (characterActions[newAnimation]) {
      characterActions[newAnimation].reset().fadeIn(0.2).play();
      currentAnimation.value = newAnimation;
    }
  }
};
This animation management system provides:
- Context-Aware Animation Selection:
- Automatically determines the appropriate animation based on character state
- Idle when stationary, walk or run when moving, based on speed
- Animation Persistence During Jumps:
- During jumps, the current animation is preserved
- This avoids animation conflicts during vertical movement
- Smooth Transitions:
- Uses Cross-fading between animations (0.2 seconds)
- Prevents jarring visual changes when movement state changes
reset()ensures the new animation starts from the beginningfadeIn(0.2)gradually increases the influence of the new animation
- Optimization:
- Only changes animations when necessary (skips if the new animation is the same as current)
- Performs early validation to avoid errors with missing components
Character Position Updates and Collision Detection
The character movement system includes collision detection to prevent walking through objects. First we’ll look at collision detection.
const checkCollision = (position: THREE.Vector3): boolean => {
  if (!character) return false;

  // Check collision with physics objects
  for (let i = 0; i < meshes.length; i++) {
    const mesh = meshes[i];
    const distance = position.distanceTo(mesh.position);

    // Simple sphere-sphere collision detection
    // Get the approximate radius of the object (assuming it's roughly spherical)
    let objectRadius = 0;

    if (mesh.geometry instanceof THREE.SphereGeometry) {
      objectRadius = mesh.geometry.parameters.radius;
    } else if (mesh.geometry instanceof THREE.BoxGeometry) {
      // For boxes, use half the maximum dimension as an approximation
      const params = mesh.geometry.parameters;
      objectRadius = Math.max(params.width, params.height, params.depth) / 2;
    } else {
      // Default radius for other geometries
      objectRadius = 0.5;
    }

    // Check if the distance is less than the sum of the radii
    if (distance < (characterCollider.radius + objectRadius)) {
      return true; // Collision detected
    }
  }

  return false; // No collision
};
This function implements a sphere-based collision detection approach:
- Distance Calculation:
- Measures the distance between the character’s position and each object in the scene
- Uses Three.js built-in
distanceTomethod for vector distance calculation
- Adaptive Radius Determination:
- Dynamically determines each object’s collision radius based on its geometry type
- For spheres, uses the exact sphere radius
- For boxes, uses half the maximum dimension (a sphere that would encompass the box)
- Falls back to a default radius for other geometry types
- Collision Testing:
- A collision occurs when the distance between objects is less than the sum of their radii
- This approach is known as “sphere-sphere collision detection”
- It’s a common technique that balances accuracy and performance
Now, let’s examine the movement system:
const updateCharacterPosition = (delta: number) => {
  if (!character) return;

  // Get character's forward direction (based on its rotation)
  const forward = new THREE.Vector3(0, 0, -1).applyQuaternion(character.quaternion);
  const right = new THREE.Vector3(1, 0, 0).applyQuaternion(character.quaternion);

  // Calculate movement vector based on key presses
  const moveVector = new THREE.Vector3(0, 0, 0);

  if (characterControls.value.moveForward) {
    moveVector.add(forward.clone().multiplyScalar(characterMovementSpeed.value));
  }
  if (characterControls.value.moveBackward) {
    moveVector.add(forward.clone().multiplyScalar(-characterMovementSpeed.value));
  }
  if (characterControls.value.moveRight) {
    moveVector.add(right.clone().multiplyScalar(characterMovementSpeed.value));
  }
  if (characterControls.value.moveLeft) {
    moveVector.add(right.clone().multiplyScalar(-characterMovementSpeed.value));
  }

  // Check if character is grounded
  isGrounded.value = checkGrounded();

  // Handle jumping and gravity
  if (isJumping.value) {
    // Apply jump velocity
    moveVector.y = jumpVelocity.value;

    // Apply gravity to jump velocity
    jumpVelocity.value -= gravity.value;

    // Check if we've landed
    if (character.position.y <= 0 && jumpVelocity.value < 0) {
      character.position.y = 0;
      isJumping.value = false;
      jumpVelocity.value = 0;
      isGrounded.value = true;
      updateCharacterAnimation();
    }

    // Check for ceiling collisions
    if (jumpVelocity.value > 0) {
      const ceilingCheckPosition = character.position.clone();
      ceilingCheckPosition.y += characterCollider.height/2 + 0.2;

      if (checkCollision(ceilingCheckPosition)) {
        jumpVelocity.value = 0;
      }
    }
  } else if (!isGrounded.value) {
    // Apply gravity when not jumping but in the air
    moveVector.y = -gravity.value * 2; // Falling is faster than jumping
  }

  // Apply movement if there's no collision
  if (moveVector.length() > 0) {
    // Calculate the new position
    const newPosition = character.position.clone().add(moveVector);

    // Check for collisions at the new position
    const collision = checkCollision(newPosition);

    if (!collision) {
      // No collision, safe to move
      character.position.copy(newPosition);
      characterPosition.value = {
        x: character.position.x,
        y: character.position.y,
        z: character.position.z
      };
    } else {
      // Implement sliding along walls by trying movement components separately
      const xMovement = new THREE.Vector3(moveVector.x, 0, 0);
      const zMovement = new THREE.Vector3(0, 0, moveVector.z);

      // Try X movement
      const newXPosition = character.position.clone().add(xMovement);
      if (!checkCollision(new THREE.Vector3(newXPosition.x, character.position.y, character.position.z))) {
        character.position.x = newXPosition.x;
      }

      // Try Z movement
      const newZPosition = character.position.clone().add(zMovement);
      if (!checkCollision(new THREE.Vector3(character.position.x, character.position.y, newZPosition.z))) {
        character.position.z = newZPosition.z;
      }

      // Apply vertical movement with collision checks
      const verticalPosition = character.position.clone();
      verticalPosition.y += moveVector.y;

      if (!checkCollision(verticalPosition)) {
        character.position.y = verticalPosition.y;
        isGrounded.value = checkGrounded();
      } else {
        // Handle collisions during jumps
        if (moveVector.y > 0) {
          jumpVelocity.value = 0;
        } else if (moveVector.y < 0) {
          isJumping.value = false;
          jumpVelocity.value = 0;
          isGrounded.value = true;
          updateCharacterAnimation();
        }
      }

      // Update position values for UI display
      characterPosition.value = {
        x: character.position.x,
        y: character.position.y,
        z: character.position.z
      };
    }
  }

  // Handle rotation
  if (characterControls.value.turnLeft) {
    character.rotateY(characterRotationSpeed.value);
  }
  if (characterControls.value.turnRight) {
    character.rotateY(-characterRotationSpeed.value);
  }
};
This section establishes how the character’s movement direction is calculated:
- Direction Vectors:
- Computes the character’s local forward and right directions based on its current rotation
- Uses quaternion rotation to properly transform the base direction vectors
- Movement Vector Calculation:
- Starts with a zero vector (no movement)
- Adds direction vectors based on which movement keys are pressed
- Scales each direction by the movement speed
- This approach allows for diagonal movement by combining directions
- Character-Relative Movement:
- The movement is always relative to the character’s facing direction
- When the character rotates, all movement directions rotate with it
- This creates an intuitive control scheme where “forward” always moves in the direction the character is facing
This implements an advanced collision resolution technique that dramatically improves the user experience:
- Collision-Free Movement:
- First attempts to move in the combined direction (all axes at once)
- If no collision is detected, performs the movement directly
- Component-Based Sliding:
- When a collision is detected, breaks the movement into its component directions (X, Z, Y)
- Tries each horizontal component (X and Z) separately
- This allows characters to “slide” along walls rather than stopping completely
- This technique is used in many professional games to create smooth movement around obstacles
- Specialized Vertical Collision Handling:
- Vertical movement (Y-axis) is handled separately from horizontal movement
- For upward collisions (hitting a ceiling while jumping), jump velocity is set to zero
- For downward collisions (landing on a surface), jumping state is reset and ground contact is established
- This approach creates realistic jumping and landing behavior
- State Synchronization:
- After all movement calculations, the character’s position values are synchronized with the UI
- This keeps the displayed character position information accurate
This movement and collision system forms the core of the character controller, enabling responsive, intuitive character movement within our 3D world while preventing impossible movements like walking through walls or falling through floors.
Environment Setup: Creating a Rich Visual Foundation
The environment setup is crucial for establishing the physical space where our character and objects will interact. The code below creates a visually appealing environment with a textured ground and clear boundary indicators:
const createGround = () => {
  // Three.js ground plane
  const groundGeometry = new THREE.PlaneGeometry(30, 30);

  // Create material based on selected texture
  let groundMaterial: THREE.MeshStandardMaterial;

  if (selectedGroundTexture.value !== 'none' && textures[selectedGroundTexture.value]) {
    groundMaterial = new THREE.MeshStandardMaterial({
      map: textures[selectedGroundTexture.value],
      roughness: 0.8,
      metalness: 0.2
    });
  } else {
    groundMaterial = new THREE.MeshStandardMaterial({
      color: new THREE.Color(groundColor.value),
      roughness: 0.8,
      metalness: 0.2
    });
  }

  const groundMesh = new THREE.Mesh(groundGeometry, groundMaterial);
  groundMesh.rotation.x = -Math.PI / 2;  // Rotate to be horizontal
  groundMesh.receiveShadow = true;       // Ground receives shadows
  scene.add(groundMesh);

  // Cannon.js ground body (infinite plane)
  const groundShape = new CANNON.Plane();
  const groundBody = new CANNON.Body({
    mass: 0,  // Mass of 0 makes it static (immovable)
    shape: groundShape
  });
  groundBody.quaternion.setFromEuler(-Math.PI / 2, 0, 0);  // Match rotation
  world.addBody(groundBody);

  // Add ground boundaries for visual reference
  const groundSize = 30;  // Same as the plane geometry size
  const edgeGeometry = new THREE.BoxGeometry(groundSize, 0.2, 0.2);
  const edgeMaterial = new THREE.MeshStandardMaterial({ color: 0xff0000 });

  // Create edges for the ground perimeter
  const edges = [
    { position: [0, 0, groundSize/2], rotation: [0, 0, 0], scale: [1, 1, 1] },
    { position: [0, 0, -groundSize/2], rotation: [0, 0, 0], scale: [1, 1, 1] },
    { position: [groundSize/2, 0, 0], rotation: [0, Math.PI/2, 0], scale: [1, 1, 1] },
    { position: [-groundSize/2, 0, 0], rotation: [0, Math.PI/2, 0], scale: [1, 1, 1] }
  ];

  edges.forEach(edge => {
    const edgeMesh = new THREE.Mesh(edgeGeometry, edgeMaterial);
    edgeMesh.position.set(edge.position[0], edge.position[1], edge.position[2]);
    edgeMesh.rotation.set(edge.rotation[0], edge.rotation[1], edge.rotation[2]);
    edgeMesh.scale.set(edge.scale[0], edge.scale[1], edge.scale[2]);
    edgeMesh.castShadow = true;
    edgeMesh.receiveShadow = true;
    scene.add(edgeMesh);
  });
};
This function creates a complete environment foundation with several important components:
1. Creating the Visual Ground
The first section creates the visible ground plane that objects will appear to rest on:
// Three.js ground plane
const groundGeometry = new THREE.PlaneGeometry(30, 30);
This creates a flat square with dimensions of 30×30 units. The size is deliberately chosen to:
- Provide enough space for character movement and object placement
- Define clear boundaries for the playable area
- Balance performance with visual quality
2. Implementing Texture Support
The ground’s appearance is enhanced with textures or color:
// Create material based on selected texture
let groundMaterial: THREE.MeshStandardMaterial;

if (selectedGroundTexture.value !== 'none' && textures[selectedGroundTexture.value]) {
  groundMaterial = new THREE.MeshStandardMaterial({
    map: textures[selectedGroundTexture.value],
    roughness: 0.8,
    metalness: 0.2
  });
} else {
  groundMaterial = new THREE.MeshStandardMaterial({
    color: new THREE.Color(groundColor.value),
    roughness: 0.8,
    metalness: 0.2
  });
}
This code:
- Checks if a texture is selected and available in the
texturesobject - Uses the selected texture if available, otherwise falls back to a solid color
- Sets physical material properties:
roughness: 0.8: Makes the surface mostly matte (non-reflective)metalness: 0.2: Gives a slight non-metallic quality (like concrete or dirt)
The texture system supports dynamically changing the ground appearance through the UI, allowing users to experiment with different environments.
3. Positioning and Shadow Setup
The ground plane is positioned and configured to interact with lighting:
const groundMesh = new THREE.Mesh(groundGeometry, groundMaterial);
groundMesh.rotation.x = -Math.PI / 2;  // Rotate to be horizontal
groundMesh.receiveShadow = true;       // Ground receives shadows
scene.add(groundMesh);
Key aspects:
- The plane is rotated 90 degrees (π/2 radians) to lie flat on the XZ plane
receiveShadow = trueenables the ground to display shadows cast by other objects- The mesh is added to the scene to make it visible
4. Physics Ground Integration
To support physics interactions, we create a corresponding CANNON.js ground plane:
// Cannon.js ground body (infinite plane)
const groundShape = new CANNON.Plane();
const groundBody = new CANNON.Body({
  mass: 0,  // Mass of 0 makes it static (immovable)
  shape: groundShape
});
groundBody.quaternion.setFromEuler(-Math.PI / 2, 0, 0);  // Match rotation
world.addBody(groundBody);
Important physics properties:
mass: 0makes the ground immovable (static)- Unlike the visual ground, the physics plane is infinite in size
- The rotation is matched to the visual ground using quaternions
- The body is added to the physics world so other objects can collide with it
Physics-based objects will react to this ground plane by:
- Bouncing or coming to rest when they fall
- Maintaining proper friction when they slide
- Preventing objects from falling through the “floor” of the scene
5. Visual Boundary Indicators
To help users perceive the limits of the ground plane (which is visually finite but physically infinite), we add clear border markers:
// Add ground boundaries for visual reference
const groundSize = 30;  // Same as the plane geometry size
const edgeGeometry = new THREE.BoxGeometry(groundSize, 0.2, 0.2);
const edgeMaterial = new THREE.MeshStandardMaterial({ color: 0xff0000 });

// Create edges for the ground perimeter
const edges = [
  { position: [0, 0, groundSize/2], rotation: [0, 0, 0], scale: [1, 1, 1] },
  { position: [0, 0, -groundSize/2], rotation: [0, 0, 0], scale: [1, 1, 1] },
  { position: [groundSize/2, 0, 0], rotation: [0, Math.PI/2, 0], scale: [1, 1, 1] },
  { position: [-groundSize/2, 0, 0], rotation: [0, Math.PI/2, 0], scale: [1, 1, 1] }
];
The boundaries are created using:
- Thin red box geometries that outline the perimeter of the ground plane
- Four edge segments positioned at the midpoints of each side of the ground square
- Rotations to correctly orient each edge along the perimeter
6. Boundary Creation Loop
We use a data-driven approach to create all four boundary indicators:
edges.forEach(edge => {
  const edgeMesh = new THREE.Mesh(edgeGeometry, edgeMaterial);
  edgeMesh.position.set(edge.position[0], edge.position[1], edge.position[2]);
  edgeMesh.rotation.set(edge.rotation[0], edge.rotation[1], edge.rotation[2]);
  edgeMesh.scale.set(edge.scale[0], edge.scale[1], edge.scale[2]);
  edgeMesh.castShadow = true;
  edgeMesh.receiveShadow = true;
  scene.add(edgeMesh);
});
This loop:
- Creates a mesh for each edge using the same geometry and material
- Sets the position, rotation, and scale based on the data in the edges array
- Enables both casting and receiving shadows for realistic lighting
- Adds each edge to the scene
The resulting red border provides:
- A clear visual indicator of the usable area
- Feedback when objects or the character approach the edge
- Context for the spatial boundaries of the environment
Design Benefits of the Environment Approach
This environment implementation offers several important benefits:
- Visual-Physical Separation:
- Visual elements (the finite ground plane) can be different from physics elements (the infinite physics plane)
- This allows for artistic flexibility while maintaining accurate physics
- Texture Customization:
- The reactive texture system allows changing the ground appearance without recreating the entire environment
- Users can experiment with different visual styles through the UI
- Clear Boundaries:
- The red border provides intuitive feedback about the limits of the playable area
- Character and object positions can be checked against these boundaries
- Performance Optimization:
- Using a simple plane for the ground minimizes polygon count
- The physics ground being infinite simplifies collision calculations
- Shadow Support:
- The ground’s shadow receiving capability enhances the realism of the scene
- Objects appear properly grounded rather than floating
This environment setup creates a foundation that is both functional and visually coherent, providing the spatial context needed for character movement, physics interactions, and object placement in our 3D scene.
Lighting Systems: Creating Dynamic Illumination
Let’s explore the lighting implementation that brings life and depth to our 3D scene:
const setupLights = () => {
  // Ambient light for global illumination
  ambientLight = new THREE.AmbientLight(0xffffff, ambientIntensity.value);
  scene.add(ambientLight);

  // Directional light (sunlight)
  directionalLight = new THREE.DirectionalLight(0xffffff, directionalIntensity.value);
  directionalLight.position.set(5, 10, 7.5);
  directionalLight.castShadow = shadowsEnabled.value;

  // Optimize shadow settings for the directional light
  directionalLight.shadow.mapSize.width = 1024;
  directionalLight.shadow.mapSize.height = 1024;
  directionalLight.shadow.camera.near = 0.5;
  directionalLight.shadow.camera.far = 50;
  directionalLight.shadow.camera.left = -10;
  directionalLight.shadow.camera.right = 10;
  directionalLight.shadow.camera.top = 10;
  directionalLight.shadow.camera.bottom = -10;

  scene.add(directionalLight);

  // Spotlight for dramatic focused lighting
  spotLight = new THREE.SpotLight(
    new THREE.Color(spotlightColor.value),
    spotlightIntensity.value,
    50,                              // Distance
    spotlightAngle.value,           // Cone angle
    0.5,                             // Penumbra (softness)
    2                                // Decay
  );
  spotLight.position.set(
    spotlightPosition.value.x,
    spotlightPosition.value.y,
    spotlightPosition.value.z
  );
  spotLight.castShadow = true;
  spotLight.visible = spotlightEnabled.value;

  // Add spotlight target
  const targetObject = new THREE.Object3D();
  targetObject.position.set(0, 0, 0);  // Point at center
  scene.add(targetObject);
  spotLight.target = targetObject;

  scene.add(spotLight);
};
This function establishes a comprehensive lighting system with three distinct light types, each serving a different purpose in our scene. Let’s examine each component:
1. Ambient Light: The Base Illumination
// Ambient light for global illumination
ambientLight = new THREE.AmbientLight(0xffffff, ambientIntensity.value);
scene.add(ambientLight);
Ambient light provides non-directional, global illumination that affects all objects equally:
- Purpose: Ensures no part of the scene is completely black, simulating light bouncing and filling shadows
- Color: Pure white (
0xffffff) provides neutral illumination that doesn’t tint the scene - Intensity: Controlled via
ambientIntensity.value, a reactive property that users can adjust through the UI - Characteristics:
- No direction, so it creates no shadows
- Illuminates all surfaces equally, including those facing away from other light sources
- Simulates indirect lighting and light scattering in a simplified way
The ambient light serves as a foundation layer that ensures visibility and prevents unrealistically dark shadows.
2. Directional Light: Simulating Sunlight
// Directional light (sunlight)
directionalLight = new THREE.DirectionalLight(0xffffff, directionalIntensity.value);
directionalLight.position.set(5, 10, 7.5);
directionalLight.castShadow = shadowsEnabled.value;
Directional light mimics distant light sources like the sun, where all light rays are parallel:
- Purpose: Creates the primary illumination with clear highlights and shadows
- Position: Set to
(5, 10, 7.5)to create light coming from above and slightly to the side - Color: White for neutral daylight-like illumination
- Intensity: Controlled via
directionalIntensity.valuefor user adjustment - Shadow Casting: Enabled based on
shadowsEnabled.value, allowing users to toggle shadows
Shadow Configuration
// Optimize shadow settings for the directional light
directionalLight.shadow.mapSize.width = 1024;
directionalLight.shadow.mapSize.height = 1024;
directionalLight.shadow.camera.near = 0.5;
directionalLight.shadow.camera.far = 50;
directionalLight.shadow.camera.left = -10;
directionalLight.shadow.camera.right = 10;
directionalLight.shadow.camera.top = 10;
directionalLight.shadow.camera.bottom = -10;
This section configures the directional light’s shadow properties:
- Shadow Map Resolution:
1024×1024pixels provides good quality shadows without excessive performance cost - Shadow Camera Frustum: Defines the volume within which shadows will be calculated
nearandfardefine the depth range (0.5 to 50 units)left,right,top, andbottomdefine the width and height (20×20 units)
- Optimization Balance: These values are carefully chosen to:
- Cover the entire playable area
- Maintain shadow detail
- Avoid wasting resolution on areas outside the scene
The shadow camera works similarly to a regular camera, but it’s used to render the scene from the light’s perspective to calculate shadows.
3. Spotlight: Dynamic Focused Illumination
// Spotlight for dramatic focused lighting
spotLight = new THREE.SpotLight(
  new THREE.Color(spotlightColor.value),
  spotlightIntensity.value,
  50,                              // Distance
  spotlightAngle.value,           // Cone angle
  0.5,                             // Penumbra (softness)
  2                                // Decay
);
The spotlight provides concentrated, cone-shaped illumination with multiple configurable properties:
- Color: User-defined via
spotlightColor.value, allowing for creative lighting effects - Intensity: Controlled through
spotlightIntensity.value - Distance: 50 units, defining how far the light reaches before fading completely
- Angle: Controlled via
spotlightAngle.value, determining the width of the light cone - Penumbra: 0.5 creates soft edges by gradually fading light intensity at the cone’s edges
- Decay: 2 creates physically accurate quadratic light falloff with distance
Spotlight Positioning and Targeting
spotLight.position.set(
  spotlightPosition.value.x,
  spotlightPosition.value.y,
  spotlightPosition.value.z
);
spotLight.castShadow = true;
spotLight.visible = spotlightEnabled.value;

// Add spotlight target
const targetObject = new THREE.Object3D();
targetObject.position.set(0, 0, 0);  // Point at center
scene.add(targetObject);
spotLight.target = targetObject;
This section configures the spotlight’s position and direction:
- Position: Set via reactive coordinates, allowing users to reposition the spotlight through the UI
- Shadows: Enabled by default but toggled alongside other shadows
- Visibility: Controlled via
spotlightEnabled.value, allowing users to turn it on/off - Target: An invisible object at the scene center that the spotlight points toward
- This approach allows for easily adjusting where the spotlight aims
- The target could be animated or attached to scene objects for dynamic lighting effects
Lighting Design Principles
Our lighting system follows several important design principles:
- Three-Point Lighting Adaptation:
- Ambient light serves as fill light
- Directional light functions as the key light
- Spotlight can be positioned as a rim/accent light
- Layered Approach:
- Base layer: ambient light ensures minimum visibility
- Primary layer: directional light creates the main lighting direction
- Accent layer: spotlight adds drama and emphasis
- Interactive Control:
- All key lighting parameters are exposed to the UI
- Users can experiment with different lighting setups
- Real-time updates allow immediate feedback
- Performance Considerations:
- Shadow map resolution balances quality and performance
- Spotlight distance limit prevents unnecessary calculations
- Option to disable shadows completely for performance-critical situations
Shadow Quality Optimization
Shadows are one of the most computationally expensive lighting features, so we’ve implemented several optimizations:
- Appropriate Shadow Map Size:
- 1024×1024 provides good quality without excessive memory usage
- For higher-end devices, this could be increased to 2048×2048
- Constrained Shadow Camera:
- The shadow camera frustum is tightly configured to the scene dimensions
- This maximizes the available resolution within the relevant area
- Soft Shadows:
THREE.PCFSoftShadowMap(set in the renderer) provides filtered shadows- This reduces aliasing artifacts and creates more realistic soft edges
- Toggle Option:
- The ability to disable shadows provides an easy performance boost when needed
- Shadow calculations can be selectively enabled for important objects only
Reactive Lighting Controls
The lighting system integrates with Vue’s reactivity system:
// Examples of reactive lighting controls
watch(ambientIntensity, () => {
  ambientLight.intensity = ambientIntensity.value;
});

watch(directionalIntensity, () => {
  directionalLight.intensity = directionalIntensity.value;
});

watch(spotlightColor, () => {
  spotLight.color.set(spotlightColor.value);
});

watch(shadowsEnabled, () => {
  directionalLight.castShadow = shadowsEnabled.value;
  spotLight.castShadow = shadowsEnabled.value;
});
This reactive approach enables:
- Real-time lighting adjustments through the UI
- Synchronization of visual state with control values
- Easy experimentation with different lighting scenarios
- Performance tuning based on the device capabilities
Animation Loop and Physics Update
The animation loop ties everything together, responsible for updating the scene state and rendering each frame. Let’s explore how our animation loop integrates physics simulation, character movement, and scene rendering:
const animate = () => {
  animationFrameId = requestAnimationFrame(animate);

  // Get delta time for smooth animations
  const delta = clock.getDelta();

  // Update physics if enabled
  if (physicsEnabled.value) {
    world.step(timeStep);

    // Update mesh positions based on physics bodies
    for (let i = 0; i < meshes.length; i++) {
      meshes[i].position.copy(bodies[i].position as any);
      meshes[i].quaternion.copy(bodies[i].quaternion as any);
    }

    // Check if objects have fallen off the ground and remove them
    checkObjectBoundaries();
  }

  // Update character position based on controls
  updateCharacterPosition(delta);

  // Check if character has fallen off the edge and reset if needed
  if (character && character.position.y < -10) {
    character.position.set(-5, 0, 0);
    characterPosition.value = { x: -5, y: 0, z: 0 };
    isJumping.value = false;
    jumpVelocity.value = 0;
    isGrounded.value = true;
    updateCharacterAnimation();
  }

  // Update collision status for UI
  if (character) {
    collisionDetected.value = checkCollision(character.position);
  }

  // Update animation mixers
  mixers.forEach((mixer) => {
    mixer.update(delta * animationSpeed.value);
  });

  // Update orbit controls (for damping effect)
  controls.update();

  // Render scene
  renderer.render(scene, camera);
};
This function forms the core loop that drives our entire 3D application. Let’s break down its components and understand how they work together:
1. Frame Timing Management
animationFrameId = requestAnimationFrame(animate);
const delta = clock.getDelta();
This section establishes the foundation for smooth animation:
requestAnimationFrame: Schedules the next execution of the animation loop to synchronize with the browser’s refresh rate (typically 60Hz)clock.getDelta(): Calculates the time elapsed since the last frame in seconds- This “delta time” ensures animations run at the same speed regardless of frame rate
- Using delta time prevents animations from running faster on high-refresh-rate displays
- The
THREE.Clockinstance tracks time automatically
2. Physics Simulation Update
// Update physics if enabled
if (physicsEnabled.value) {
  world.step(timeStep);

  // Update mesh positions based on physics bodies
  for (let i = 0; i < meshes.length; i++) {
    meshes[i].position.copy(bodies[i].position as any);
    meshes[i].quaternion.copy(bodies[i].quaternion as any);
  }

  // Check if objects have fallen off the ground and remove them
  checkObjectBoundaries();
}
This section advances the physics simulation:
- Conditional Execution: The physics update only runs if enabled (allows toggling physics for performance)
- Fixed Time Step:
world.step(timeStep)advances the physics simulation by a constant time increment (1/60 second)- Using a fixed time step (rather than delta time) ensures stable, predictable physics calculations
- This is a standard approach in physics engines to prevent simulation instability
- Visual-Physical Synchronization:
- After the physics world updates, visual meshes must be updated to match their physical counterparts
- Both position (translation) and quaternion (rotation) are synchronized
- This two-way representation (visual and physical) is central to physics-based rendering
- Boundary Cleanup:
checkObjectBoundaries()removes objects that have fallen far below the ground- This prevents performance degradation from tracking objects that are no longer relevant
- It’s an important memory management technique for long-running simulations
3. Character Movement and Safety Checks
// Update character position based on controls
updateCharacterPosition(delta);

// Check if character has fallen off the edge and reset if needed
if (character && character.position.y < -10) {
  character.position.set(-5, 0, 0);
  characterPosition.value = { x: -5, y: 0, z: 0 };
  isJumping.value = false;
  jumpVelocity.value = 0;
  isGrounded.value = true;
  updateCharacterAnimation();
}
This section handles character movement and safety measures:
- Delta-Based Character Movement: Character position is updated with time-based movement for smooth motion
- Fall Recovery System:
- Checks if the character has fallen off the edge (y < -10)
- Resets the character to a safe starting position (-5, 0, 0)
- Resets all character state variables (jumping, velocity, grounded)
- Updates animation to match the new state
- This prevents the character from becoming permanently lost if it falls off the level
4. UI State Updates
// Update collision status for UI
if (character) {
  collisionDetected.value = checkCollision(character.position);
}
This section updates reactive state for UI feedback:
- Collision Indication: Checks and updates the collision status for UI display
- User Feedback: This information appears in the control panel, providing valuable feedback
- Reactive Integration: Using Vue’s reactivity system, this state change automatically updates the UI
5. Animation System Updates
// Update animation mixers
mixers.forEach((mixer) => {
  mixer.update(delta * animationSpeed.value);
});
This section advances all skeletal animations:
- Animation Mixer Updates: Each animation mixer is updated based on the elapsed time
- Speed Control: The delta time is multiplied by a user-controlled speed factor
- This allows users to slow down or speed up animations without affecting other systems
- Particularly useful for debugging or creating slow-motion effects
- Multiple Mixers Support: The loop can handle multiple animated objects simultaneously
6. Camera Controls and Rendering
// Update orbit controls (for damping effect)
controls.update();

// Render scene
renderer.render(scene, camera);
This final section completes the frame:
- Camera Control Update: Updates the OrbitControls to process any user input
- The
.update()call is required for the damping effect (smooth camera movement) - This creates the inertia-like behavior when orbiting the camera
- The
- Scene Rendering: Finally renders the current state of the scene from the camera’s perspective
- This is where all the visual output is generated
- The renderer applies materials, lighting, shadows, and other visual effects
Technical Advantages of This Approach
This animation loop design offers several important benefits:
- Separation of Concerns:
- Physics, character control, animation, and rendering are kept separate
- Each system can be enabled/disabled independently
- Modular design makes debugging and extending the application easier
- Performance Optimization Opportunities:
- Physics can be toggled for performance-critical situations
- Object cleanup prevents unbounded growth in the number of tracked objects
- Animation speed can be adjusted without affecting physics simulation
- State Synchronization:
- Visual and physical representations stay in sync
- UI state is updated each frame for accurate feedback
- Character state correctly influences animation state
- Safety Mechanisms:
- Character reset prevents “falling forever” scenarios
- Collision detection provides user feedback
- Object cleanup prevents memory leaks
- Frame Rate Independence:
- Delta time ensures consistent animation speed regardless of device performance
- Fixed physics timestep ensures simulation stability
- Speed controls allow for adjustments without breaking the simulation
The animation loop is where all systems come together to create a seamless, interactive experience. By carefully orchestrating these updates in the correct order and managing frame timing, we create a fluid, responsive 3D application that maintains consistent behavior across different devices and frame rates.
Interactive UI Controls
A key feature of our demo is the ability to modify scene parameters in real-time through a UI panel:
<template>
  <div class="scene-container">
    <div ref="containerRef" class="three-container"></div>

    <!-- Loading screen -->
    <div v-if="isLoading" class="loading-screen">
      <div class="loading-content">
        <h2>Loading Three.js Scene</h2>
        <div class="progress-bar">
          <div class="progress-fill" :style="{ width: `${loadingProgress}%` }"></div>
        </div>
        <div class="loading-text">{{ Math.round(loadingProgress) }}%</div>
      </div>
    </div>

    <!-- Controls panel -->
    <div class="controls-toggle" @click="showControls = !showControls">
      {{ showControls ? '« Hide Controls' : 'Show Controls »' }}
    </div>

    <div class="controls-container" :class="{ 'controls-hidden': !showControls }">
      <div class="control-panel">
        <h3>Three.js Comprehensive Demo</h3>

        <!-- Tabs for different control categories -->
        <div class="tabs">
          <button
            @click="activeTab = 'environment'"
            :class="{ active: activeTab === 'environment' }"
            class="tab-button"
          >
            Environment
          </button>
          <button
            @click="activeTab = 'physics'"
            :class="{ active: activeTab === 'physics' }"
            class="tab-button"
          >
            Physics
          </button>
          <button
            @click="activeTab = 'lighting'"
            :class="{ active: activeTab === 'lighting' }"
            class="tab-button"
          >
            Lighting
          </button>
          <button
            @click="activeTab = 'models'"
            :class="{ active: activeTab === 'models' }"
            class="tab-button"
          >
            Models
          </button>
        </div>

        <!-- Tab content panels with various controls -->
        <!-- Environment tab -->
        <div v-if="activeTab === 'environment'" class="tab-content">
          <!-- Environment controls: sky color, ground color, textures, fog -->
        </div>

        <!-- Physics tab -->
        <div v-if="activeTab === 'physics'" class="tab-content">
          <!-- Physics controls: add objects, gravity, bounciness -->
        </div>

        <!-- Lighting tab -->
        <div v-if="activeTab === 'lighting'" class="tab-content">
          <!-- Lighting controls: shadows, ambient/directional/spotlight settings -->
        </div>

        <!-- Models tab -->
        <div v-if="activeTab === 'models'" class="tab-content">
          <!-- Character controls and information -->
          <div v-if="modelLoaded" class="control-group">
            <!-- Animation speed slider -->

            <div class="character-controls">
              <h4>Character Controls</h4>
              <div class="control-info">
                <div class="control-key">W</div>
                <div class="control-desc">Move Forward</div>
              </div>
              <!-- Other control key explanations -->
            </div>

            <!-- Character movement parameters -->

            <div class="character-position">
              <h4>Character Position</h4>
              <div>X: {{ characterPosition.x.toFixed(2) }}</div>
              <div>Y: {{ characterPosition.y.toFixed(2) }}</div>
              <div>Z: {{ characterPosition.z.toFixed(2) }}</div>
              <div>Animation: {{ currentAnimation }}</div>
              <div>Jumping: {{ isJumping ? 'Yes' : 'No' }}</div>
              <div>Grounded: {{ isGrounded ? 'Yes' : 'No' }}</div>
              <div class="collision-status" :class="{ 'collision-active': collisionDetected }">
                {{ collisionDetected ? 'Collision Detected!' : 'No Collision' }}
              </div>
            </div>
          </div>
        </div>
      </div>
    </div>
  </div>
</template>
Reactive Properties and Resource Management
We use Vue’s reactivity system to update the scene when UI controls change:
// Watch for changes to update the scene
watch(fogEnabled, updateFog);
watch(fogDensity, updateFog);
watch(skyColor, () => {
  scene.background = new THREE.Color(skyColor.value);
  if (scene.fog) {
    (scene.fog as THREE.FogExp2).color.set(skyColor.value);
  }
});
watch(groundColor, updateGroundTexture);
watch(ambientIntensity, () => { ambientLight.intensity = ambientIntensity.value; });
watch(directionalIntensity, () => { directionalLight.intensity = directionalIntensity.value; });
watch(shadowsEnabled, () => {
  directionalLight.castShadow = shadowsEnabled.value;
  spotLight.castShadow = shadowsEnabled.value;
});
// ... more watch handlers for other properties
Proper resource management is crucial for web-based 3D applications:
const cleanup = () => {
  // Cancel animation frame
  if (animationFrameId) {
    cancelAnimationFrame(animationFrameId);
  }

  // Remove event listeners
  window.removeEventListener('resize', onWindowResize);
  window.removeEventListener('keydown', handleKeyDown);
  window.removeEventListener('keyup', handleKeyUp);

  // Remove renderer from DOM
  if (containerRef.value && renderer) {
    containerRef.value.removeChild(renderer.domElement);
  }

  // Dispose of controls
  if (controls) {
    controls.dispose();
  }

  // Clean up all meshes and materials
  meshes.forEach(mesh => {
    if (mesh.geometry) mesh.geometry.dispose();
    if (mesh.material) {
      if (Array.isArray(mesh.material)) {
        mesh.material.forEach(m => m.dispose());
      } else {
        mesh.material.dispose();
      }
    }
  });

  // Clean up textures
  Object.values(textures).forEach(texture => {
    texture.dispose();
  });
};

// Initialize on mount, clean up on unmount
onMounted(() => {
  init();
});

onBeforeUnmount(() => {
  cleanup();
});
CSS Styling for UI Controls
The UI styling completes our application:
<style scoped>
.scene-container {
  position: relative;
  width: 100%;
  height: 100vh;
  overflow: hidden;
}

.three-container {
  width: 100%;
  height: 100%;
}

.loading-screen {
  position: absolute;
  top: 0;
  left: 0;
  width: 100%;
  height: 100%;
  background-color: rgba(0, 0, 0, 0.8);
  display: flex;
  justify-content: center;
  align-items: center;
  z-index: 100;
}

/* ... more styling for UI elements ... */

.control-desc {
  flex: 1;
}

.character-position {
  background-color: rgba(255, 255, 255, 0.1);
  padding: 10px;
  border-radius: 4px;
  margin-top: 16px;
  text-align: center;
}

.character-position h4 {
  margin-top: 0;
  margin-bottom: 10px;
  color: #42b883;
}

.character-position div {
  margin-bottom: 5px;
}

.collision-status {
  margin-top: 8px;
  padding: 5px;
  border-radius: 4px;
  font-weight: bold;
  background-color: rgba(0, 255, 0, 0.2);
  transition: all 0.3s ease;
}

.collision-active {
  background-color: rgba(255, 0, 0, 0.4);
  color: white;
}
</style>
Key Technical Challenges
1. Character Movement and Collision Detection
Implementing character movement with collision detection requires a custom approach. We used a hybrid solution:
- Raycasting for Ground Detection: We detect whether the character is grounded by casting a ray downward.
- Sphere-Based Collision: We use a simplified sphere collider for character-object collision detection.
- Sliding Algorithm: When a collision is detected, we try to slide along walls by separating movement into x, y, and z components.
// Check if character is grounded
const checkGrounded = (): boolean => {
  if (!character) return true;

  // Check if we're at ground level (y=0)
  if (character.position.y <= 0.01) {
    // Also check if we're within the ground boundaries
    const groundSize = 30;
    const halfGroundSize = groundSize / 2;

    if (Math.abs(character.position.x) < halfGroundSize &&
        Math.abs(character.position.z) < halfGroundSize) {
      return true;
    }
    return false; // On ground level but outside boundaries
  }

  // Check if there's an object below us
  const groundCheckPosition = character.position.clone();
  groundCheckPosition.y -= 0.1; // Check just below the character's feet
  return checkCollision(groundCheckPosition);
};
2. Animation Transitions
Smooth transitions between animations require proper fade-in/fade-out timing:
// Only change animation if it's different from current
if (newAnimation !== currentAnimation.value) {
  // Fade out current animation
  if (characterActions[currentAnimation.value]) {
    characterActions[currentAnimation.value].fadeOut(0.2);
  }

  // Fade in new animation
  if (characterActions[newAnimation]) {
    characterActions[newAnimation].reset().fadeIn(0.2).play();
    currentAnimation.value = newAnimation;
  }
}
3. Physics-Visuals Synchronization
Ensuring physics bodies and their visual counterparts stay synchronized requires updating positions every frame:
// Update mesh positions based on physics bodies
for (let i = 0; i < meshes.length; i++) {
  meshes[i].position.copy(bodies[i].position as any);
  meshes[i].quaternion.copy(bodies[i].quaternion as any);
}
Performance Optimization Techniques
- Object Pooling: Reuse objects rather than creating/destroying them.
- Level of Detail (LOD): Use simpler meshes for distant objects.
- Physics Sleep: Allow inactive physics objects to “sleep” to save CPU.
- Texture Atlasing: Combine textures to reduce draw calls.
- Frustum Culling: Skip rendering objects outside the camera’s view.
- Boundary Checks: Remove objects that fall out of bounds to prevent unbounded growth.
// Check if objects are outside the ground boundaries
const checkObjectBoundaries = () => {
  const groundSize = 30;
  const halfGroundSize = groundSize / 2;
  const fallThreshold = -50; // How far objects can fall before being removed

  // Check each physics object
  for (let i = meshes.length - 1; i >= 0; i--) {
    const position = bodies[i].position;

    // Check if object has fallen off the ground
    if (Math.abs(position.x) > halfGroundSize ||
        Math.abs(position.z) > halfGroundSize ||
        position.y < fallThreshold) {

      // Remove the object from the scene and dispose resources
      scene.remove(meshes[i]);
      world.removeBody(bodies[i]);

      // Dispose of resources
      if (meshes[i].geometry) meshes[i].geometry.dispose();
      if (meshes[i].material) {
        if (Array.isArray(meshes[i].material)) {
          meshes[i].material.forEach(m => m.dispose());
        } else {
          meshes[i].material.dispose();
        }
      }

      // Remove from arrays
      meshes.splice(i, 1);
      bodies.splice(i, 1);
      objectCount.value--;
    }
  }
};
Conclusion
In this comprehensive tutorial, we’ve built a complete 3D interactive scene that combines many Three.js features:
- Character animation with skeletal meshes
- Physics simulation with CANNON.js
- Dynamic lighting and shadows
- Environmental effects like fog and textures
- Interactive UI controls for real-time parameter adjustment
- Collision detection and response
This example demonstrates how the individual components we’ve explored in previous tutorials can be combined to create an engaging 3D web application. The modular structure allows you to adapt and extend this foundation for your own projects, whether you’re building games, visualizations, or interactive experiences.
Key takeaways:
- Integration is Crucial: The power of Three.js comes from combining its various systems.
- Performance Matters: Always consider optimization, especially for web-based 3D.
- User Controls Add Value: Interactive parameters make your 3D applications more engaging.
- Resource Management: Proper cleanup prevents memory leaks in long-running applications.